
· 4 min read
DahnM20

Unleashing the Power of AI Workflow with API Builder Nodes

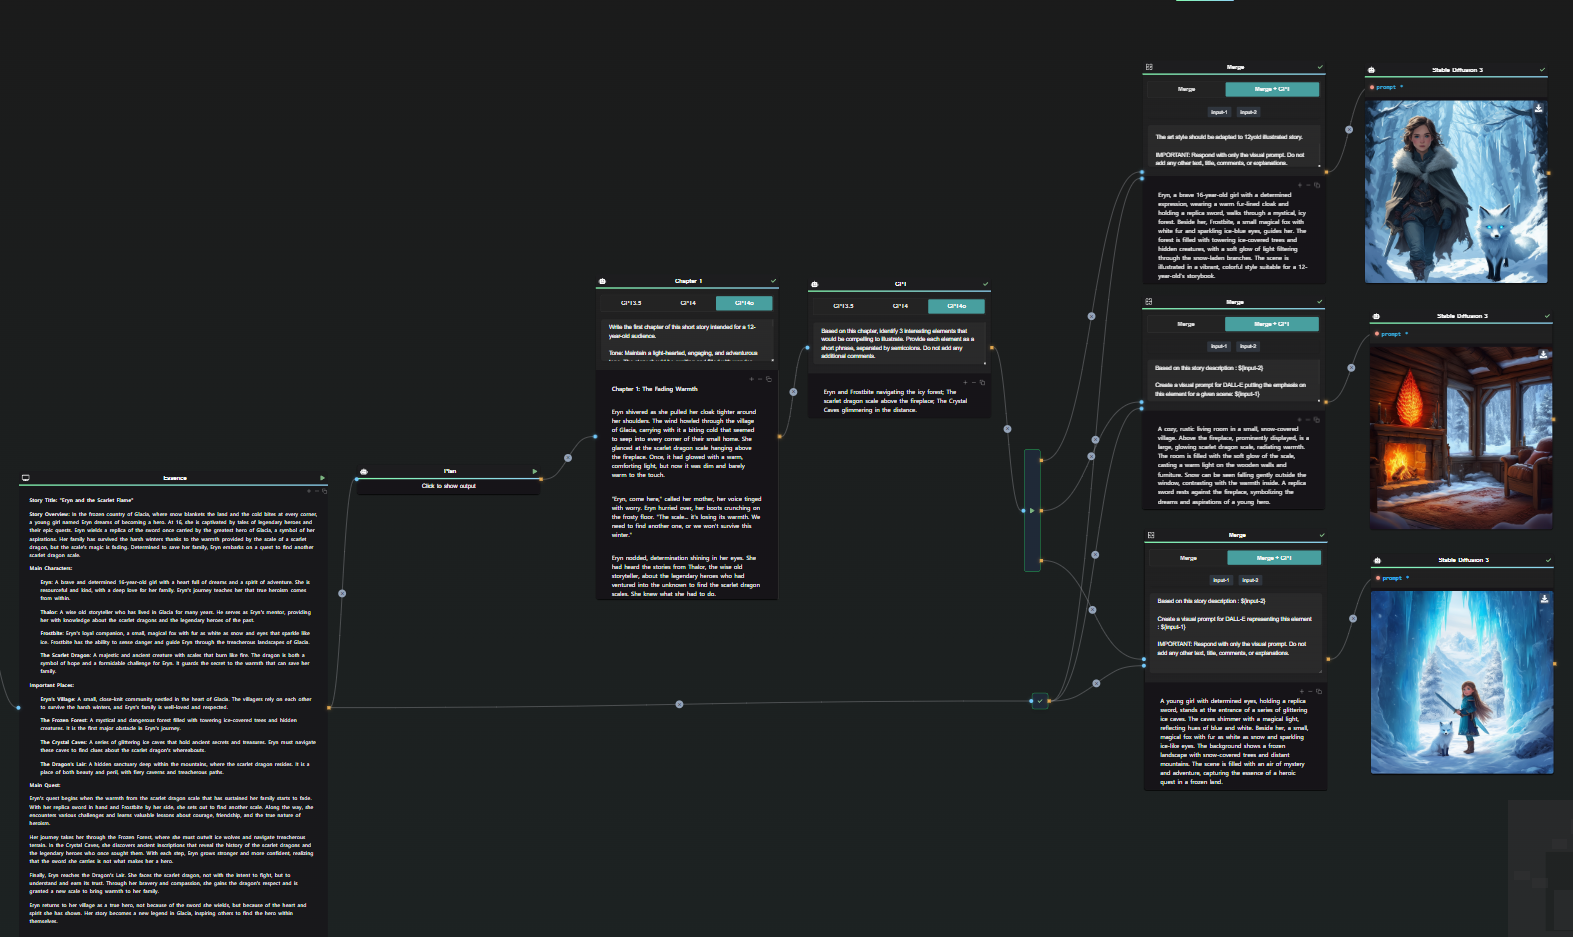
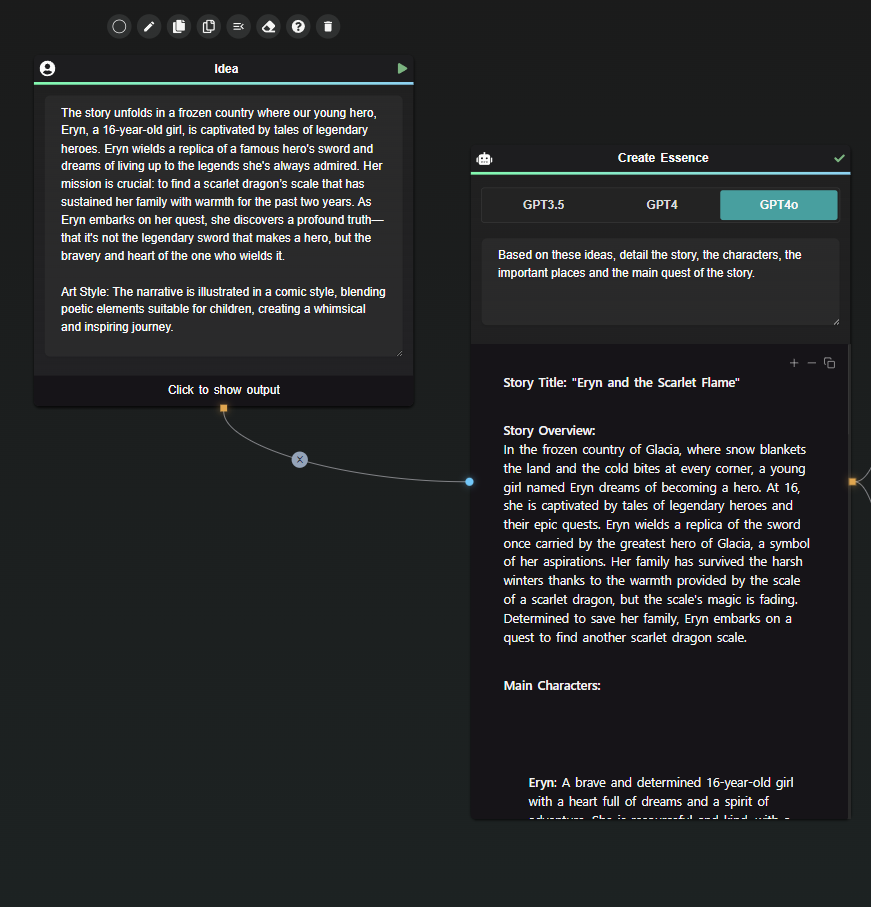
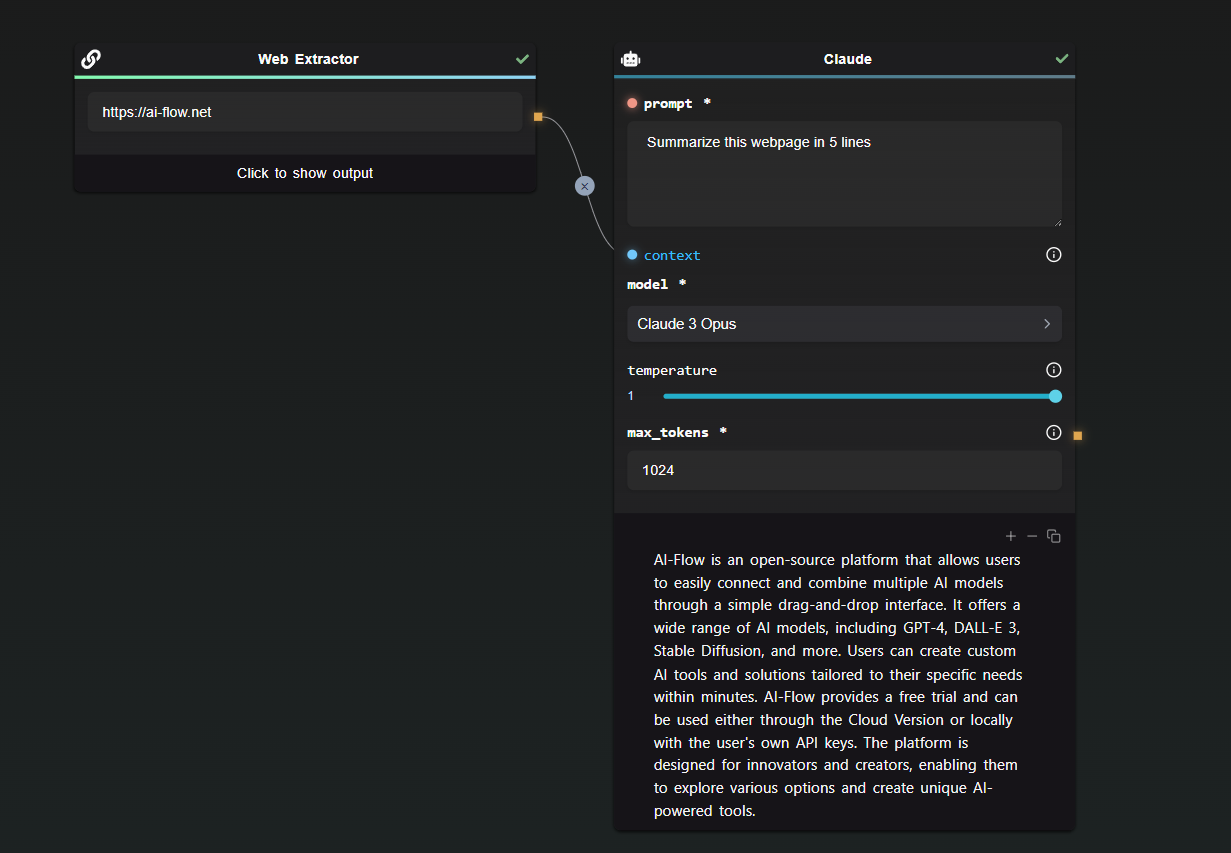
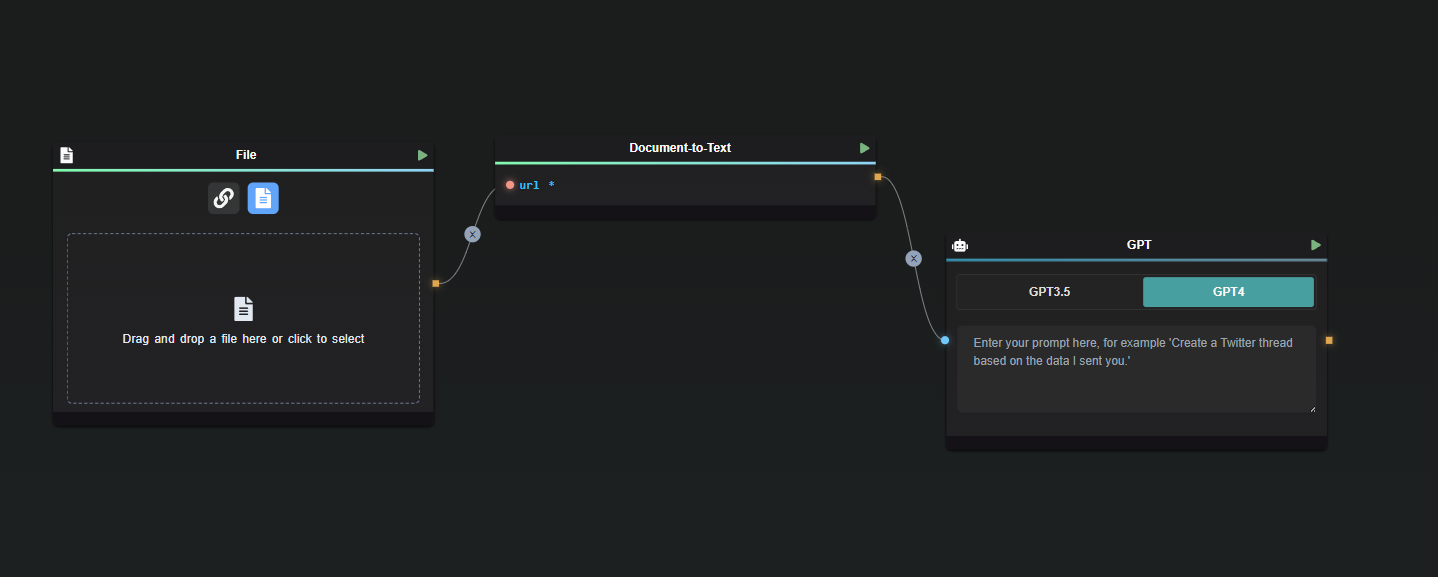
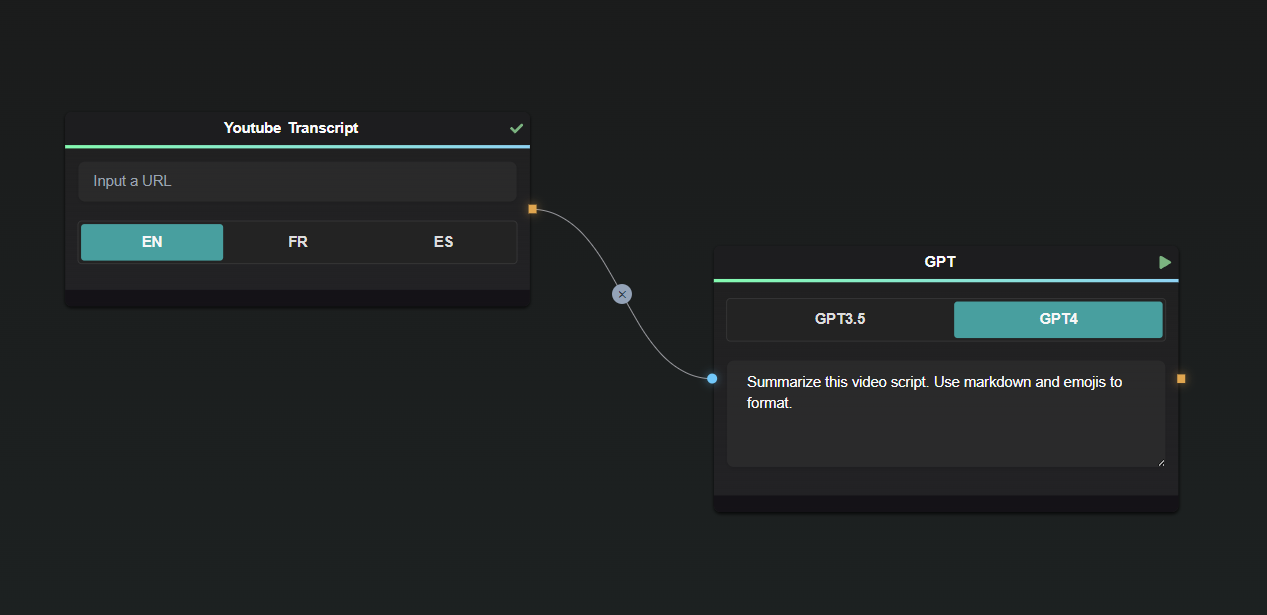
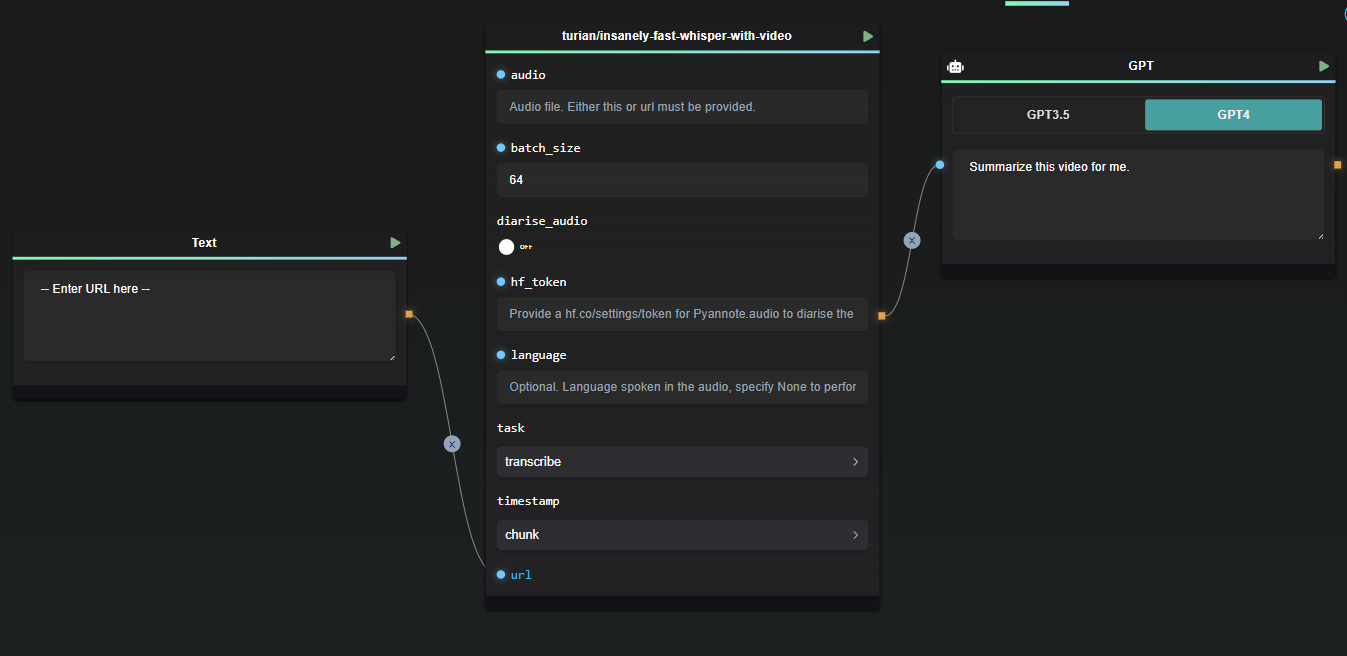
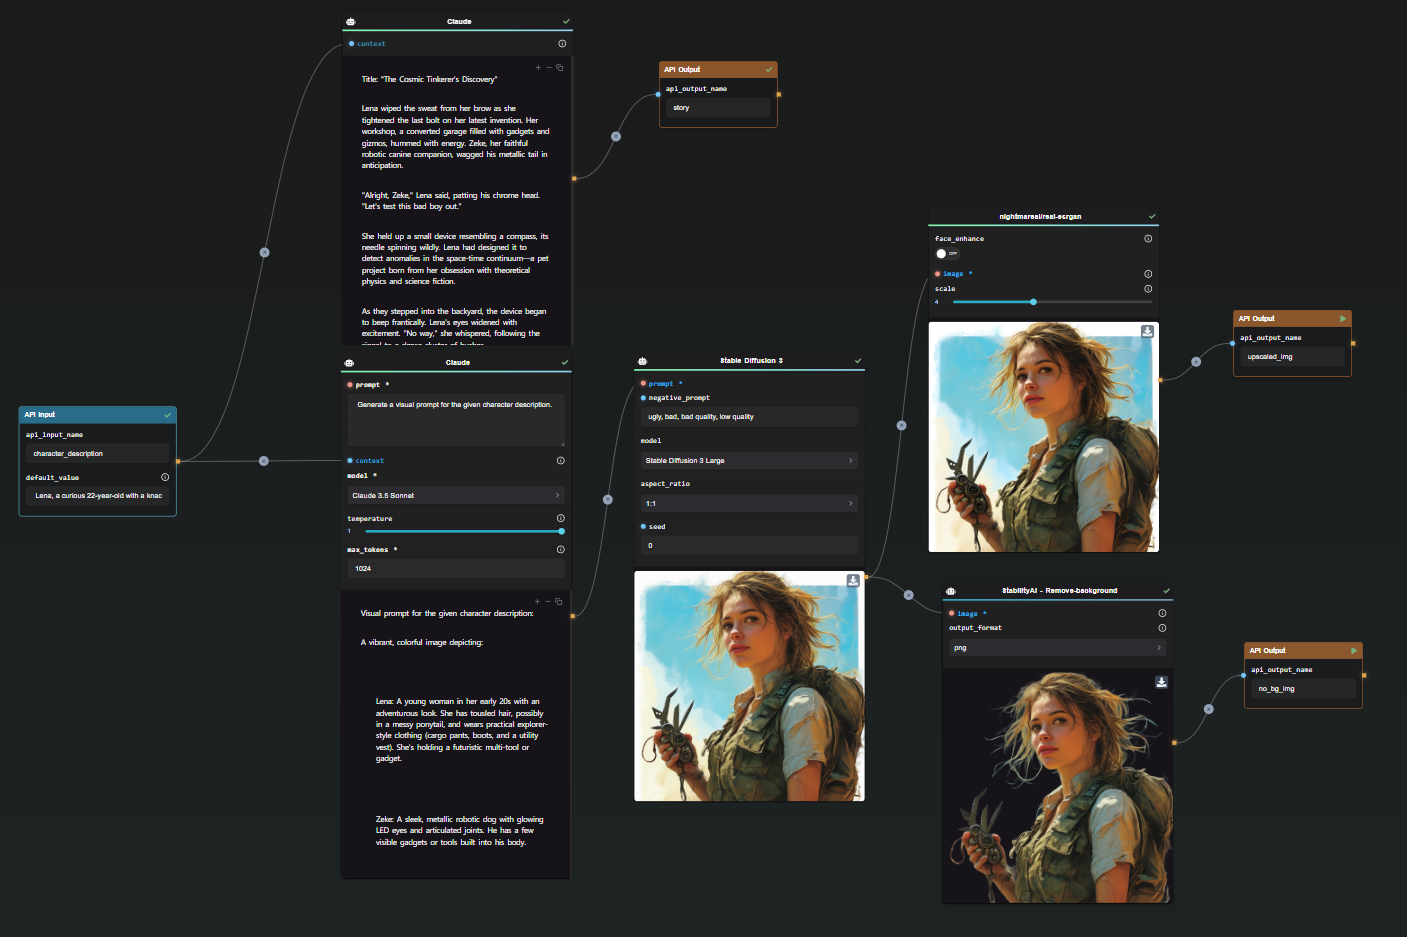
Streamlining and integrating AI workflows is now more accessible with the advanced capabilities of the AI-Flow API. By leveraging the API Builder, developers can create robust AI flows, ensuring seamless integration and interaction between various AI models like GPT, DALL-E, Claude, Stable Diffusion, or any Replicate model. This article delves into the core features of the AI-Flow API Builder, demonstrating its benefits and ease of use.

API Builder Overview

Streamline Your AI Flow with API Input and Output Nodes

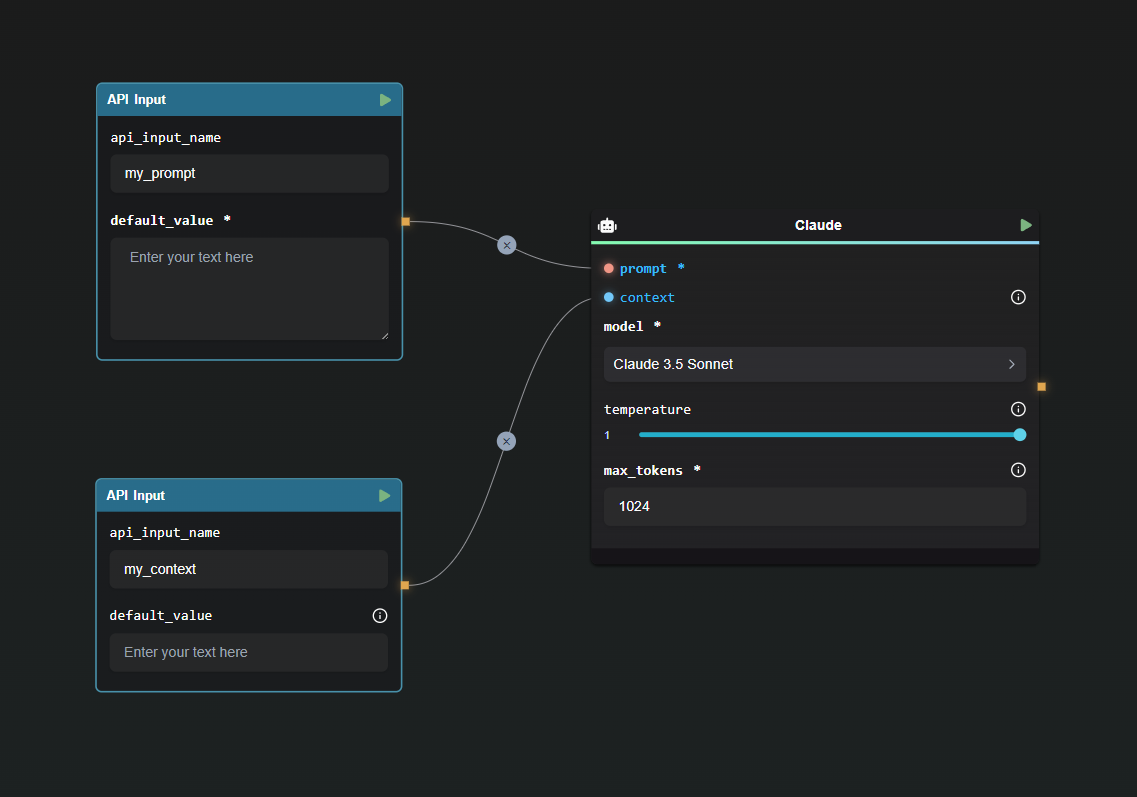
API Input Node: The API Input Node is designed to define the inputs for your API, mapping each field in the request body to a corresponding node in your flow. By setting default values, developers can make certain parameters optional.

API Input Node Example

Example Configuration:

{
"my_prompt": "Lorem Ipsum",
"my_context": "Lorem Ipsum"
}

This configuration showcases how inputs are structured, making it straightforward to initiate the flow with clear, defined parameters.


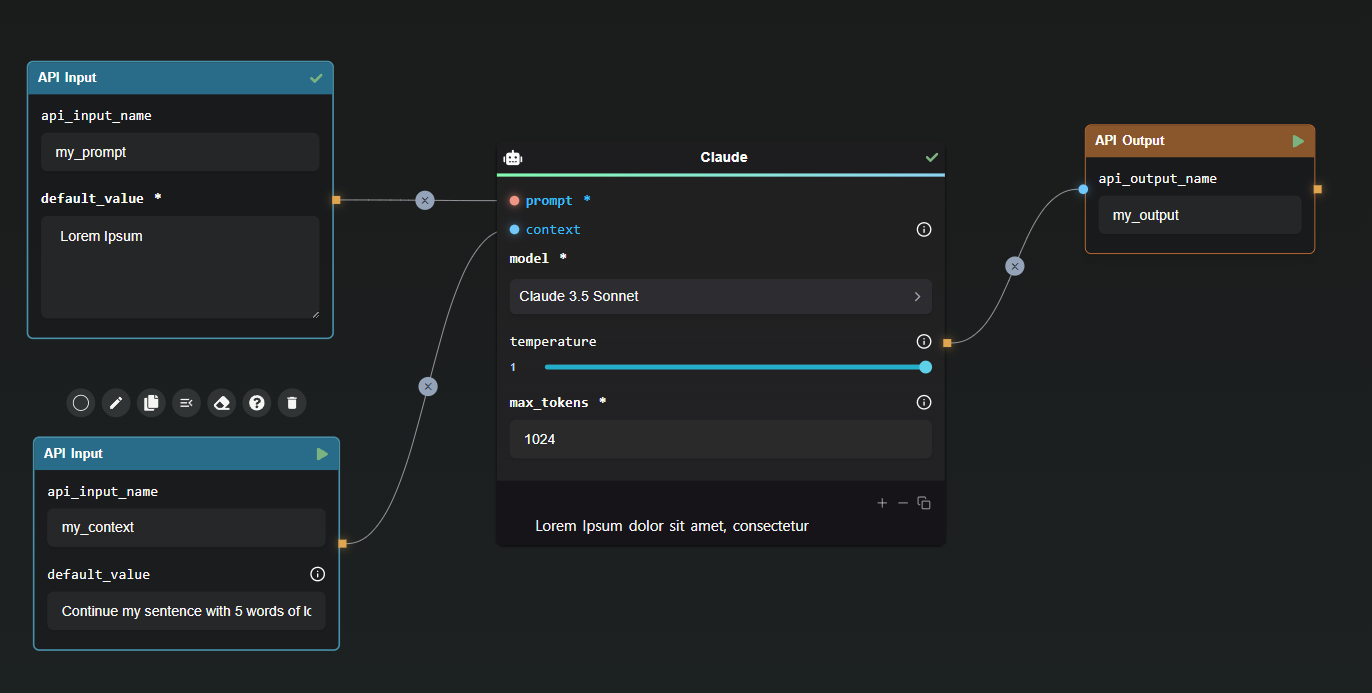
API Output Node: Configuring the API Output Node is very simple. This node specifies the names of the fields in the final response, ensuring the output is structured and understandable. Multiple output nodes can be set to pass additionnal or intermediate results.

API Output Node Example

In this simple example, the API response will be formatted as followed:

{
"my_output": "Lorem Ipsum dolor sit amet, consectetur"
}

This example demonstrates the simplicity of output configuration, providing a clear and concise response structure.

Manage and Monitor Your API with the API Builder View

The API Builder View is your command center for managing and monitoring your AI Workflow API. Accessible through the right pane of the app, this view provides a comprehensive overview of your API configuration, allowing you to generate and manage API Keys seamlessly.

API Builder View

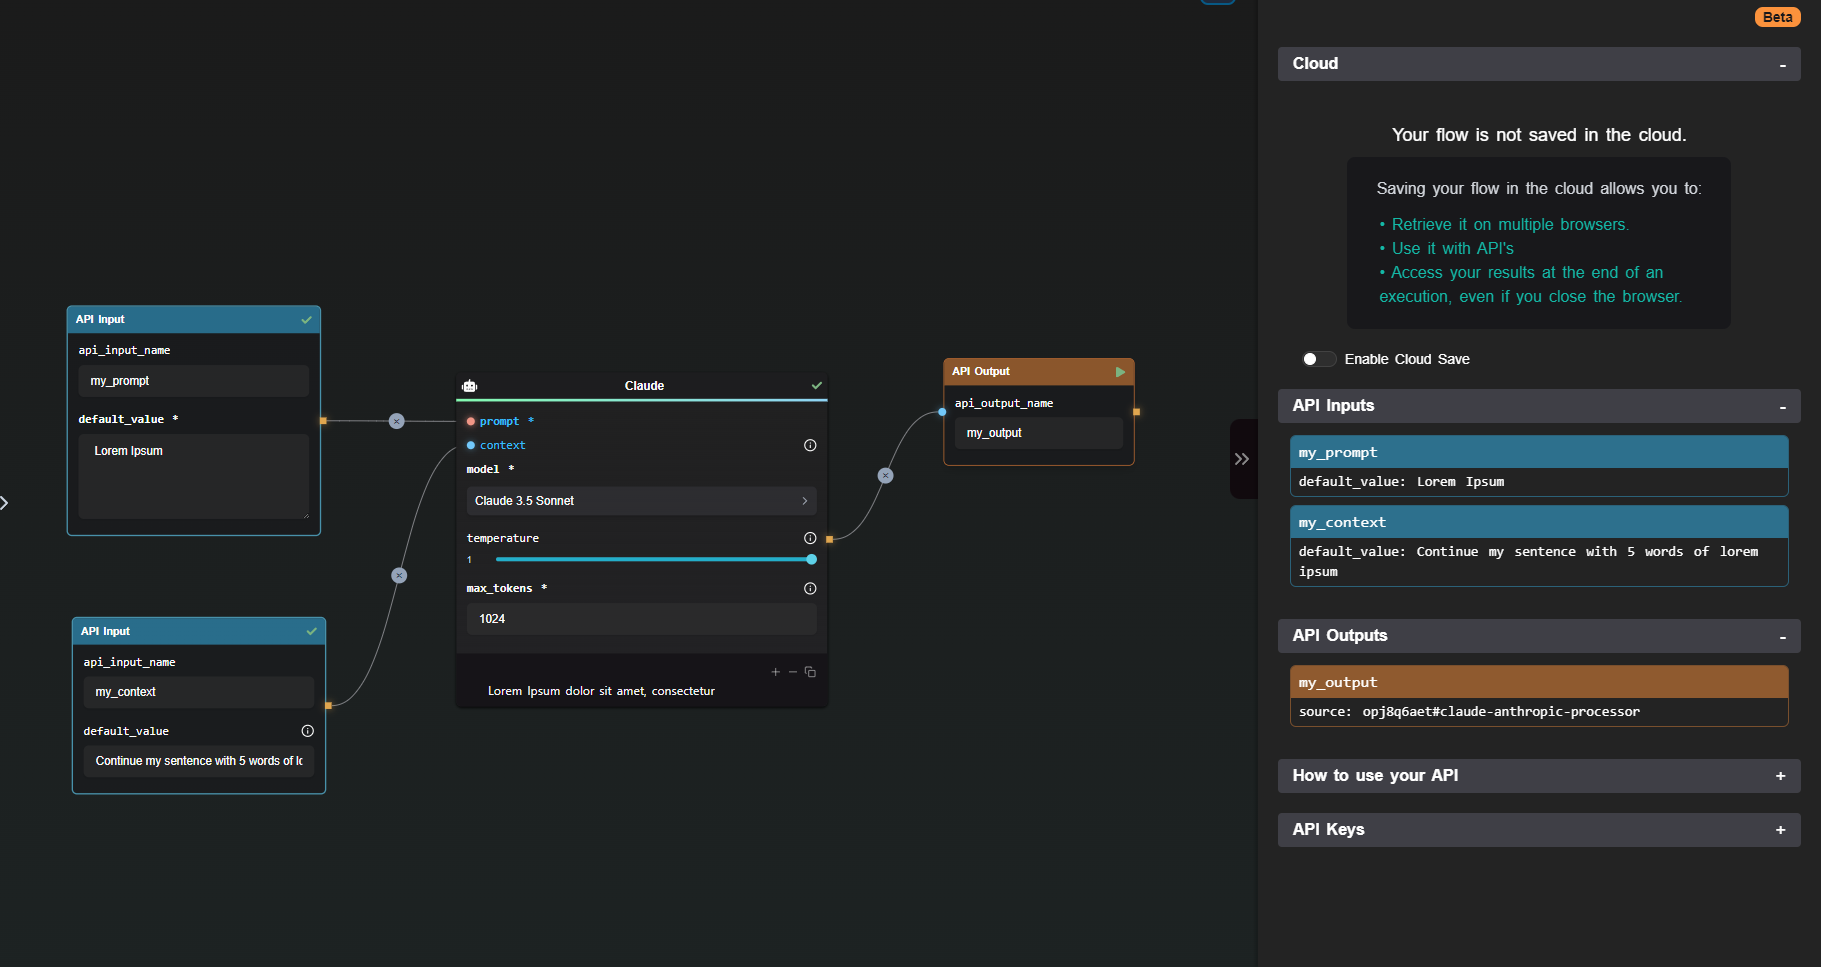
Generating API Keys: To ensure secure access, API Keys are generated within the API Builder. These keys, essential for authorizing requests, are displayed only once to maintain security. Including these keys in your requests as an Authorization header is crucial for successful API calls.

Running Your Flow through the API: Launching your flow is straightforward with the provided code snippets in the API Builder View. For instance, using cURL, you can initiate your flow as follows:

curl https://api.ai-flow.com/v1/flow/<your_flow_id>/run \
-H "Content-Type: application/json" \
-H "Authorization: Bearer $AI_FLOW_API_KEY" \
-d '{
"my_prompt": "Lorem Ipsum",
"my_context": "Continue my sentence with 5 words of lorem ipsum"
}'

This command initiates the flow, returning a run ID to track the process. Retrieve the results using this ID once the processing completes.

Enhance Integration with Webhook Nodes

The Webhook Node is a versatile tool within the API Builder, enabling you to send outputs to designated URLs. Configuring the Webhook Node involves specifying the target URL and selecting the outputs to send, with the option to include custom signatures for enhanced security.

Webhook Node Example

In this case, the webhook will send the following data :

{
"my_output": "Lorem Ipsum dolor sit amet, consectetur"
}

In this configuration, the Webhook Node sends structured data to the specified URL, ensuring smooth integration and authentication via custom signatures.

Conclusion

The AI Workflow API, powered by the API Builder Nodes, offers a streamlined, efficient way to create and manage AI flows. With intuitive nodes for input and output, API management tools, and flexible webhook configurations, developers can build powerful AI workflows tailored to their needs.

Additional Resources

For more detailed information, refer to the following resources:

· 4 min read
DahnM20

Generate Consistent Characters Using AI: A Comprehensive Guide

Are you looking to create consistent and cohesive characters in your AI-generated images? This guide will walk you through practical methods to achieve uniformity in your AI character generation, part of our broader challenge on How to Automate Story Creation.

The Challenge of Consistent AI Image Generation

AI-powered image generation is a powerful tool, but it often introduces a level of randomness. This means you might need to generate images multiple times to get a convincing result. This guide doesn't present state-of-the-art techniques but rather shares my own experiments to help you achieve more consistent character images.

While the methods discussed are not foolproof, they represent a series of experiments that can guide you in developing your own approach to consistent AI character generation.

Method 1: Precise Prompt Descriptions

One of the keys to successful image generation is crafting high-quality prompts. If your descriptions are precise and consistent, you’re more likely to achieve similar results across multiple images.

Given our challenges with precision, we’ll use AI to assist in generating detailed descriptions. For example, I started with an image previously generated and asked ChatGPT to describe it accurately. This description was then used as a prompt for Stable Diffusion 3.

First Generation

Despite some similarities, the AI missed certain details, such as the character's age. By updating the prompt to specify that the character is 16 years old, we achieve better consistency.

Second Generation

In this iteration, the AI misinterpreted the hair color due to lighting effects in the original image. Using StabilityAI’s Search and Replace feature, I swapped red hair for brown hair and refined the description.

Third Generation

Here's a quick fix for the character's pet, again using the Search and Replace feature.

Fourth Generation

With the revised prompt, including specific details about hair color and other features, the results are more consistent at the beginning in the new iteration.

Method 2: Creating a Consistent Face Template

Once you have a consistent character concept, ensuring the face remains consistent across different angles and expressions can be challenging. To address this, create a clear face template that can be used to correct other images.

Using the same method, generate a close-up portrait of the character:

Portrait Generation

Next, use models like fofr/consistent-character with the Replicate Node to generate various face angles. This model helps maintain consistency in facial features across different poses.

Face Angle Generation

Although we lost some of the digital painting fantasy vibe, the model ensures facial consistency, which can be invaluable for face-swapping in illustrations. We can maybe find a way to reintroduce it later.

Conclusion and Next Steps

This guide provides a starting point for achieving consistency in AI-generated characters. By refining prompts and creating consistent face templates, you can produce more cohesive and believable character images.

Stay tuned for Part 2, where we’ll explore additional methods to refine and complete your character generation process.

Start experimenting with these methods today using AI-FLOW.


By incorporating these strategies, you’ll be on your way to mastering consistent character generation in AI. For more in-depth techniques and examples, be sure to follow our blog and check out the next part of this series.

· 4 min read
DahnM20

How to Automate Story Creation Using AI-FLOW - Part 2

This is the second installment of our challenge on How to Automate Story Creation.

In this part, we will focus on building a chapter and automating illustration generation.

Writing the First Chapter

In the previous part, we have created a plan of the story with three chapters, and a small summary for each. We could split the plan into three chunks, but for simplicity, I'll keep chapters as a single block. This approach helps GPT maintain the story's context, ensuring continuity between chapters without introducing conflicting elements.

When writing your chapter, it is important to remind GPT of the desired tone, the target audience, and how you want the story to be told. You might prefer more dialogue or perhaps more descriptions. This choice is up to you.

I’ve used a basic prompt that emphasizes important elements, but please note that this is just a simple example.

Here’s the prompt I used for the first chapter:

Write the first chapter of this short story intended for a 12-year-old audience.

  • Tone: Maintain a light-hearted, engaging, and adventurous tone. The story should be exciting and filled with wonder, suitable for young readers.
  • Language: Use simple and clear language. Avoid complex vocabulary and ensure that sentences are easy to follow, yet vivid enough to spark imagination.
  • Dialogue: Craft natural and relatable dialogue for pre-teens. Ensure conversations are lively and reflect the age and personality of the characters.
  • Pacing: Keep the chapter fast-paced and captivating to hold the reader's attention. Introduce key elements of the story quickly to hook the audience from the beginning.
  • Descriptions: Use vibrant and imaginative descriptions to paint a clear picture of the scenes and characters. Aim for language that is evocative but not overly detailed or intricate.
  • Length: Keep the chapter concise, focusing on introducing the main elements of the story without overloading the reader with too much information.

Extracting Interesting Scenes

From the chapter, we will identify the most interesting scenes to illustrate:

Based on this chapter, identify 3 interesting elements that would be compelling to illustrate. Provide each element as a short phrase, separated by semicolons. Do not add any additional comments.

Output:

Eryn and Frostbite navigating the icy forest; The scarlet dragon scale above the fireplace; The Crystal Caves glimmering in the distance.

Next, use the Data Splitter to treat each element individually.

Split the concepts

Creating Visual Prompts

Once the concepts are split, use the Merge Node to create an illustrated prompt based on the specific scene and the overall essence of the story. If your essence is good enough, it should include character descriptions, important places, concepts, and the desired art style. This helps to get consistent visual prompts.

Here we are using the "Merge + GPT" mode, so that the merge result is directly send as a prompt to GPT.

Example Prompt:

Based on this story description: ${input-2}

Create a visual prompt for DALL-E emphasizing this element for a given scene: ${input-1}

IMPORTANT: Respond with only the visual prompt. Do not add any other text, title, comments, or explanations.


Ensure GPT understands to focus on the current element to avoid depicting the entire story/chapter.

Repeat this process for each scene. You can duplicate your node.

Illustrate story element

Here are my results for "The Crystal Caves" and "The scarlet dragon scale above the fireplace". Note that GPT added the main characters in the first one, based on the essence.

Advanced Tips

Also, consider adding a negative prompt to tools like Stable Diffusion 3 to refine the results. For example, adding "realistic" as a negative prompt can steer the generation away from realism if that’s not desired.

When merging, make sure GPT prioritizes the current element over the entire story to maintain focus.

Conclusion

Creating a story is a complex project. Even with perfect prompts, proceed step by step to ensure smooth progress. This guide provides a logical flow for using AI-FLOW to aid in your story creation. In the next part, we will explore ways to create consistent visuals for our characters.

Start your journey with AI-FLOW now!

Overall flow

Stay tuned for the next part where we delve into character visual consistency.

· 4 min read
DahnM20

How to Automate Story Generation Using AI-FLOW - Part 1

This guide aims to provide insights into automating the generation of a full short story using AI. The objective is to generate a coherent and compelling story, complete with engaging visuals. The ultimate goal is to achieve this in one click after setting up the initial workflow.

To clarify, this guide is not intended to promote mass production of AI powered stories but rather to offer a method to help visualize and inspire you during your creative process.

Initializing the Story

Begin with a basic concept of the story you want to create:

  • Who is the main character?
  • Does the main character have a sidekick, pet, or companion?
  • Where does the story take place?
  • What are the key concepts or events in your story?
  • What is the art style?
  • Who is the target audience?

Adding your personal touch to the story is crucial. You can choose to generate these ideas with AI, but if your prompt is too simple, the result may be a generic story.

I will keep it simple for the example, but you may need something more elaborated, here's my prompt:


The story unfolds in a frozen country where our young hero, Eryn, a 16-year-old girl, is inspired by her late father's heroism. Eryn wields his cherished sword, dreaming of living up to his legacy. Her mission is crucial: to find a scarlet dragon’s scale that has sustained her family with warmth for the past two years. As Eryn embarks on her quest, she discovers a profound truth—that true heroism lies not in the legendary sword but in the bravery and heart of the one who wields it.

Art Style: The narrative is illustrated in a digital painting style, blending poetic elements suitable for children, creating a whimsical and inspiring journey.


Elaborating the Universe with AI

Using your inputs, ask the AI to connect all the elements and develop the universe and story into a simple summary. The goal is to capture the "essence" of the story.

Here’s a sample prompt you can use:

Based on these ideas, detail the story, characters, important locations, and the main quest.

Building the essence of the story

Structuring Your Story

Using the essence of your story, ask the AI to create a simple plan. For a short story, you might request three chapters. Each chapter should have a title and a brief summary.

Here's an example prompt:

Based on this description, create a plan for the book with three chapters. Provide a short summary for each chapter, ensuring that the story concludes at the end of Chapter 3.

Cover image flow

The first node here is just a Display Node used to show the essence of the story.

Creating the Cover for Your Story

Using the essence, create a visual prompt for the story's cover. Ask GPT to refine the essence into a visual prompt that considers the chosen art style. Then, use tools like Stable Diffusion 3 or DALL-E to generate the image. If the result isn't satisfactory, re-run the image generation. If necessary, regenerate the prompt and try again.

Here’s a sample prompt for DALL-E:

Based on this story, create a visual prompt for DALL-E representing an ideal cover for this story.

Cover image flow

Here is the resulting cover!

For this example, I used both DALL-E 3 and Stable Diffusion 3 to compare. DALL-E produced a cover with a strong art style and a solid title reminiscent of children’s stories. Stable Diffusion 3 created a more realistic, teenager-appropriate illustration. The outcome depends on how you instruct GPT to build your prompt. In a real scenario, you’ll need to tweak your prompt and regenerate the image multiple times to achieve convincing results.

N.B : DALL-E 3 improves each of your prompts in the background.

In the next article, we will explore how to build a chapter and create associated images!

You can try AI-FLOW now!

· 2 min read
DahnM20

Introducing Enhanced StabilityAI Integration in AI-FLOW

With the integration of StabilityAI's API into AI-FLOW, we've broadened our suite of features far beyond Stable Diffusion 3. This integration allows us to offer a versatile range of image processing capabilities, from background removal to creative upscaling, alongside search-and-replace functionalities.

Given the expansive set of tools and the ongoing advancements from StabilityAI, we've adopted a more flexible integration approach, akin to our implementation with the Replicate API. Our goal is to support automation and rapid adoption of new features released by StabilityAI.

StabilityAI feature showcase

Here's a rundown of the features now accessible through AI-FLOW, as per the StabilityAI documentation:

  • Control - Sketch: Guide image generation with sketches or line art.
  • Control - Structure: Precisely guide generation using an input image.
  • Edit - Outpaint: Expand an image in any direction by inserting additional content.
  • Edit - Remove Background: Focus on the foreground by removing the background.
  • Edit - Search and Replace: Automatically locate and replace objects in an image using simple text prompts.
  • Generate - Core: Create high-quality images quickly with advanced workflows.
  • Generate - SD3: Use the most robust version of Stable Diffusion 3 for your image generation needs.
  • Image to Video: Employ the state-of-the-art Stable Video Diffusion model to generate short videos.
  • Upscale - Creative: Elevate any low-resolution image to a 4K masterpiece with guided prompts.

These enhanced capabilities are great assets for your image processing workflow. Explore these features and find innovative ways to enhance your projects! Try it now!

· 2 min read
DahnM20

This article only concerns the hosted version of the application.

Inspired by valuable user feedback, our new Flexible Pricing strategy is now live, offering a more streamlined and cost-effective approach to using the platform. This update allows users to specify their API keys when logged in, providing greater flexibility and control over their usage and expenses.

Understanding the Hybrid System

Here’s how the new system works:

  • Credits by Default: Upon logging into the app, you can access everything by default if you have platform credits.
  • Add Your API Keys: You can add your API keys and use the related nodes for free, with a minor fee for resource usage.
  • Avoid Duplicated Services: This system prevents users from paying for services they already have, ensuring they only pay for the platform's resources.

While the hosted version remains practical for some, this system ensures the platform's long-term viability and provides a fair approach for all users.

Transition to the New System

Our goal is to make this flexible pricing system the standard. Starting June 24, it will replace the current "Use my own keys" option, simplifying the process for all users. We encourage you to explore this new feature and share your feedback with us.

Conclusion

The introduction of flexible pricing options marks a significant step forward in enhancing user experience on our platform. By integrating your API keys and benefiting from a resource-based fee structure, you can enjoy a more personalized and cost-effective service.

We are eager to hear your thoughts on this new strategy. Please feel free to share your feedback as we continue to improve and evolve our platform to better meet your needs.

· 2 min read
DahnM20

Introducing Claude 3 from Anthropic in AI-FLOW v0.7.0

Following user feedback, AI-FLOW has now integrated Claude from Anthropic, an upgrade in our text generation toolkit.

Example using Claude

Get Started

The Claude node is quite similar to the GPT one. You can add a textual prompt and additional context for Claude.

Example using Claude

The only difference is that the Claude node is a bit more customizable. You'll have access to:

  • temperature : Use a temperature closer to 0.0 for analytical/multiple-choice tasks and closer to 1.0 for creative and generative tasks.
  • max_tokens : The maximum number of tokens to generate before stopping.

Here are the 3 models descriptions according to Anthropic documentation :

  • Claude 3 Opus: Most powerful model, delivering state-of-the-art performance on highly complex tasks and demonstrating fluency and human-like understanding
  • Claude 3 Sonnet: Most balanced model between intelligence and speed, a great choice for enterprise workloads and scaled AI deployments
  • Claude 3 Haiku: Fastest and most compact model, designed for near-instant responsiveness and seamless AI experiences that mimic human interactions

Dive into a world of enhanced text creation with Claude from Anthropic on AI-FLOW. Experience the power of advanced AI-driven text generation. Try it now!

· 2 min read
DahnM20

Introducing Stable Diffusion 3 in AI-FLOW v0.6.4

AI-FLOW has now integrated Stable Diffusion 3, a significant upgrade in our image generation toolkit. This new version offers enhanced capabilities and adheres more closely to the prompts you input, creating images that truly reflect your creative intent. Additionally, it introduces the ability to better incorporate text directly within the generated images.

Visual Comparison: From Old to New

To illustrate the advancements, compare the outputs of the previous Stable Diffusion node and the new Stable Diffusion 3 node using the prompt:

The phrase 'Stable Diffusion' sculpted as a block of ice, floating in a serene body of water.

The difference in detail and fidelity is striking.

Example

Model Options: Standard and Turbo

Choose between the standard Stable Diffusion 3 and the Turbo version. Note that with the Turbo variant, the negative_prompt field is not utilized, which accelerates processing while maintaining high-quality image generation.

Enhance Your Creative Process

Experiment by combining outputs from Stable Diffusion 3 with other APIs, such as the instantmesh from Replicate API that generates a mesh from any given image input. This integration opens new possibilities for creators and developers.

Example

Looking Ahead

Expect more enhancements and support from StabilityAI in the coming weeks as we continue to improve AI-FLOW and expand its capabilities.

Get Started

Dive into a world of enhanced image creation with Stable Diffusion 3 on AI-FLOW. Experience the power of advanced AI-driven image generation. Try it now!

· 2 min read
DahnM20

Introduction

Whether you need to summarize key information or query specific details within a document, AI-FLOW offers a user-friendly solution to integrate advanced document processing into your workflow. This guide outlines a straightforward setup to help you enhance efficiency and productivity.

Understanding the Workflow

When integrating AI-FLOW into your workflow, it's important to recognize the specific roles of different nodes. A common mistake is using the output from the file upload node directly as input for a GPT node. This approach is generally not effective due to the distinct functionalities of these nodes.

The Role of the File Upload Node

The file upload node is designed primarily for uploading documents and generating a URL to access them. This URL is crucial for interfacing with other APIs but does not itself facilitate content extraction from the document. Understanding this separation of functions is key to optimizing your document processing setup.

Extracting Text from Your Document

To extract text for analysis, utilize the Document-to-Text node. This node is specifically engineered to convert the contents of your document into a readable text format, which can then be processed further depending on your needs.

Using the Template

For convenience, AI-FLOW includes a pre-configured template in its Template menu. This template incorporates the necessary nodes for document processing, enabling you to implement the setup with just a few clicks. Accessing and using this template significantly streamlines the integration of document processing tasks into your workflow.

Efficient Document Processing Setup

Conclusion

Following this guide will allow you to effectively integrate document processing features of AI-FLOW into your daily tasks, enhancing both productivity and the quality of your outputs.

Enhance your productivity by integrating document processing into your workflow with AI-FLOW. Try it now.

· 2 min read
DahnM20

Discover the most effective ways to summarize YouTube videos with AI-FLOW, an AI-powered open-source tool designed for AI content processing. Whether you're aiming to create concise content summaries or extract detailed information, AI-FLOW's streamline the process, making it faster, efficient et reusable.

Effortlessly Summarize with the YouTube Transcript Node

AI-FLOW's YouTube Transcript Node offers a straightforward method to access video transcriptions. By integrating with the YouTube API, this node automatically retrieves transcripts, which can then be processed to generate succinct summaries or in-depth analyses. This approach is perfect for professionals and content creators looking to leverage AI for enhancing their productivity and content quality.

Efficient summarization using YouTube Transcript Node

Advanced Transcription with Whisper

Sometimes however, transcript aren't available via the Youtube API. For those needing a more powerful transcription solution, the turian/insanely-fast-whisper-with-video model on Replicate is a solid choice. Input a YouTube URL and the model efficiently processes the audio track of the video, delivering a high-quality transcription using OpenAI Whisper. These transcriptions are then perfect for further refinement and analysis using AI-FLOW’s GPT-4 node, among other tools.

Advanced transcription with Whisper

More ideas

Why limit yourself to a simple summary? With AI-FLOW, you can explore a range of creative options that transform standard video summaries into engaging, informative content. Here are some innovative ways to utilize AI-FLOW for more dynamic video summarizations:

  • Markdown Summaries with Emojis: Enhance readability and engagement by requesting summaries formatted in Markdown, complete with emojis to highlight key points or emotions. This format is particularly useful for content creators looking to publish ready-to-use, visually appealing summaries on platforms that support Markdown.

  • Multi-Grained Summaries with Multiple GPT Nodes: Utilize multiple GPT nodes to receive summaries of different lengths and detail levels. For instance, generate a brief, generic summary for a quick overview and a separate, detailed summary to capture the top 10 facts or insights from the video. This approach allows for tailored content that caters to varied audience preferences.

Conclusion: Streamline Your YouTube Video Analysis

By incorporating AI-FLOW into your workflow, you can significantly enhance your productivity and the quality of your content creation. The platform’s powerful AI tools, such as the YouTube Transcript Node and the Whisper model, simplify the task of summarizing and analyzing video content from YouTube.

Start streamlining your analysis and summarization processes today. Try AI-FLOW now.