
18 posts tagged with "AI-FLOW"

View All Tags

· 4 min read
DahnM20

Simplify OCR Tasks with AI-Flow: Transform Images and Scanned Documents into Usable Text

Efficiently extracting text from images and scanned documents is essential in today’s digital world. Whether for data analysis, archiving, or improving accessibility, transforming visual information into text saves both time and effort. AI-Flow's OCR (Optical Character Recognition) template offers a streamlined solution, providing multiple automated paths to get the best results quickly and accurately.

The AI-Flow Advantage: Transforming Images into Text

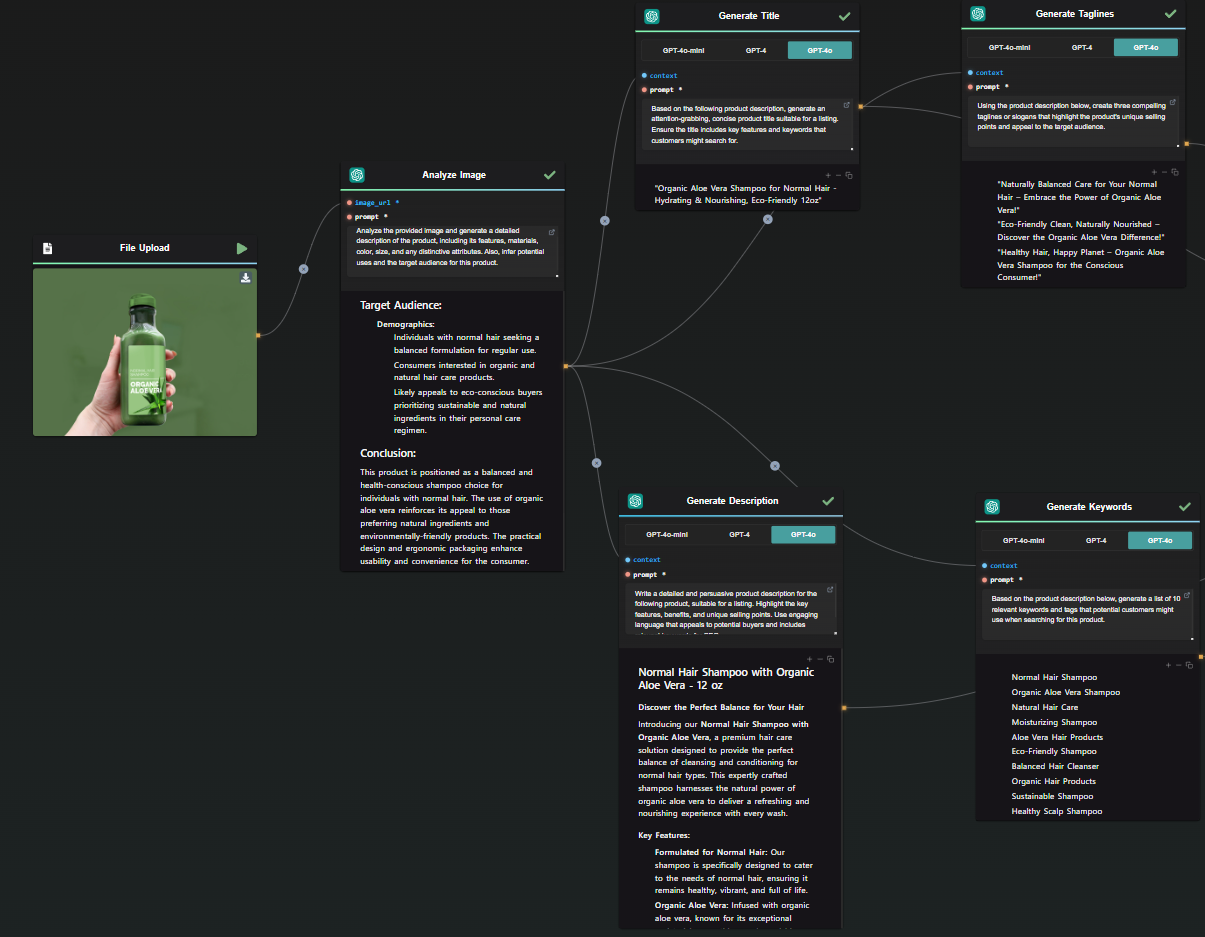
AI-Flow provides a structured, user-friendly approach to OCR, offering various methods for text extraction. In this article, we’ll introduce three ways AI-Flow can enhance your workflow, allowing you to select the most suitable approach based on your document type and end goals.

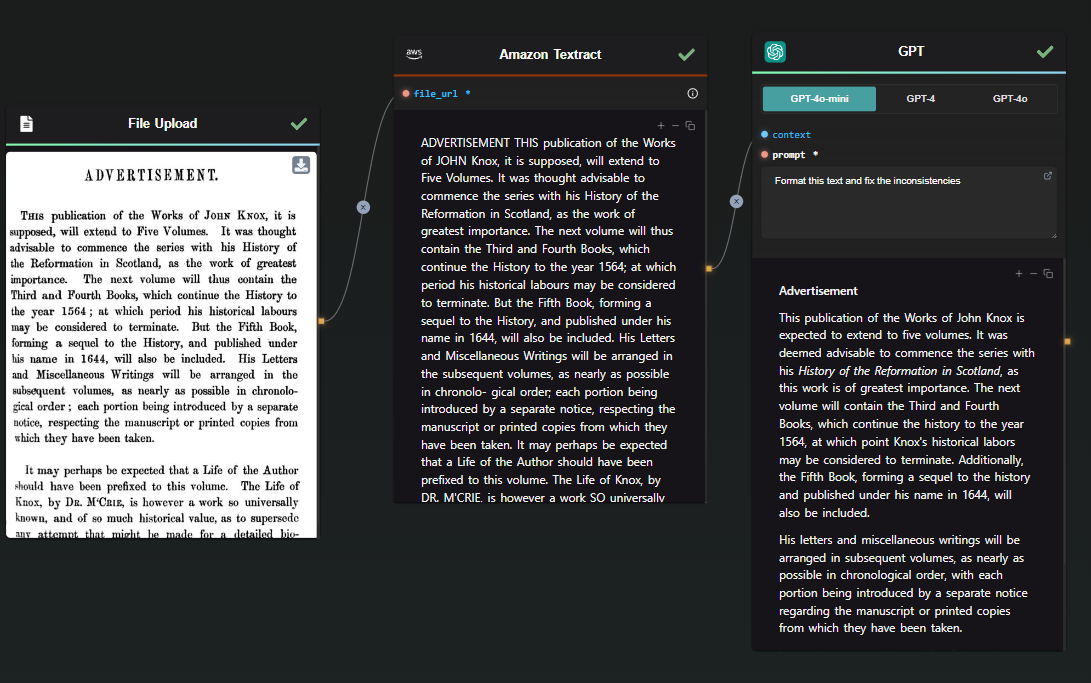
1. Streamlining Text Extraction with Amazon Textract Integration

Amazon Textract is known for its robust performance in extracting text from complex documents, such as forms and invoices. By integrating Amazon Textract into AI-Flow, you can automatically process large volumes of documents with high efficiency. Compared to other methods, Amazon Textract is faster and more cost-effective.

OCR Workflow with Amazon Textract

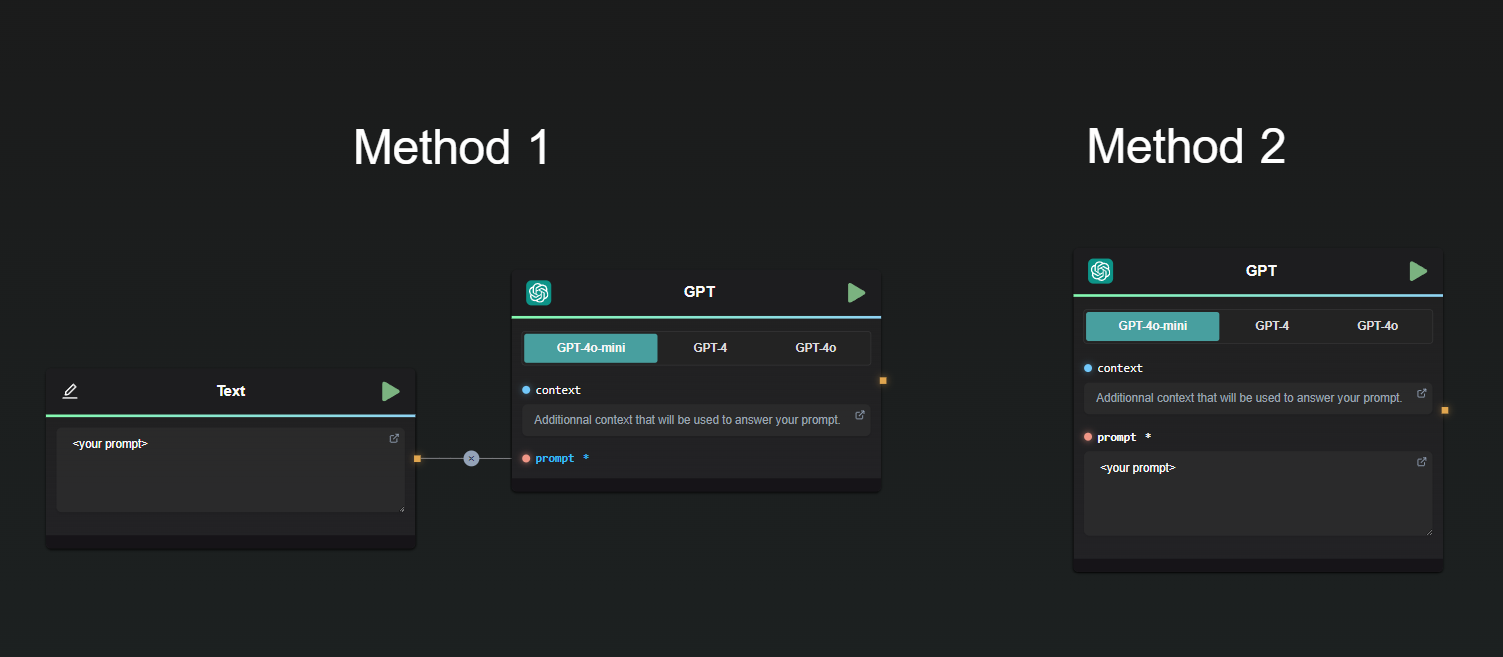
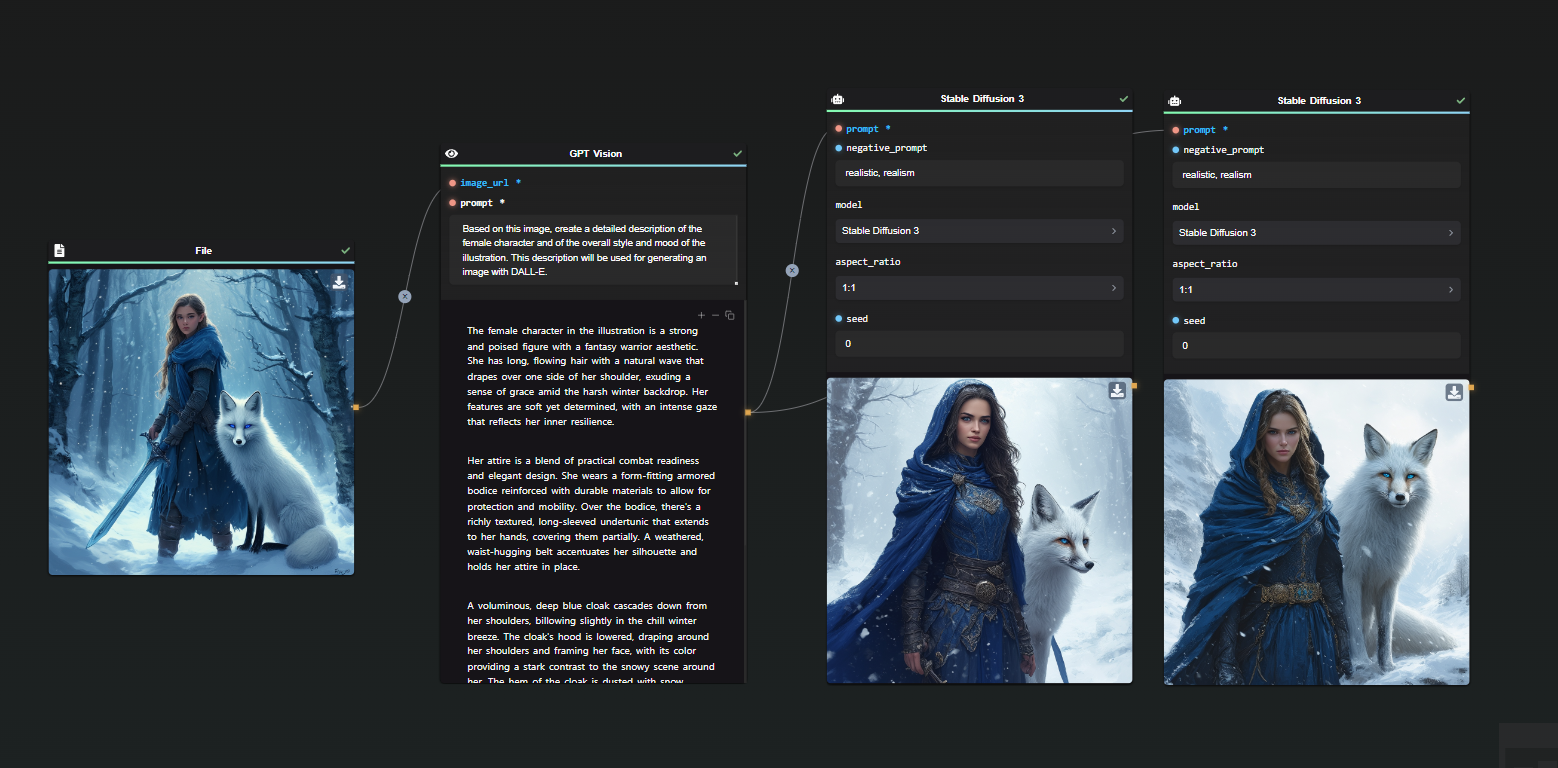
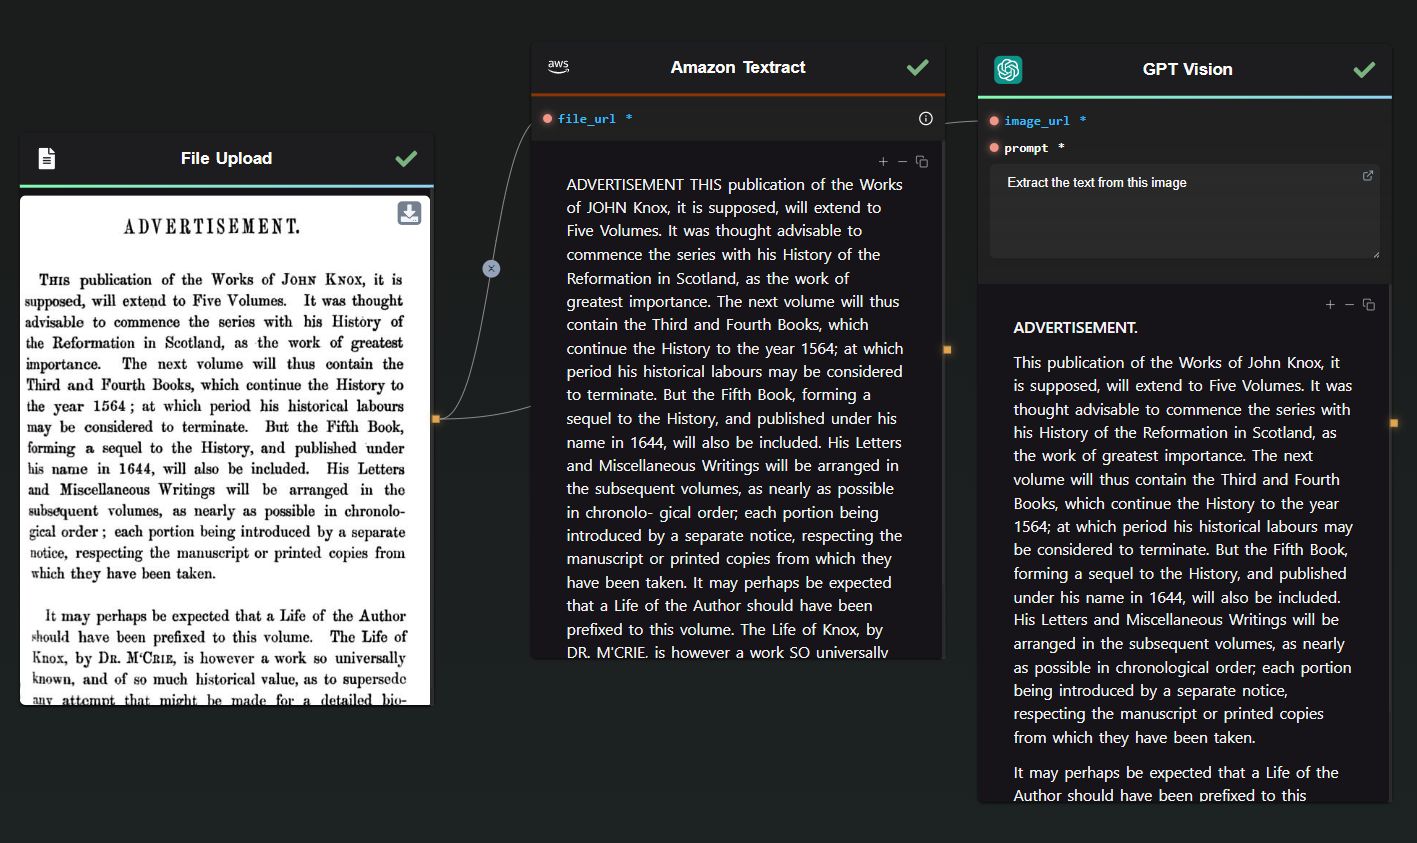
2. GPT 4o Vision Mode

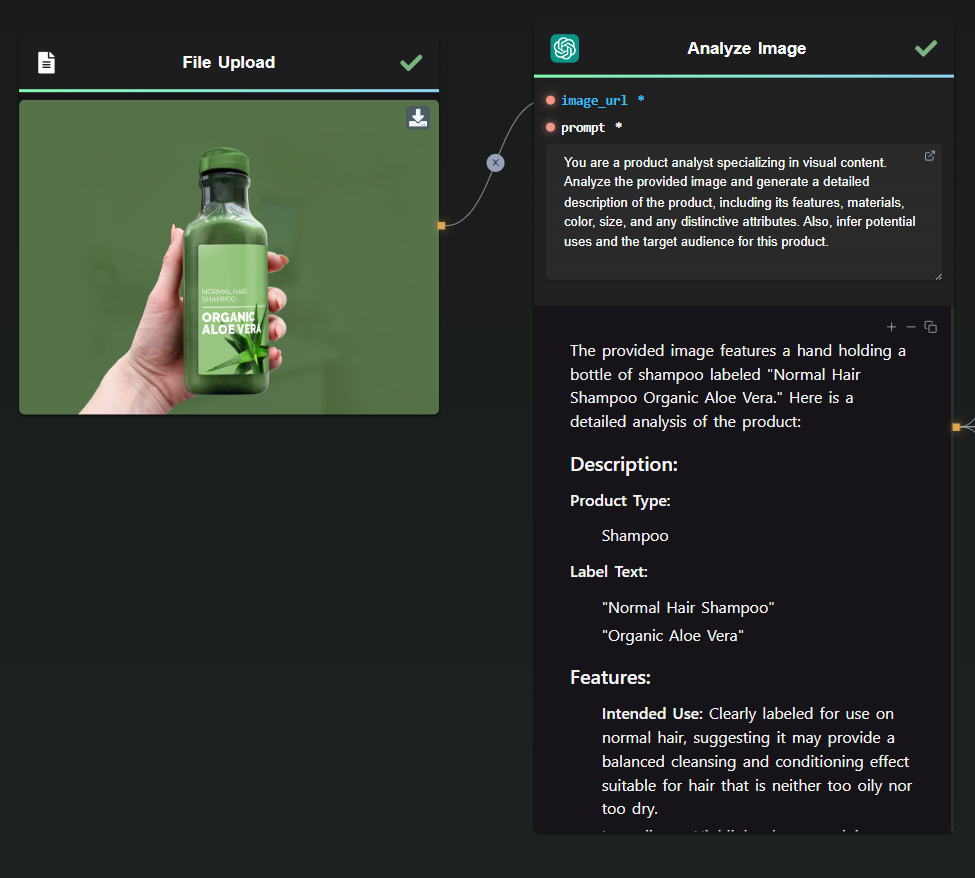
For situations where context and deeper understanding are essential, GPT Vision Mode is a valuable tool. This method not only extracts text but also adds an interpretive layer, making it ideal for tasks that require nuanced understanding or additional processing, such as summarization. For instance, GPT Vision excels at extracting text from comics or manga panels, where traditional OCR tools like Amazon Textract may struggle with layout complexities.

Studies about the previous GPT-4 Vision model have shown that while GPT-4 Vision performs well for Latin characters (e.g., English, French, German), it struggles significantly with non-Latin scripts like Chinese, Korean, and Japanese. Additionally, GPT-4 Vision adapts to varying image resolutions, potentially capturing more intricate details than some traditional OCR models. However, it may have a higher "refusal rate," where it produces unusable results, a problem not typically found with traditional OCR models​.

Source : Exploring OCR Capabilities of GPT-4V(ision) : A Quantitative and In-depth Evaluation

OCR Workflow with GPT

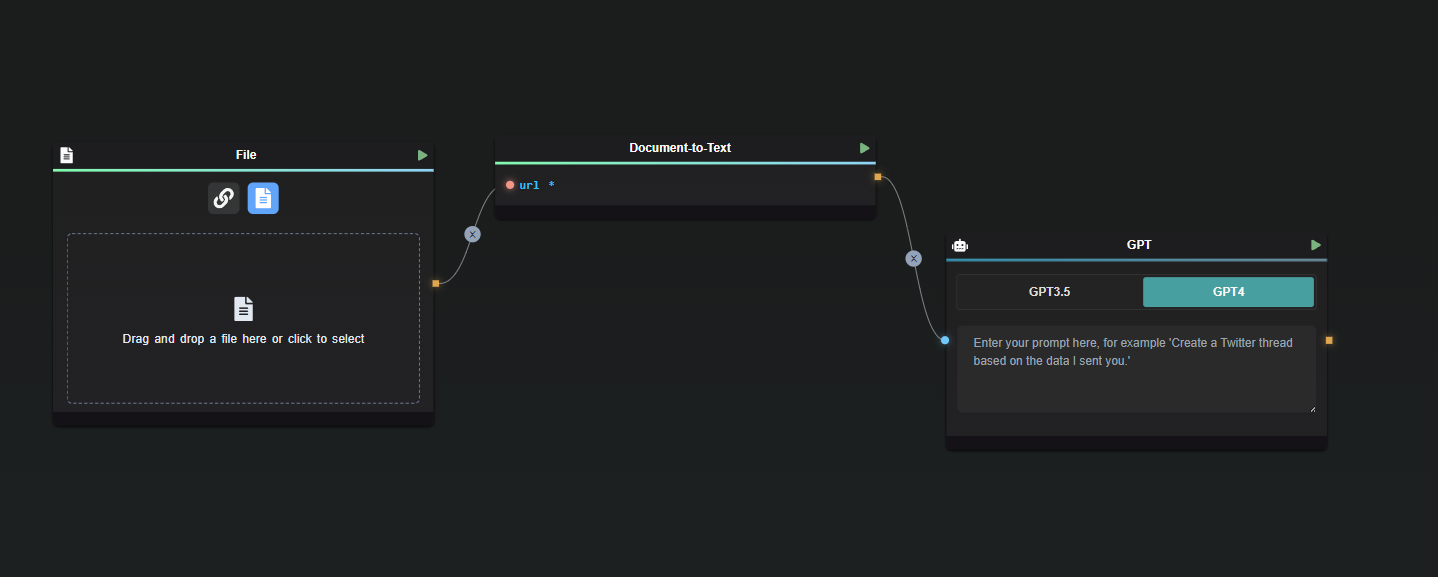
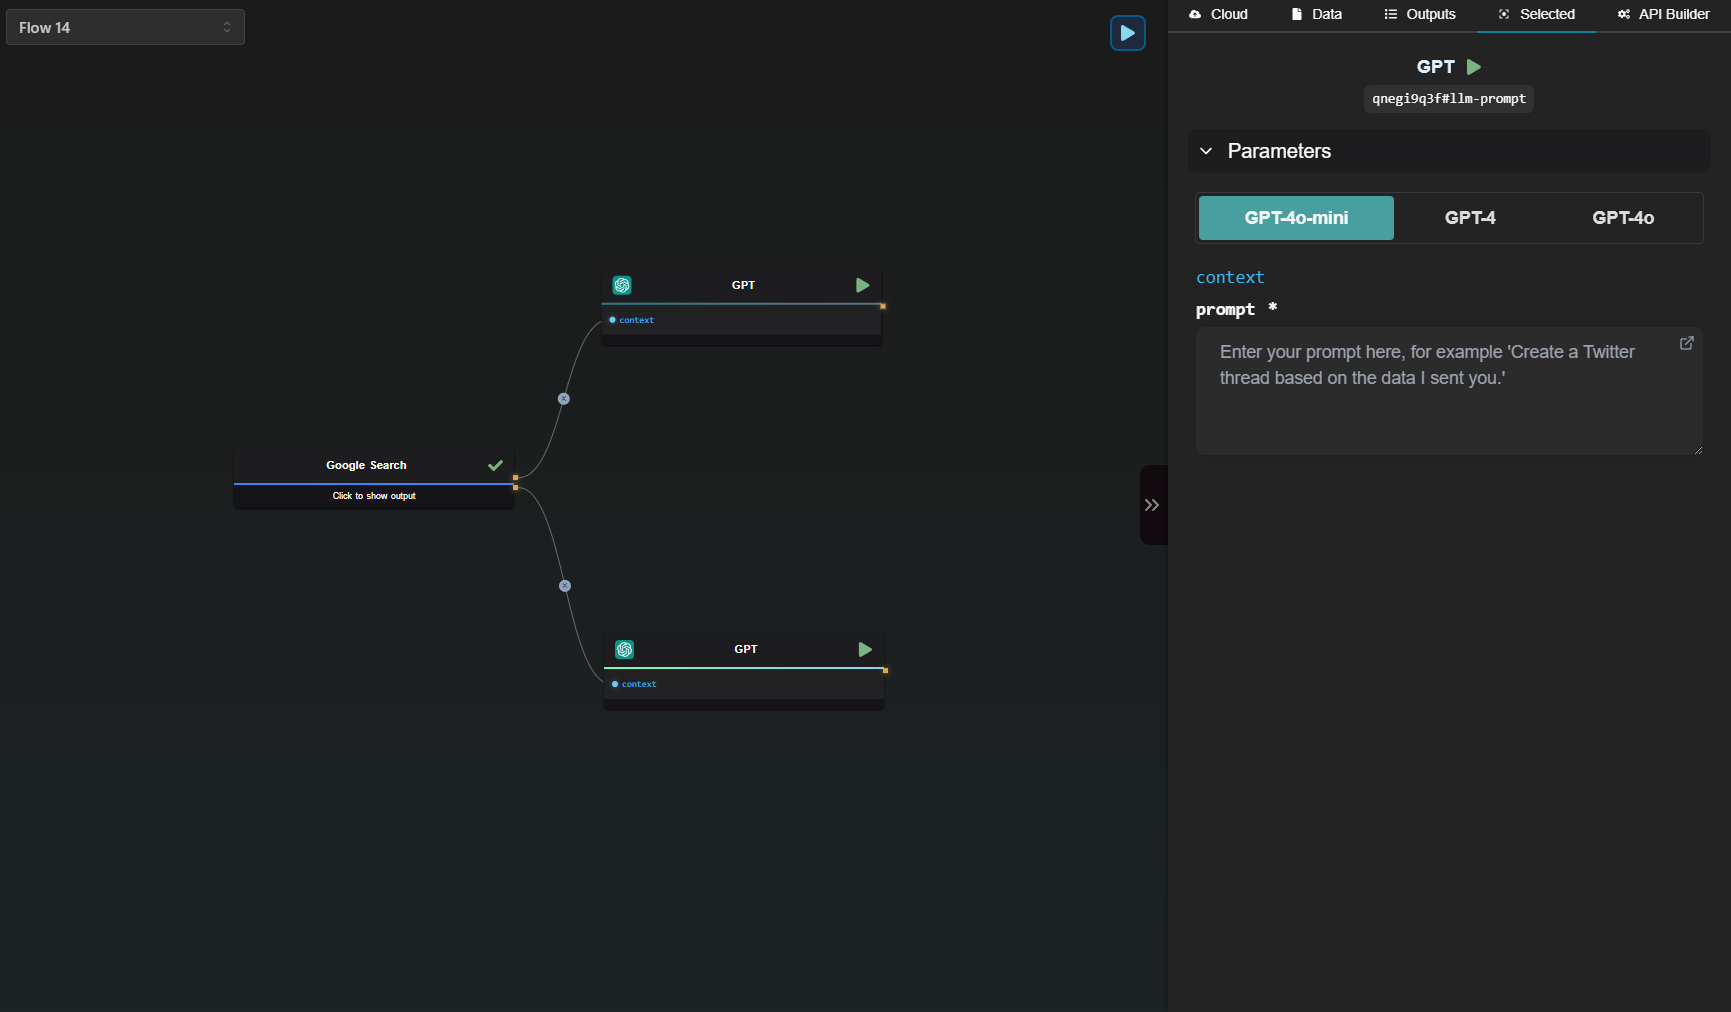
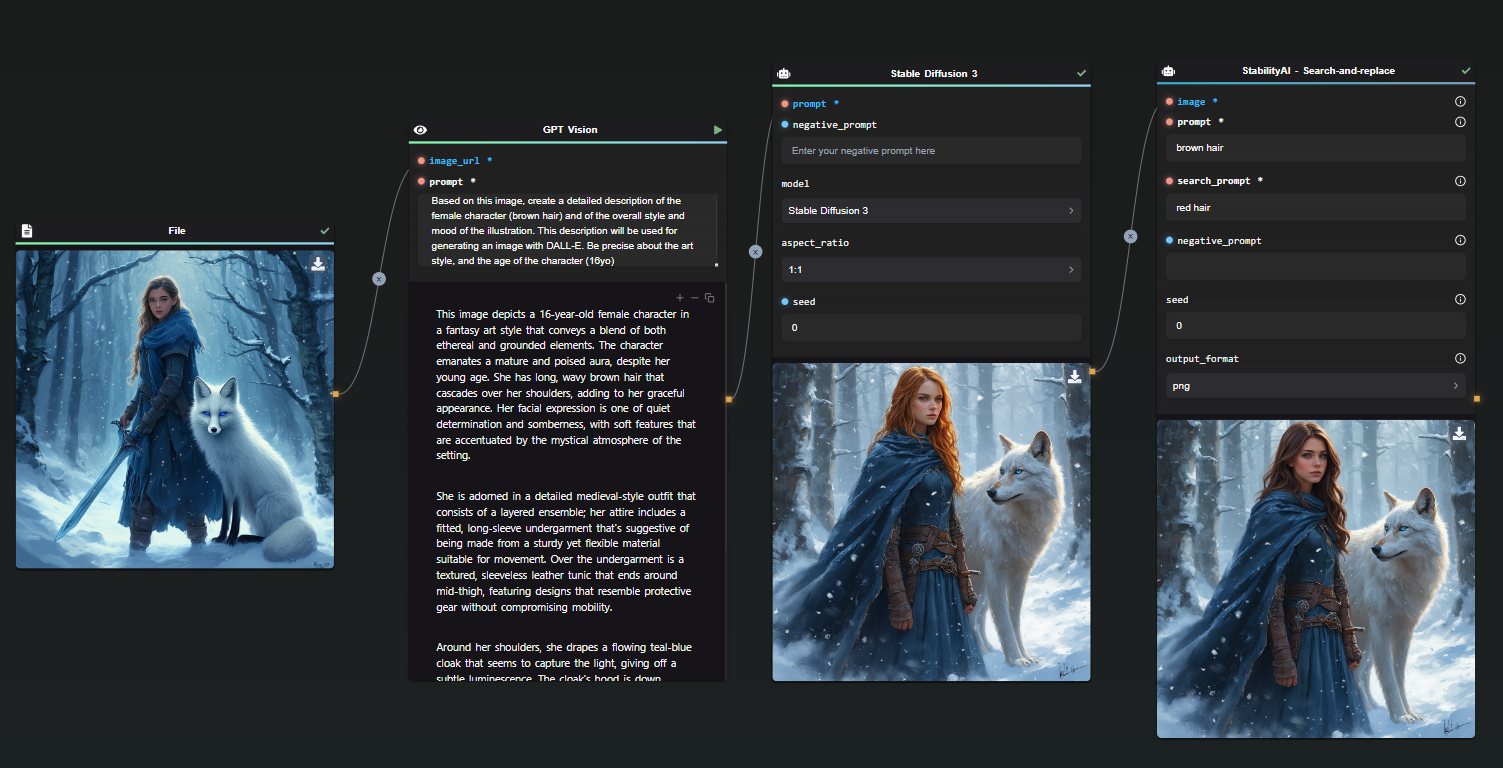
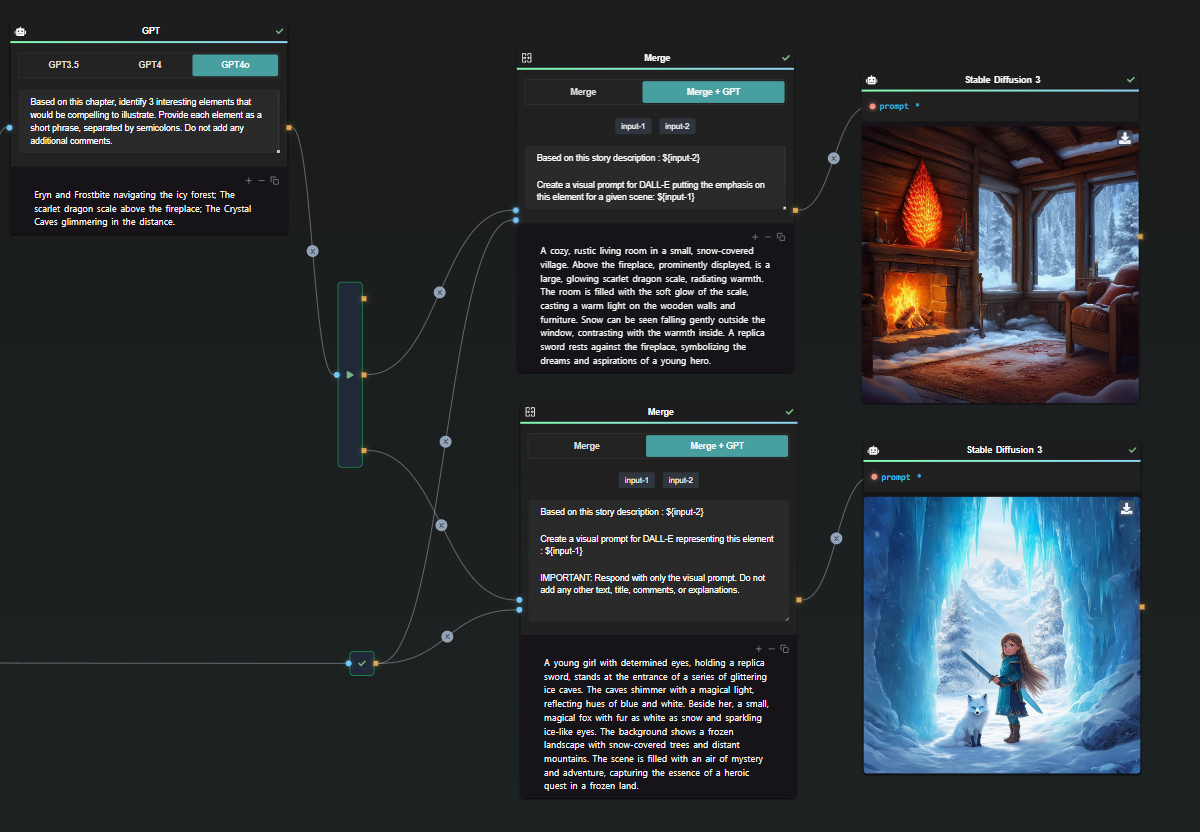
3. Combined Approach: Textract and GPT Vision

When accuracy is paramount, combining Amazon Textract with GPT Vision ensures precision by addressing discrepancies and inconsistencies. This hybrid approach allows for different strategies, such as using GPT to correct Textract’s results or leveraging both the extracted text and the image as prompts for GPT Vision. This method is particularly useful in applications where data accuracy is crucial.

Combined OCR Workflow

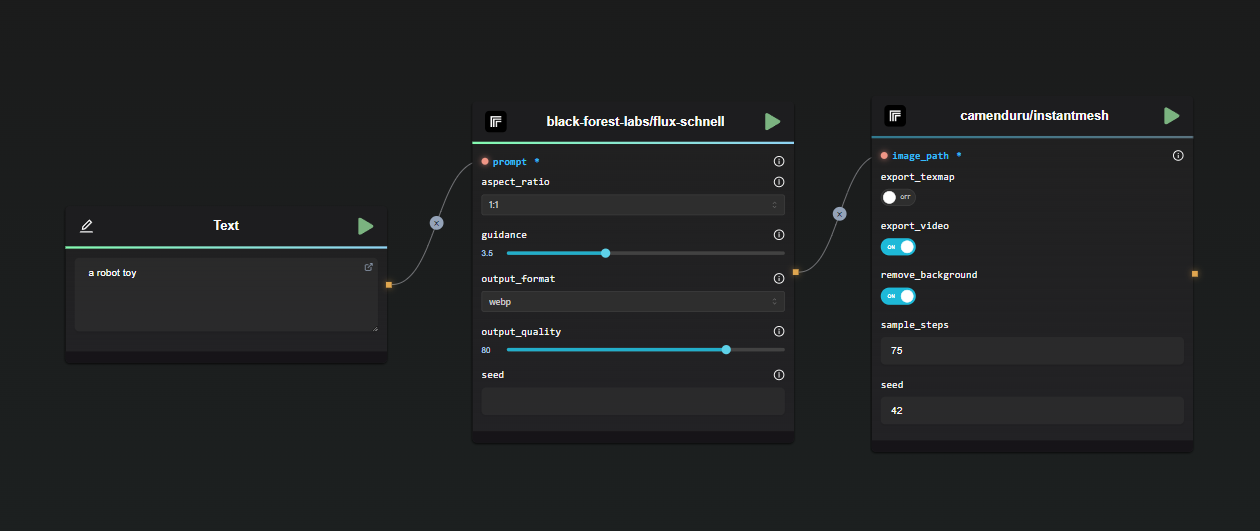
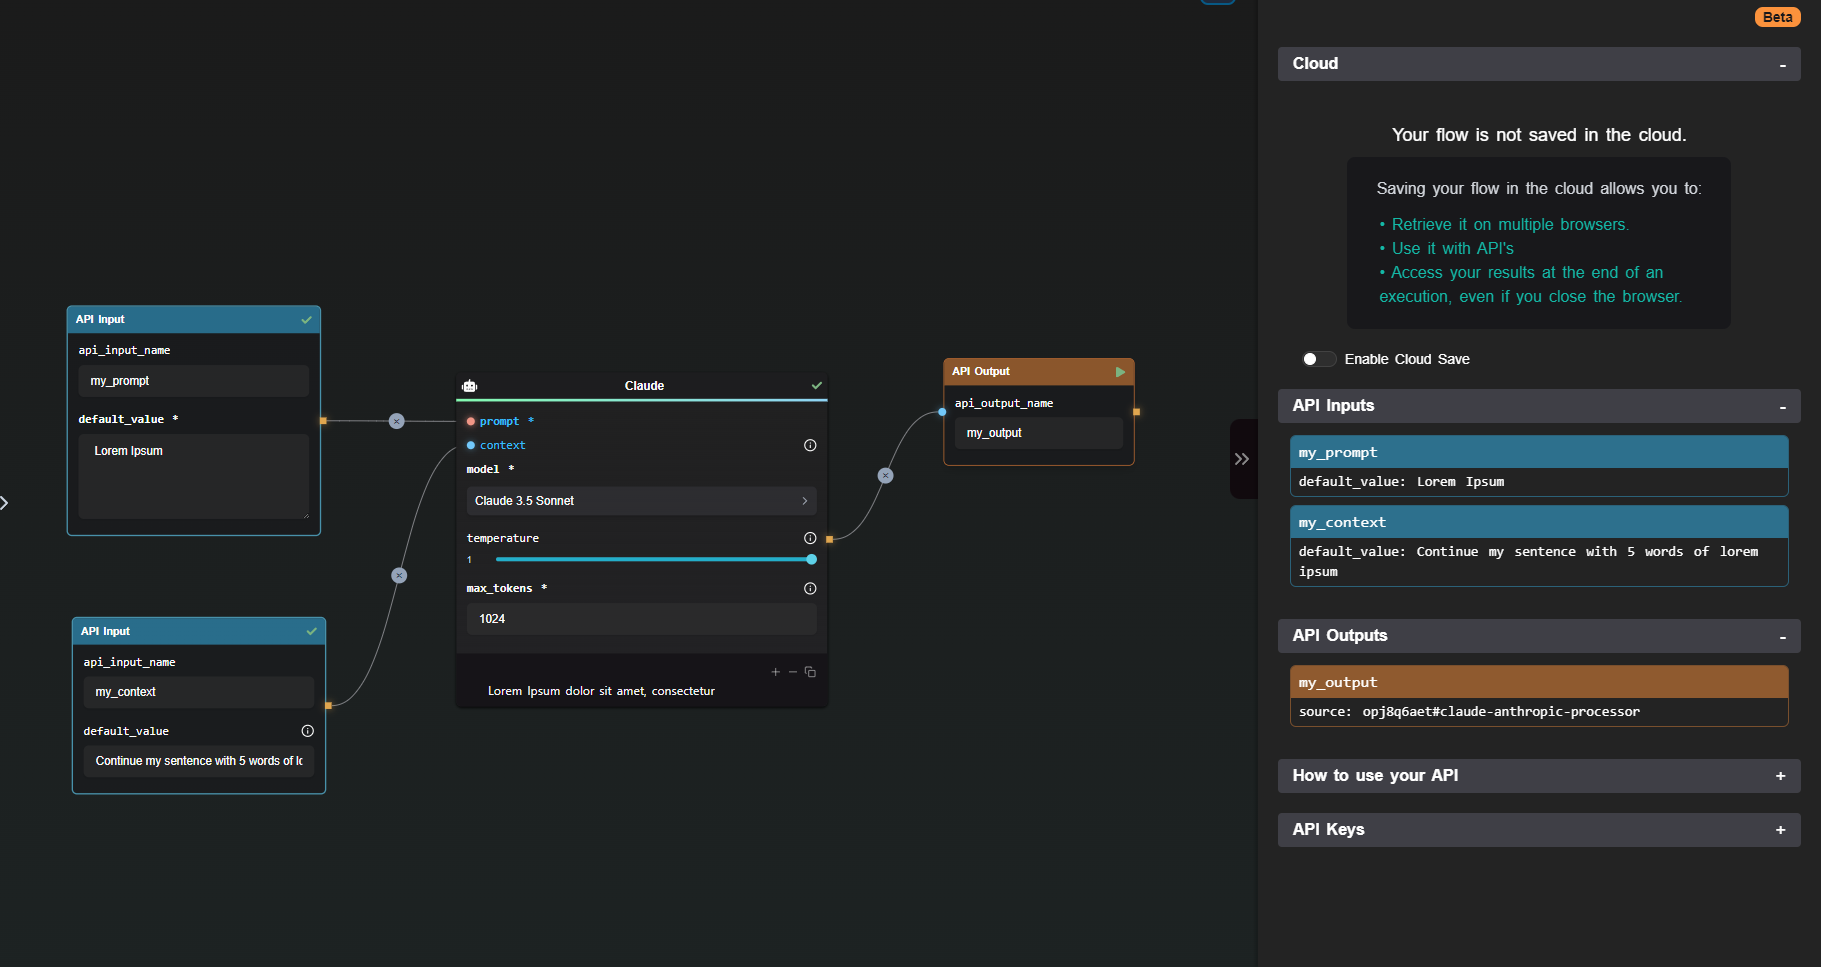
Customization and Enhancement with AI-Flow

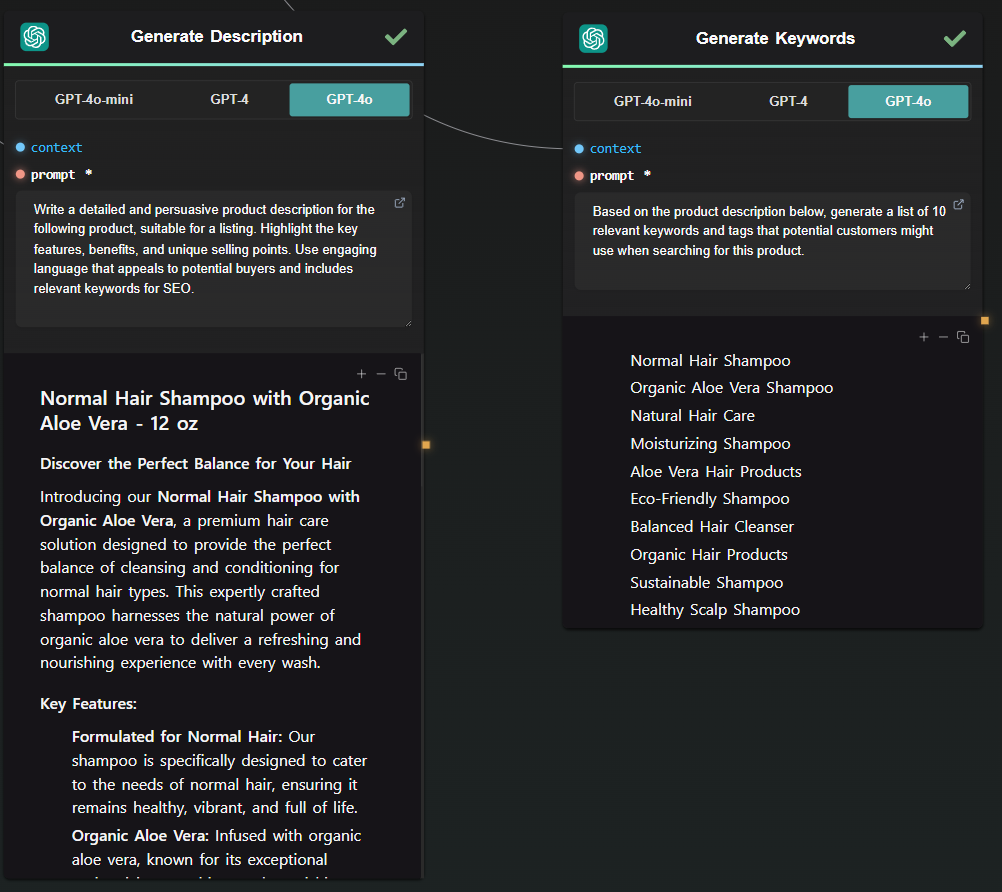
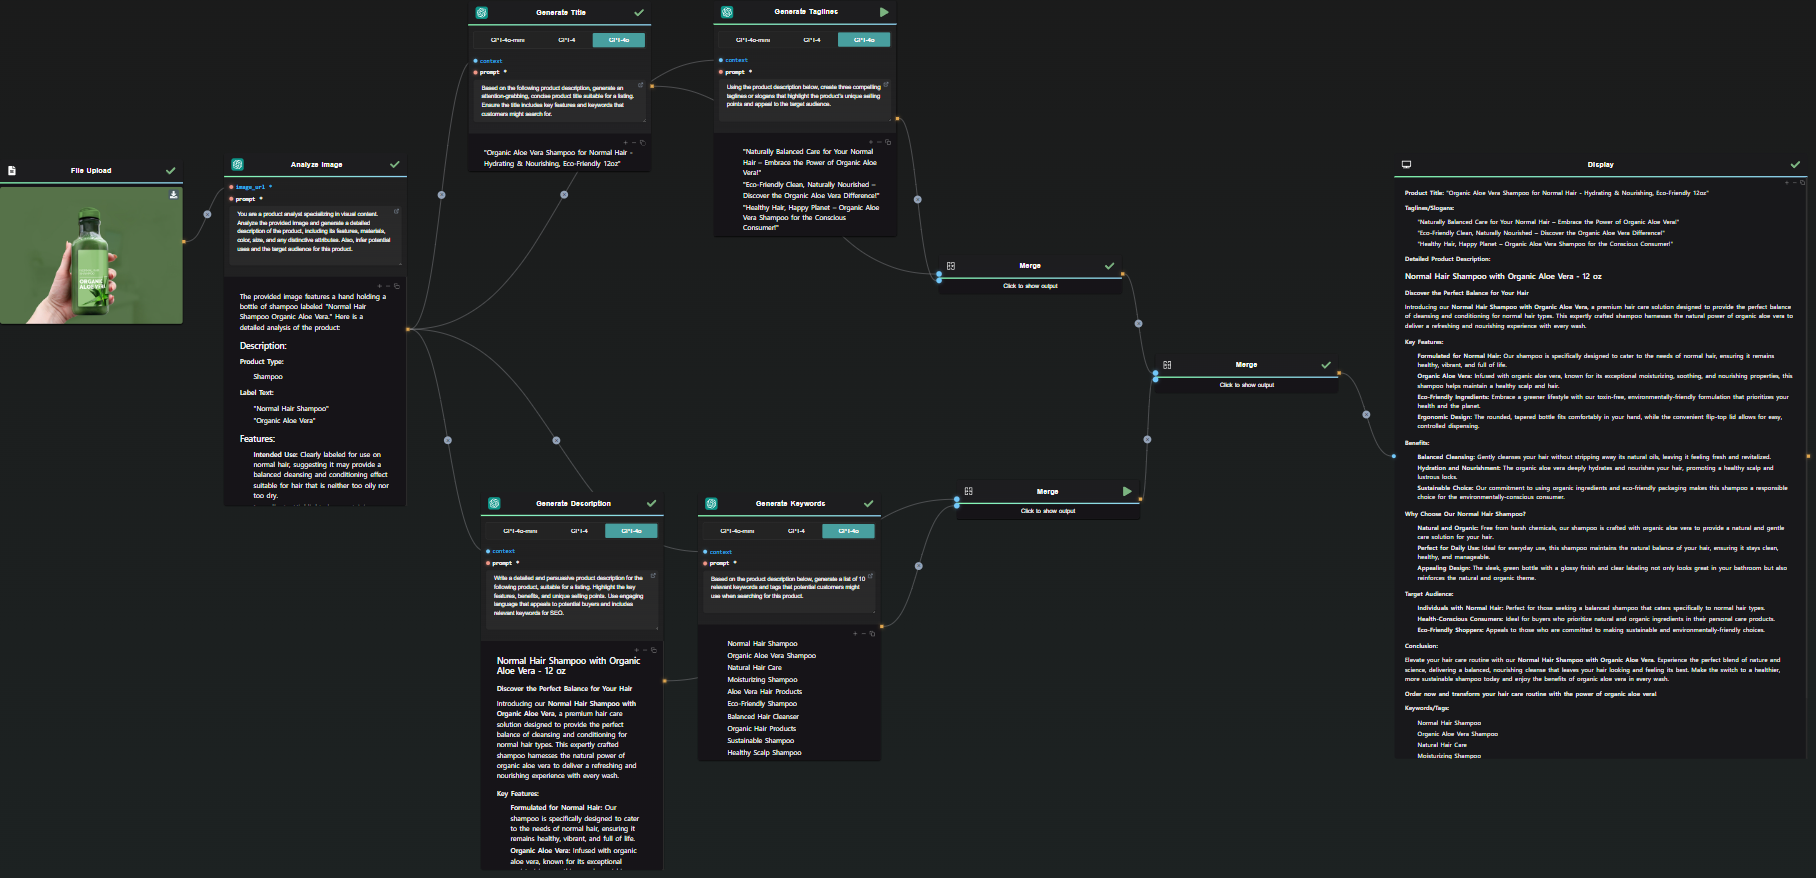
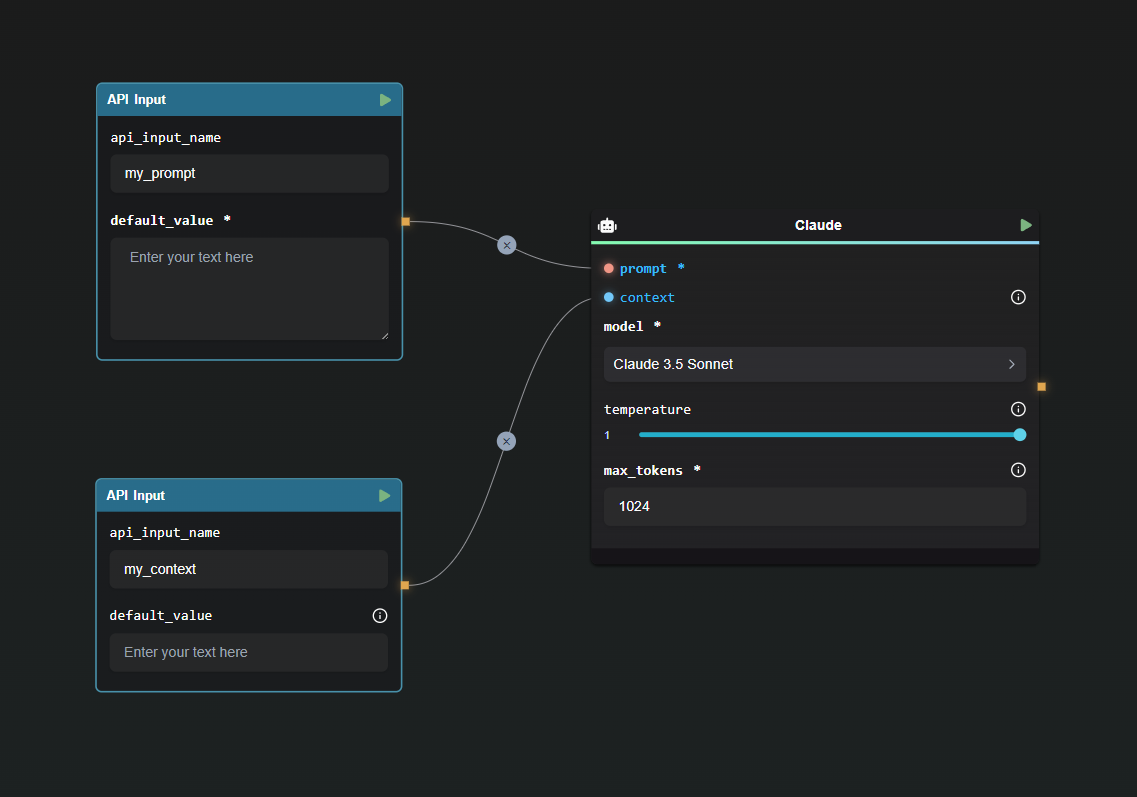
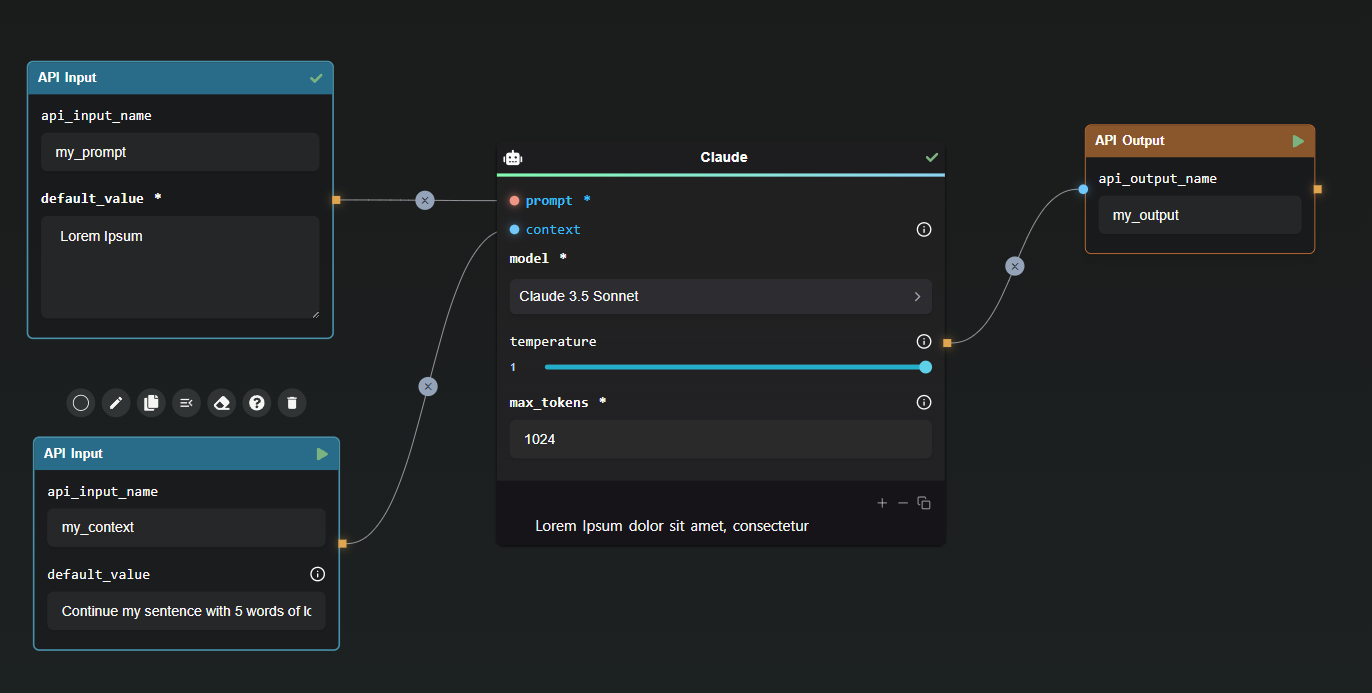
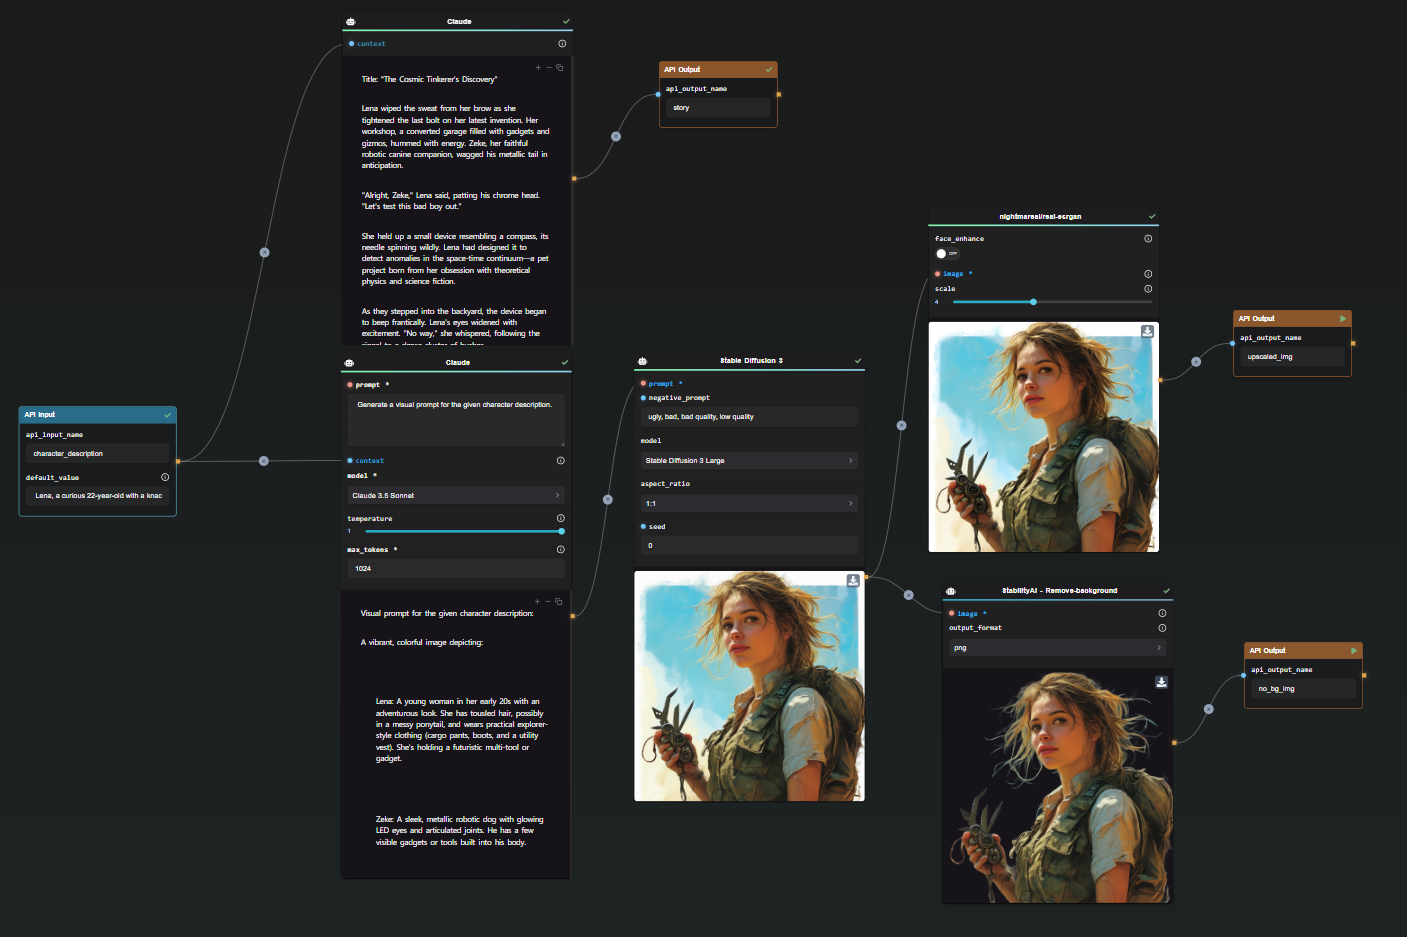
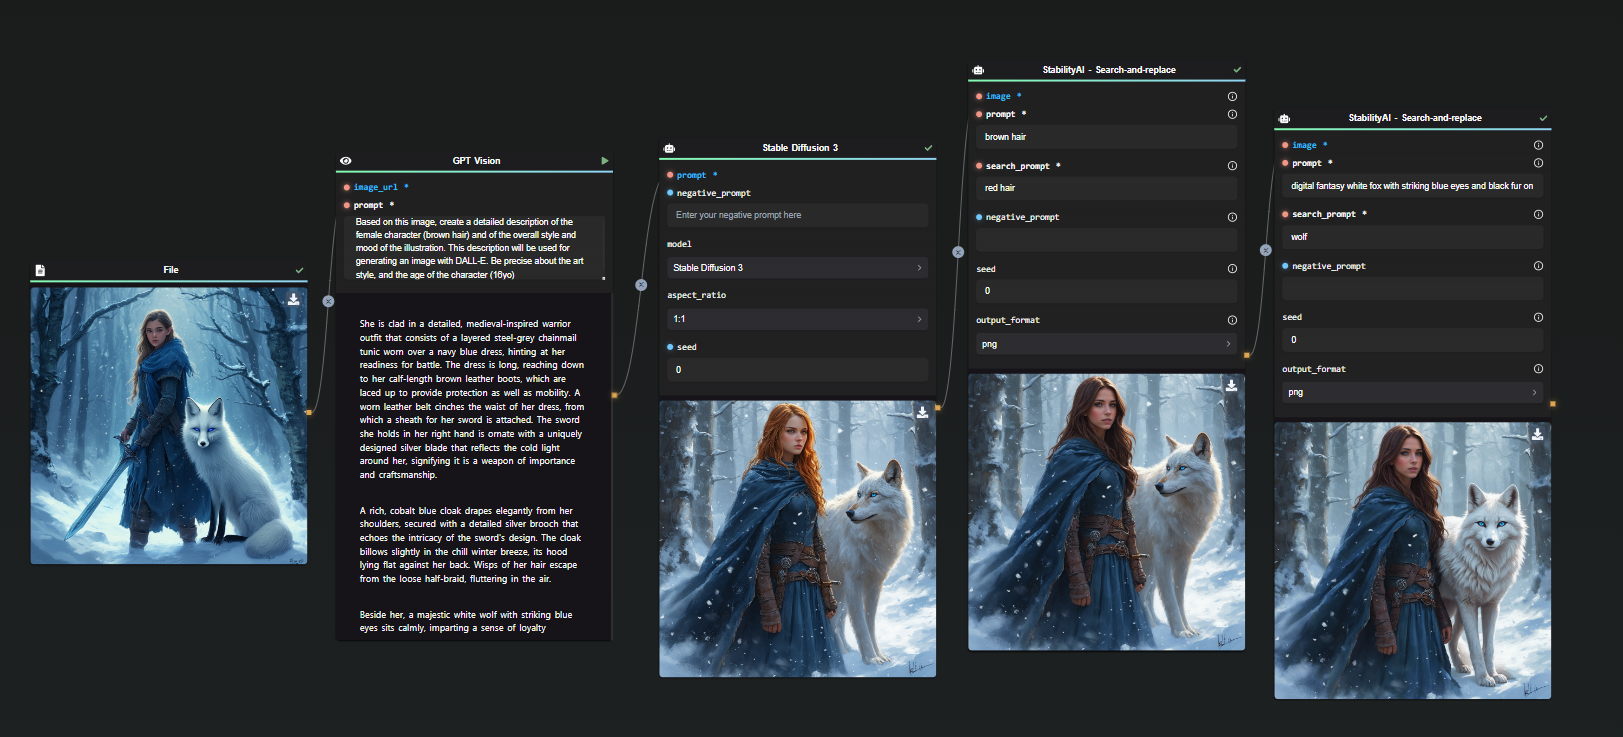
AI-Flow's intuitive drag-and-drop interface makes it easy to customize and enhance your OCR workflows. You can integrate additional AI models, automate repetitive tasks, and seamlessly connect outputs to other processes, such as data entry or content management systems.

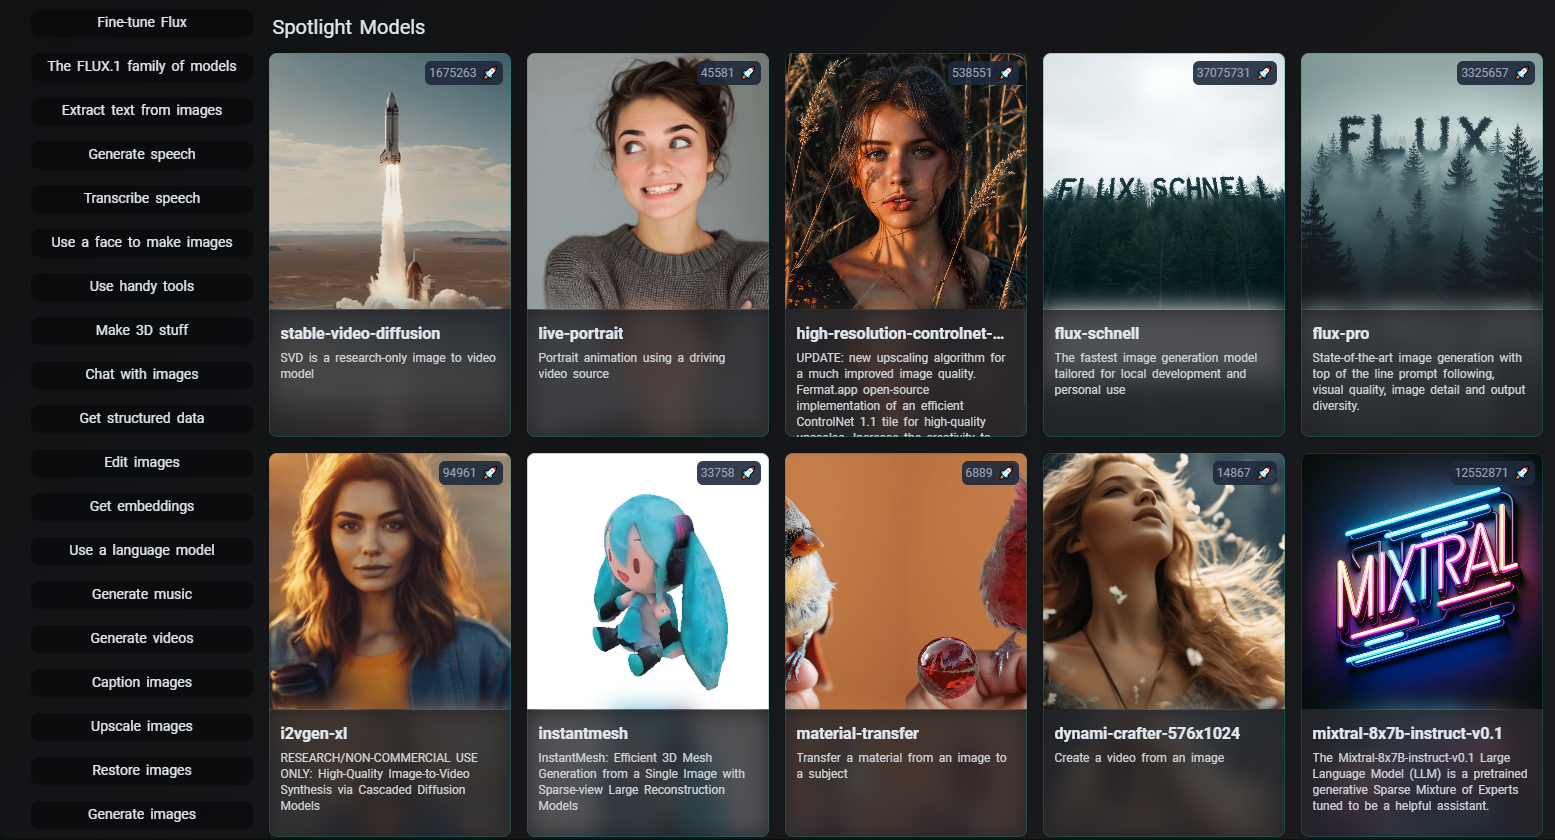
AI-Flow also supports various AI models, enabling you to experiment and refine your OCR processes to perfectly align with your specific requirements. Whether you're a small business owner or part of a large corporation, AI-Flow adapts effortlessly to meet your unique workflow needs.

Why Choose AI-Flow?

While standalone AI tools like ChatGPT offer impressive text extraction capabilities, the AI-Flow template provides a more structured, automated solution that simplifies the entire process. AI-Flow bridges the gap between multiple AI services, tailoring the experience to your specific document and data processing requirements.

Conclusion

AI-Flow empowers you to automate and enhance your OCR tasks by leveraging advanced AI solutions within a cohesive, user-friendly platform. Its versatile template offers tailored solutions that significantly improve efficiency and accuracy in text extraction projects.

Ready to streamline your OCR processes? Explore the possibilities with AI-Flow today at AI-Flow App. Unlock the full potential of AI-driven workflows and transform the way you handle text extraction from images and scanned documents.


Additional Resources

For more detailed information, refer to the following resources:

· 5 min read
DahnM20

Product Description with AI: A Comprehensive Guide

Creating compelling product descriptions is essential for any successful online business. Whether you're selling homemade soaps or high-tech gadgets, the right words can help you connect with customers and drive more sales. However, generating engaging, informative, and SEO-optimized product descriptions can be challenging, especially if you're working alone or have a small team. This is where AI-Flow's "Generate Product Description" template comes in, enabling entrepreneurs and marketers to streamline the content creation process effortlessly.

Template Overview

Introduction to the "Generate Product Description" Template

The "Generate Product Description" template within AI-Flow is specifically designed to assist users in creating high-quality, SEO-friendly product descriptions. This powerful tool harnesses the capabilities of multiple AI models to produce descriptions that are not only informative but also engaging and tailored to your target audience.

Imagine you have a new product—a hydrating, nourishing shampoo infused with organic aloe vera. Crafting the perfect product description is your next step. Rather than struggling with writer's block or settling for generic, uninspired content, you can leverage the AI-Flow template to generate a compelling description that resonates with potential customers.

How to Use AI-Flow for SEO-Optimized Product Descriptions

Step 1: Upload Your Product Image

Start by uploading a clear image of your product. For our example, you would upload a photo of the shampoo bottle.

Step 2: Analyze the Image

GPT-Vision node's image recognition capabilities come into play here. The platform analyzes the uploaded image, identifying the product type and key features visible on the label. This is a crucial step that lays the foundation for generating a description that accurately represents your product.

Analyze Image Output

Step 3 (Optional): Provide Contextual Information

The template works with just one image, but you can customize the prompts or add other steps to input additional details about the product, such as its intended use, unique ingredients, and key benefits. For our shampoo example, you could include information about its organic ingredients, its suitability for normal hair, and its hydrating properties.

Step 4: Generate Titles, Taglines, and Descriptions

With a few clicks, AI-Flow produces a set of SEO-optimized titles, taglines, and full product descriptions. The generated content not only highlights the unique selling points of your product but also appeals to search engines, helping you rank higher on search results pages.

Product Description and Keywords

Adding Value Through Customization

One of the standout features of the AI-Flow platform is its user-friendly drag-and-drop interface. Users can customize their workflows by adding nodes representing different AI models, each contributing unique features and enhancements. For instance, while GPT-4 might handle the text generation, you can add another node to refine the tone and style to best suit your brand.

Moreover, users can experiment with different AI models to tailor the output perfectly to their needs. This flexibility enables the production of descriptions that align with your brand voice, providing a consistent and professional touch to your product listings.

Full Template

The Benefits of a Structured AI Workflow

Many entrepreneurs already use tools like ChatGPT for creating content. This aligns with the broader trend, as McKinsey's 2024 AI Report indicates that 65% of organizations now utilize generative AI in at least one business function—a significant increase from just a year ago. Notably, marketing and sales departments have seen their adoption rates more than double, emphasizing the crucial role AI plays in driving eCommerce success.

The structured workflow provided by AI-Flow offers numerous advantages:

  • Consistency: Seamlessly integrate multiple AI models to produce cohesive and polished content.
  • Efficiency: Automate repetitive tasks, freeing up more time for creative and strategic activities.
  • Customization: Easily adapt and refine your workflows to match evolving business needs and customer expectations.

Your Path to Engaging Product Descriptions

By using the "Generate Product Description" template in AI-Flow, you can transform your content creation process. Whether you're launching a new product or updating existing descriptions, this template offers a streamlined, efficient, and highly effective solution.

Why struggle with mundane writing tasks when you can focus on what you do best—innovating and growing your business? Leverage the power of AI-Flow to produce captivating descriptions that turn browsers into buyers and elevate your online presence.

Get Started Now

Explore the capabilities of AI-Flow today and see how the "Generate Product Description" template can bring your products to life. Visit AI-Flow to start your journey for free.


Additional Resources

For more detailed information, refer to the following resources:

· 4 min read
DahnM20

Generate Illustrated Short Children's Stories with AI

Are you captivated by the prospect of bringing magical children's stories to life with charming illustrations? Look no further than AI-Flow, a versatile platform designed for both novices and seasoned developers. With AI-Flow, crafting enchanting short children's stories complete with vivid illustrations is an effortless and exciting endeavor.

Template How to Create Short Children's Stories

The Template in Focus

The "Create a Short Children's Story with 5 Magical Illustrations" template is available for a quick setup in AI-Flow. It seamlessly blends creative storytelling with beautiful imagery, making it ideal for authors, educators, parents, and anyone passionate about children's literature. Here’s why this template is a must-try:

  1. Automated Story Generation:

    • Using the narrative power of AI models like GPT-4o, you can generate engaging and imaginative storylines perfect for young readers. The default template prompt is simple, but you can edit it to tailor the generated story to your needs—making it entertaining, educational, and fostering creativity and curiosity.
  2. Captivating Illustrations:

    • Five visual descriptions are generated by GPT-4 to match your story. You can edit the prompt to tell GPT to include character descriptions in each prompt, ensuring that the results are more coherent with your story.
    • The five visual descriptions are split to be processed by image generation models.
    • The template leverages new image generation model FLUX Schnell to create five stunning, custom illustrations that bring your story to life. You can also choose to use Stable Diffusion 3, DALL-E 3, FLUX Pro, and others.

How to Create Your Magical Story

Template Empty How to Create Short Children's Stories

With AI-Flow’s drag-and-drop interface, creating your illustrated children's story is as simple as following these intuitive steps:

  1. Start Your Story:

    • Select the "Create a Short Children's Story with 5 Magical Illustrations" template.
    • The process begins by generating a captivating story using GPT-4.
  2. Customize Characters and Scenes:

    • Edit prompts to personalize your story's characters and settings. Whether you envision a brave bunny, a wise owl, or a playful squirrel, the AI can adapt to your creative inputs, enhancing the narrative's uniqueness.
  3. Generate Illustrations:

    • Let image generation models work their magic by producing five custom illustrations that match key moments in your story. Each image adds a layer of enchantment, sparking the imagination of young readers.
  4. Save Your Illustrations and Story:

    • Retrieve your story from the first GPT node and save your illustrations.

      Template How to Create Short Children's StoriesTemplate How to Create Short Children's Stories

Enhancing Your Story with AI-Flow’s Features

While the template is already working, AI-Flow's additional features ensure your project shines:

  • AI-Flow allows you to experiment with various AI models to find the perfect fit for your creative project. Tailor each element to align with your vision, ensuring a unique and meaningful final product.
  • Feel free to experiment with prompts and make sure that the visual descriptions follow the guidelines you've established.
  • You can re-run any node individually to try to achieve better results.
  • Already have a story? Replace the first GPT node with a simple text node, add your story to it, and let the rest of the workflow generate your illustrations!

Ready to Create Your Own Story?

Experience the magic for yourself. Get started for free with AI-Flow and the "Create a Short Children's Story with 5 Magical Illustrations" template today by visiting AI-Flow.

Let your creativity run wild and watch as your stories come to life with the power of AI!

· 4 min read
DahnM20

Generate Coloring Book Pages with AI: A Step-by-Step Guide

Coloring books are universally beloved, offering a unique blend of creativity and relaxation. With AI-Flow, creating intricate and imaginative coloring book pages is now easier than ever, whether you are an artist, a publisher, or simply a coloring book enthusiast. This article will walk you through how to leverage the AI-Flow template specifically designed for generating black-and-white illustrations suitable for coloring books.

What is AI-Flow?

AI-Flow is an open-source platform that allows users to build and manage AI workflows through a simplified drag-and-drop interface. This tool integrates multiple AI models, enabling you to create custom AI tools for a variety of tasks without extensive coding knowledge.

Generating Coloring Book Pages

The Template in Focus

The provided template in AI-Flow, "Generate coloring book pages" allows users to produce detailed and imaginative visual concepts perfect for coloring book pages. This template brings together the power of several AI models to deliver high-quality, intricate line work that can be customized and tailored to your needs.

Template How To Create Coloring Book Pages

Key Capabilities

1. Integration of Multiple AI Models

The template leverages the integration of advanced AI models like GPT-4o and FLUX Schnell. These models work in harmony to produce descriptive prompts and then render those prompts into beautiful, cohesive black-and-white illustrations suited for coloring.

2. Drag-and-Drop Functionality

Using AI-Flow's intuitive drag-and-drop interface, you can easily set up your workflow. Connect nodes representing different AI functions and models, adjust settings, and view real-time outputs. This functionality makes designing a breeze, even for those without a technical background.

Steps to Create Your Coloring Book Pages

  1. Select the Template: Choose the "Generate Coloring Book Pages" template from AI-Flow's template library.

  2. Customize Your Prompts: Tailor the GPT node prompt to match your envisioned coloring book theme. For example, you can describe whimsical forest scenes, underwater adventures, or magical gardens.

  3. Run the Workflow: Once your prompt is set, run the workflow. The AI models will create three image descriptions and generate high-quality illustrations rendered in intricate line work.

  4. Review and Edit: Review the generated illustrations. AI-Flow allows you to relaunch nodes individually if needed to ensure the output perfectly fits your vision.

  5. Save and Export: Save your completed illustrations. These can be directly uploaded to your coloring book project, ready for printing or digital sharing.

Coloring book page generated

Customization and Enhancement

  • Generate More Pages at Once: Update the GPT node prompt to generate five detailed visual concepts.
  • Experiment with Other Image Generators: Try using Stable Diffusion 3, DALL-E 3, or Flux Pro instead of FLUX Schnell.
  • Experiment with Prompts: Play around with different descriptive prompts to see varying results and find the best fit for your creative project.
  • Incorporate Additional Data: Upload external images and use GPT Vision to describe them to have a base for other generations.
  • Upscale Your Images: Use the Replicate Node to access an image upscaler like Real-ESRGAN.

Template Customized

Conclusion

Creating a coloring book has never been this simple and effective. With AI-Flow, you can generate exquisite, detailed, and imaginative coloring book pages effortlessly. This user-friendly platform empowers you to bring your creative ideas to life, whether for personal enjoyment or commercial publication.

Ready to start your colorful journey? Explore AI-Flow now and generate your first coloring book pages today!


By leveraging AI-Flow’s comprehensive and user-friendly tools, you can transform your creative processes and produce stunning, tailor-made outputs that reflect your unique artistic vision. Embrace the power of AI-Flow and let your creativity flourish!

· 6 min read
DahnM20

Build and Deploy AI Workflows with AI-Flow

In today's rapidly evolving technological landscape, artificial intelligence (AI) is at the forefront of innovation. However, building custom AI tools often requires integrating multiple AI models or tools, which can be a daunting task, especially for those without extensive coding experience.

AI-Flow is a platform designed to simplify the process of building and deploying AI workflows. With its intuitive drag-and-drop interface, AI-Flow allows users to connect various AI models seamlessly and automate complex tasks with ease. In this article, we'll explore how to build and deploy AI workflows using AI-Flow, highlighting its key features and the API Builder for deployment.

Integrate Multiple AI Models

Getting Started with AI-Flow

What is AI-Flow?

AI-Flow is both a platform and an open-source tool that enables users to create custom AI tools through a simple drag-and-drop interface. It supports a wide range of AI models. Whether you're looking to generate images, summarize content, or automate workflows, AI-Flow provides the tools you need to get started quickly and efficiently.

Key Features of AI-Flow

  • Integrate Multiple AI Models Seamlessly: Combine AI models like GPT-4, Claude, and all the models hosted on Replicate and StabilityAI, among many others, for innovative outcomes.
  • Drag-and-Drop Interface: Create AI tools in minutes without any coding.
  • Customizable AI Solutions: Tailor AI solutions to your specific needs, from SEO content creation to image generation.
  • API Builder: Automate inputs and retrieve outputs via API requests or webhooks, making it easy to integrate AI workflows into your projects.

Building AI Workflows with AI-Flow

Step 1: Creating Your First Workflow

Once you have AI-Flow set up, you can start creating your first workflow:

  1. Open the AI-Flow Interface: Launch the AI-Flow application and navigate to the workflow builder.
  2. Drag and Drop Nodes: Select the AI models you want to use from the available nodes and drag them into the workflow area.
  3. Connect Nodes: Connect the nodes to define the flow of data between them. For example, you can connect a text generation model like GPT-4o to an image generation model like FLUX Pro.
  4. Configure Nodes: Customize the parameters for each node to suit your specific requirements. This might include setting prompts for text generation or specifying styles for image creation.

Step 2: Running Your Workflow

  1. Run the Workflow: Click the "Run" button to execute your workflow within the AI-Flow interface.
  2. Review Outputs: Check the outputs generated by each node to verify that they meet your expectations.
  3. Make Adjustments: If necessary, adjust the parameters or connections between nodes to refine your workflow.

Workflow Output Example

Optional: Start with a Template

AI-Flow comes with various templates, inspired by user feedback. These templates can be easily customized or used as a way to discover the features of the app.

Start with a template - AI Flow

Deploying AI Workflows with the API Builder

This is an optional feature, designed for those looking to integrate their workflow into an external project.

What is the API Builder?

The API Builder is a powerful feature within AI-Flow that allows you to automate inputs, execute workflows with REST API calls, and handle outputs efficiently with webhooks. This makes it easy to integrate your AI-powered workflows into any project, whether it's a web application, mobile app, or backend service.

Step 1: Configuring API Input and Output Nodes

To deploy your workflow via the API Builder, you'll need to use the API Input and Output nodes:

  1. API Input Node: Define the inputs for your API by mapping each field in the request body to a corresponding API Input node in your workflow. Set default values for optional parameters.

Webhook Node Example

Example Request Body:

{
"my_prompt": "Lorem Ipsum",
"my_context": "Lorem Ipsum"
}
  1. API Output Node: Specify the names of the fields in the final response to ensure the output is structured and understandable.

Webhook Node Example

Example Response:

{
"my_output": "Lorem Ipsum dolor sit amet, consectetur"
}

Step 2: Generating API Keys

To ensure secure access to your workflow, generate API keys within the API Builder. These keys are essential for authorizing requests and are displayed only once for security purposes.

Step 3: Running Your Workflow via API

With your API keys in hand, you can now run your workflow using REST API calls. The API Builder provides code snippets to help you get started. For example, using cURL:

curl https://api.ai-flow.com/v1/flow/<your_flow_id>/run \
-H "Content-Type: application/json" \
-H "Authorization: Bearer $AI_FLOW_API_KEY" \
-d '{
"my_prompt": "Lorem Ipsum",
"my_context": "Continue my sentence with 5 words of lorem ipsum"
}'

This command initiates the flow and returns a run ID to track the process. You can retrieve the results using this ID once the processing is complete.

Step 4: Enhancing Integration with Webhook Nodes

The Webhook Node allows you to send outputs to designated URLs, enabling real-time integration and response handling in your applications. Configure the Webhook Node by specifying the target URL and selecting the outputs to send.

Example Configuration:

{
"my_output": "Lorem Ipsum dolor sit amet, consectetur"
}

This ensures that structured data is sent to the specified URL, facilitating smooth integration and authentication via custom signatures.

Conclusion

AI-Flow simplifies the way we build and deploy AI workflows by offering an intuitive, no-code platform that simplifies the integration of multiple AI models. With its drag-and-drop interface, customizable solutions, and API Builder, AI-Flow empowers users to create and deploy AI-powered workflows effortlessly. Whether you're a beginner or an expert, AI-Flow provides the tools you need to harness the power of AI and drive innovation in your projects.

Start building your AI workflows today with AI-Flow and experience the ease and efficiency of seamless AI integration. For more information and to get started, visit the AI-Flow Application and explore the comprehensive documentation and resources available.


Additional Resources

For more detailed information, refer to the following resources:

· 4 min read
DahnM20

AI-Flow is a tool designed to simplify and automate your AI workflows by connecting various services and tools into a unified flow. This guide will help you get started with AI-Flow, including adding nodes, connecting them, and customizing your workspace for an optimized workflow.

Adding and Connecting Nodes

To build your AI workflow, nodes can be added to the canvas using a simple drag-and-drop interface. Here's a quick overview of how to manage nodes:

  • Handles: In AI-Flow, input and output connections are visualized through handles:
    • Round handles represent input connections.
    • Square handles represent output connections.
  • Handle Color Coding:
    • Blue input are optional.
    • Red input are mandatory and must be connected (or filled) for the node to function.

For some nodes, values can either be entered directly into the field or provided through a handle. If a handle is connected to a field, the input field disappears, leaving only the handle.


Example Node connection

Here’s a basic example:

  • Both methods yield the same result.
  • The context field is optional, allowing the node to function without it.
  • The prompt field is mandatory and must be either filled in or connected to another node.

Types of Nodes

AI-Flow offers a wide variety of nodes to suit different needs. Below is a general overview of the node categories:

  • Inputs: Nodes that bring external data into your flow.
  • Models: These nodes connect to AI models provided by services such as OpenAI, StabilityAI, and Replicate.
  • Tools: Nodes designed to manipulate data and structure your workflow.
  • API Builder: These nodes enable your flow to be accessed via API calls. Learn more about this feature in the API Builder documentation.

To dive deeper into the functionality of a specific node, use the help action within the node for detailed descriptions, demos, and related resources.

Help Action

File Upload Node

The File Upload node is used to upload a file into the workflow. The node returns a URL that links to the uploaded file.

It's important to note that if you upload a PDF file, the output of the File Upload node will not contain the text content of the PDF itself. To extract the text from the document, follow the upload with a Document-to-Text node, which will process the file and return its text content.

File Upload Node

Opening the Right-Side Pane

Help Action

The right-side pane in AI-Flow provides additional functionality to enhance your workflow management. Here’s what you can do when the pane is open:

  • View Outputs: See a comprehensive list of all outputs generated by the nodes in your flow.
  • Edit Nodes: Directly edit any selected node, even if the node is minimized on the canvas.
  • Disable Auto-Save: Choose to disable the automatic cloud save feature if preferred.
  • Save and Import Flows: You can save your current flow as a .json file for future use or import a previously exported flow.
  • API Management: Manage your API settings and configurations directly from this pane.

This feature is essential for keeping your workflow organized and accessible while providing quick access to critical actions.

Customizing Your Experience

You can tailor the AI-Flow interface to fit your needs:

  • Access the settings to customize which nodes are displayed on the app.
  • The minimap can be toggled on or off to suit your preference.

Note that new nodes may be added over time but may not appear by default. Stay updated with news on the Home page and adjust your display settings to include any newly added nodes that fit your workflow.

Additional Resources

For more detailed information, refer to the following resources:

· 2 min read
DahnM20

AI-Flow empowers users to automate complex AI workflows by connecting various tools, models, and data sources. Through the Replicate Node in AI-Flow, you can easily access, select, and utilize models from Replicate to enhance your AI workflows.

Replicate Node Overview

The Replicate Node in AI-Flow serves as a gateway to a multitude of open-source AI models available on the Replicate platform. Replicate allows community members to host and run models in the cloud, and AI-Flow makes it simple to integrate these models into your workflows.

With the Replicate Node, you gain access to a wide variety of models, including text generators, image creators, video processors, and more.

Example Node connection

Spotlight Models and Categories

AI-Flow’s Replicate Node features a curated selection of the most popular models to help users get started efficiently. These "spotlight" models are displayed in the interface for easy access. However, the complete Replicate catalog offers a vast array of additional models that cannot be fully represented within the interface. If you require a specific model not listed, you can easily search for it on the Replicate website and integrate it into AI-Flow by entering the model's ID.

Model Popup

The categorized interface allows for quick navigation, whether you're seeking models for text generation, image creation, or other specialized tasks. However, not all models are fully compatible with AI-Flow due to the diversity in functionality and support across community-hosted models. Despite this, the Replicate Node is designed to make the integration process as seamless as possible, ensuring that you can leverage a wide range of models efficiently within your workflow.

· 4 min read
DahnM20

Unleashing the Power of AI Workflow with API Builder Nodes

Streamlining and integrating AI workflows is now more accessible with the advanced capabilities of the AI-Flow API. By leveraging the API Builder, developers can create robust AI flows, ensuring seamless integration and interaction between various AI models like GPT, DALL-E, Claude, Stable Diffusion, or any Replicate model. This article delves into the core features of the AI-Flow API Builder, demonstrating its benefits and ease of use.

API Builder Overview

Streamline Your AI Flow with API Input and Output Nodes

API Input Node: The API Input Node is designed to define the inputs for your API, mapping each field in the request body to a corresponding node in your flow. By setting default values, developers can make certain parameters optional.

API Input Node Example

Example Configuration:

{
"my_prompt": "Lorem Ipsum",
"my_context": "Lorem Ipsum"
}

This configuration showcases how inputs are structured, making it straightforward to initiate the flow with clear, defined parameters.


API Output Node: Configuring the API Output Node is very simple. This node specifies the names of the fields in the final response, ensuring the output is structured and understandable. Multiple output nodes can be set to pass additionnal or intermediate results.

API Output Node Example

In this simple example, the API response will be formatted as followed:

{
"my_output": "Lorem Ipsum dolor sit amet, consectetur"
}

This example demonstrates the simplicity of output configuration, providing a clear and concise response structure.

Manage and Monitor Your API with the API Builder View

The API Builder View is your command center for managing and monitoring your AI Workflow API. Accessible through the right pane of the app, this view provides a comprehensive overview of your API configuration, allowing you to generate and manage API Keys seamlessly.

API Builder View

Generating API Keys: To ensure secure access, API Keys are generated within the API Builder. These keys, essential for authorizing requests, are displayed only once to maintain security. Including these keys in your requests as an Authorization header is crucial for successful API calls.

Running Your Flow through the API: Launching your flow is straightforward with the provided code snippets in the API Builder View. For instance, using cURL, you can initiate your flow as follows:

curl https://api.ai-flow.com/v1/flow/<your_flow_id>/run \
-H "Content-Type: application/json" \
-H "Authorization: Bearer $AI_FLOW_API_KEY" \
-d '{
"my_prompt": "Lorem Ipsum",
"my_context": "Continue my sentence with 5 words of lorem ipsum"
}'

This command initiates the flow, returning a run ID to track the process. Retrieve the results using this ID once the processing completes.

Enhance Integration with Webhook Nodes

The Webhook Node is a versatile tool within the API Builder, enabling you to send outputs to designated URLs. Configuring the Webhook Node involves specifying the target URL and selecting the outputs to send, with the option to include custom signatures for enhanced security.

Webhook Node Example

In this case, the webhook will send the following data :

{
"my_output": "Lorem Ipsum dolor sit amet, consectetur"
}

In this configuration, the Webhook Node sends structured data to the specified URL, ensuring smooth integration and authentication via custom signatures.

Conclusion

The AI Workflow API, powered by the API Builder Nodes, offers a streamlined, efficient way to create and manage AI flows. With intuitive nodes for input and output, API management tools, and flexible webhook configurations, developers can build powerful AI workflows tailored to their needs.

Additional Resources

For more detailed information, refer to the following resources:

· 4 min read
DahnM20

Generate Consistent Characters Using AI: A Comprehensive Guide

Are you looking to create consistent and cohesive characters in your AI-generated images? This guide will walk you through practical methods to achieve uniformity in your AI character generation, part of our broader challenge on How to Automate Story Creation.

The Challenge of Consistent AI Image Generation

AI-powered image generation is a powerful tool, but it often introduces a level of randomness. This means you might need to generate images multiple times to get a convincing result. This guide doesn't present state-of-the-art techniques but rather shares my own experiments to help you achieve more consistent character images.

While the methods discussed are not foolproof, they represent a series of experiments that can guide you in developing your own approach to consistent AI character generation.

Method 1: Precise Prompt Descriptions

One of the keys to successful image generation is crafting high-quality prompts. If your descriptions are precise and consistent, you’re more likely to achieve similar results across multiple images.

Given our challenges with precision, we’ll use AI to assist in generating detailed descriptions. For example, I started with an image previously generated and asked ChatGPT to describe it accurately. This description was then used as a prompt for Stable Diffusion 3.

First Generation

Despite some similarities, the AI missed certain details, such as the character's age. By updating the prompt to specify that the character is 16 years old, we achieve better consistency.

Second Generation

In this iteration, the AI misinterpreted the hair color due to lighting effects in the original image. Using StabilityAI’s Search and Replace feature, I swapped red hair for brown hair and refined the description.

Third Generation

Here's a quick fix for the character's pet, again using the Search and Replace feature.

Fourth Generation

With the revised prompt, including specific details about hair color and other features, the results are more consistent at the beginning in the new iteration.

Method 2: Creating a Consistent Face Template

Once you have a consistent character concept, ensuring the face remains consistent across different angles and expressions can be challenging. To address this, create a clear face template that can be used to correct other images.

Using the same method, generate a close-up portrait of the character:

Portrait Generation

Next, use models like fofr/consistent-character with the Replicate Node to generate various face angles. This model helps maintain consistency in facial features across different poses.

Face Angle Generation

Although we lost some of the digital painting fantasy vibe, the model ensures facial consistency, which can be invaluable for face-swapping in illustrations. We can maybe find a way to reintroduce it later.

Conclusion and Next Steps

This guide provides a starting point for achieving consistency in AI-generated characters. By refining prompts and creating consistent face templates, you can produce more cohesive and believable character images.

Stay tuned for Part 2, where we’ll explore additional methods to refine and complete your character generation process.

Start experimenting with these methods today using AI-FLOW.


By incorporating these strategies, you’ll be on your way to mastering consistent character generation in AI. For more in-depth techniques and examples, be sure to follow our blog and check out the next part of this series.

· 4 min read
DahnM20

How to Automate Story Creation Using AI-FLOW - Part 2

This is the second installment of our challenge on How to Automate Story Creation.

In this part, we will focus on building a chapter and automating illustration generation.

Writing the First Chapter

In the previous part, we have created a plan of the story with three chapters, and a small summary for each. We could split the plan into three chunks, but for simplicity, I'll keep chapters as a single block. This approach helps GPT maintain the story's context, ensuring continuity between chapters without introducing conflicting elements.

When writing your chapter, it is important to remind GPT of the desired tone, the target audience, and how you want the story to be told. You might prefer more dialogue or perhaps more descriptions. This choice is up to you.

I’ve used a basic prompt that emphasizes important elements, but please note that this is just a simple example.

Here’s the prompt I used for the first chapter:

Write the first chapter of this short story intended for a 12-year-old audience.

  • Tone: Maintain a light-hearted, engaging, and adventurous tone. The story should be exciting and filled with wonder, suitable for young readers.
  • Language: Use simple and clear language. Avoid complex vocabulary and ensure that sentences are easy to follow, yet vivid enough to spark imagination.
  • Dialogue: Craft natural and relatable dialogue for pre-teens. Ensure conversations are lively and reflect the age and personality of the characters.
  • Pacing: Keep the chapter fast-paced and captivating to hold the reader's attention. Introduce key elements of the story quickly to hook the audience from the beginning.
  • Descriptions: Use vibrant and imaginative descriptions to paint a clear picture of the scenes and characters. Aim for language that is evocative but not overly detailed or intricate.
  • Length: Keep the chapter concise, focusing on introducing the main elements of the story without overloading the reader with too much information.

Extracting Interesting Scenes

From the chapter, we will identify the most interesting scenes to illustrate:

Based on this chapter, identify 3 interesting elements that would be compelling to illustrate. Provide each element as a short phrase, separated by semicolons. Do not add any additional comments.

Output:

Eryn and Frostbite navigating the icy forest; The scarlet dragon scale above the fireplace; The Crystal Caves glimmering in the distance.

Next, use the Data Splitter to treat each element individually.

Split the concepts

Creating Visual Prompts

Once the concepts are split, use the Merge Node to create an illustrated prompt based on the specific scene and the overall essence of the story. If your essence is good enough, it should include character descriptions, important places, concepts, and the desired art style. This helps to get consistent visual prompts.

Here we are using the "Merge + GPT" mode, so that the merge result is directly send as a prompt to GPT.

Example Prompt:

Based on this story description: ${input-2}

Create a visual prompt for DALL-E emphasizing this element for a given scene: ${input-1}

IMPORTANT: Respond with only the visual prompt. Do not add any other text, title, comments, or explanations.


Ensure GPT understands to focus on the current element to avoid depicting the entire story/chapter.

Repeat this process for each scene. You can duplicate your node.

Illustrate story element

Here are my results for "The Crystal Caves" and "The scarlet dragon scale above the fireplace". Note that GPT added the main characters in the first one, based on the essence.

Advanced Tips

Also, consider adding a negative prompt to tools like Stable Diffusion 3 to refine the results. For example, adding "realistic" as a negative prompt can steer the generation away from realism if that’s not desired.

When merging, make sure GPT prioritizes the current element over the entire story to maintain focus.

Conclusion

Creating a story is a complex project. Even with perfect prompts, proceed step by step to ensure smooth progress. This guide provides a logical flow for using AI-FLOW to aid in your story creation. In the next part, we will explore ways to create consistent visuals for our characters.

Start your journey with AI-FLOW now!

Overall flow

Stay tuned for the next part where we delve into character visual consistency.