
7 posts tagged with "AI Tools"

View All Tags

· 5 min read
DahnM20

FLUX 1.1 Pro: A Comprehensive Guide

FLUX 1.1 Pro, the latest advancement in generative AI technology developed by Black Forest Labs, is now available through the Replicate Node in AI-FLOW. In this guide, we'll explore how FLUX 1.1 Pro can revolutionize your projects, how to run it, and how it compares to other popular models like its predecessor, FLUX Pro, and Stable Diffusion 3.

Why Choose FLUX 1.1 Pro?

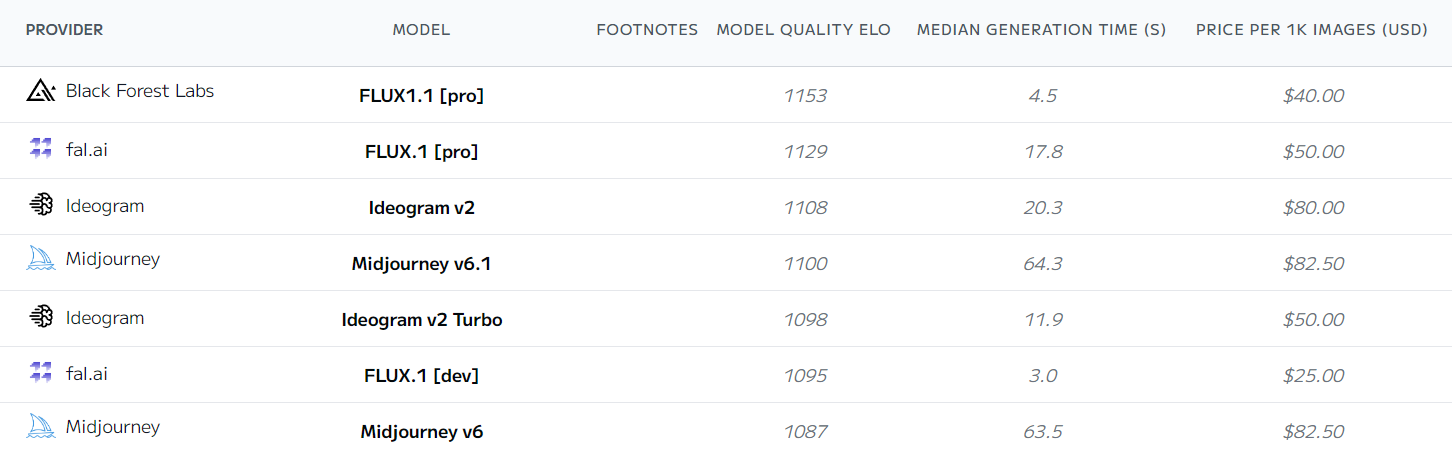
FLUX 1.1 Pro is three times faster than FLUX Pro, offering significant improvements in image quality, prompt adherence, and diversity. It sets a new standard in AI-driven image creation, making it an excellent choice for both seasoned developers and beginners across a range of applications. FLUX 1.1 Pro is currently the best text-to-image model available.

OCR Workflow with Amazon Textract

Source: Artificial Analysis

Comparing FLUX 1.1 Pro to FLUX Pro and Stable Diffusion

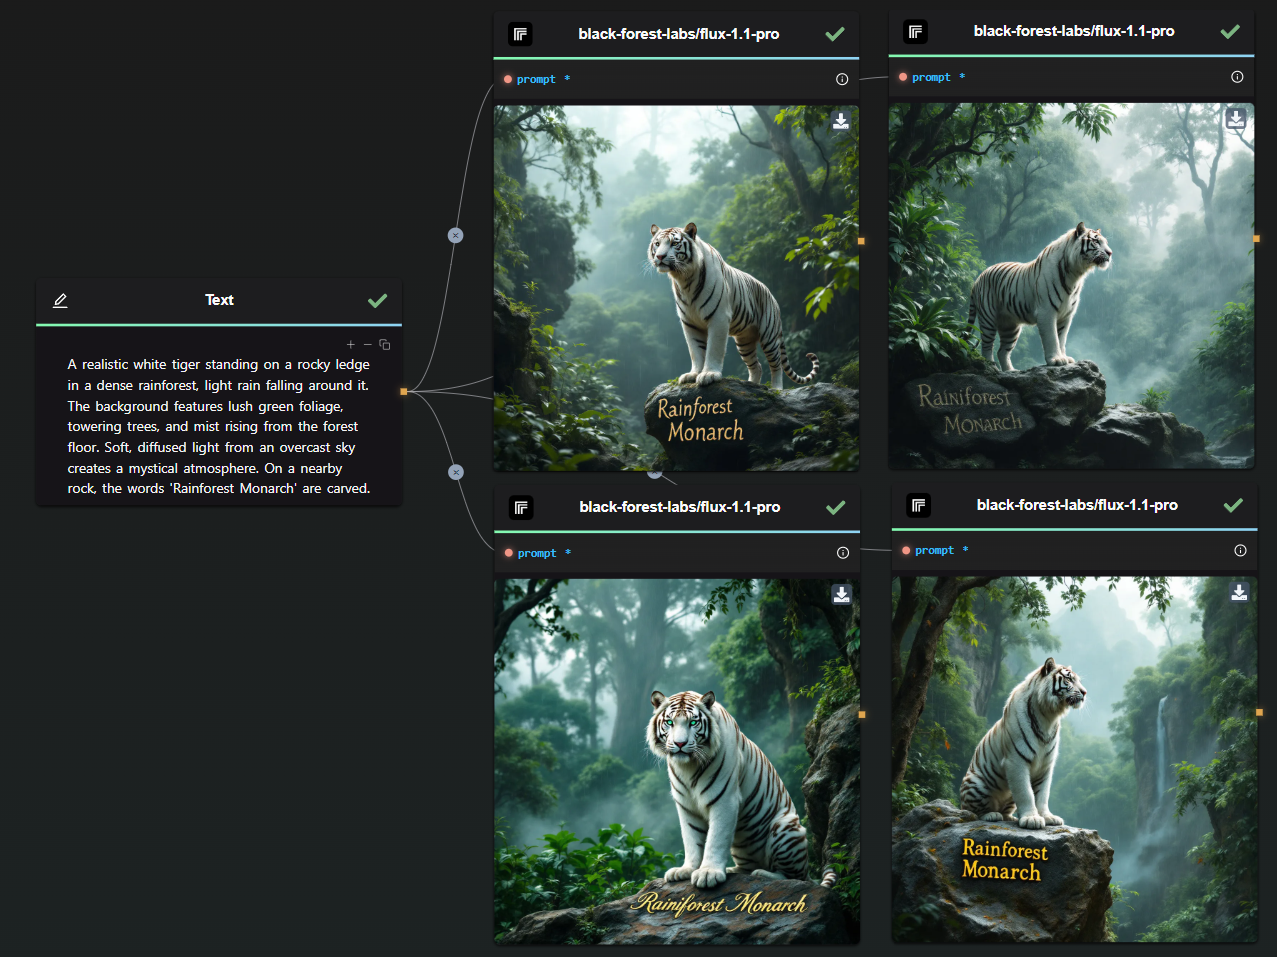
Choosing an AI model requires understanding how it measures up to other available options. Let’s use a sample prompt to illustrate the capabilities of these models:

A realistic white tiger standing on a rocky ledge in a dense rainforest, light rain falling around it. The background features lush green foliage, towering trees, and mist rising from the forest floor. Soft, diffused light from an overcast sky creates a mystical atmosphere. On a nearby rock, the words 'Rainforest Monarch' are carved.

This prompt provides enough elements to thoroughly evaluate each model's precision and creativity.

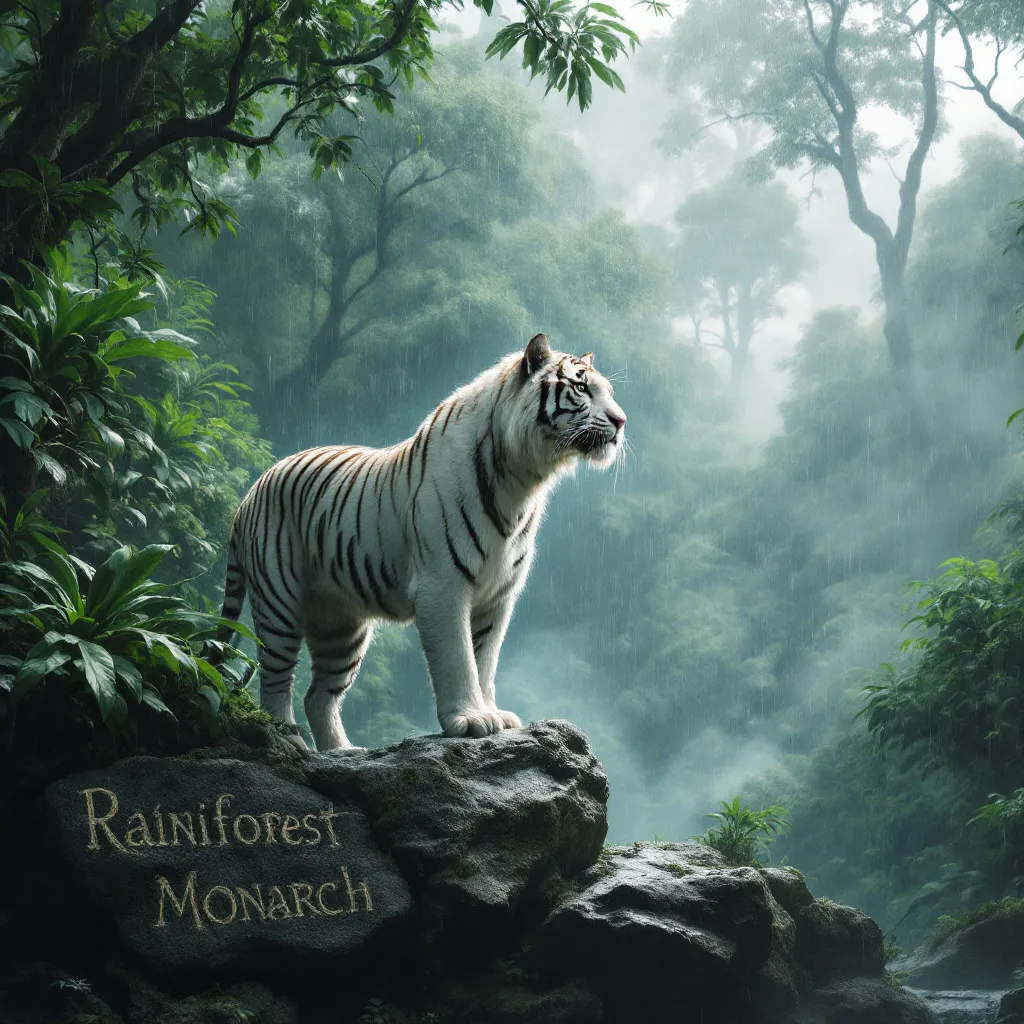
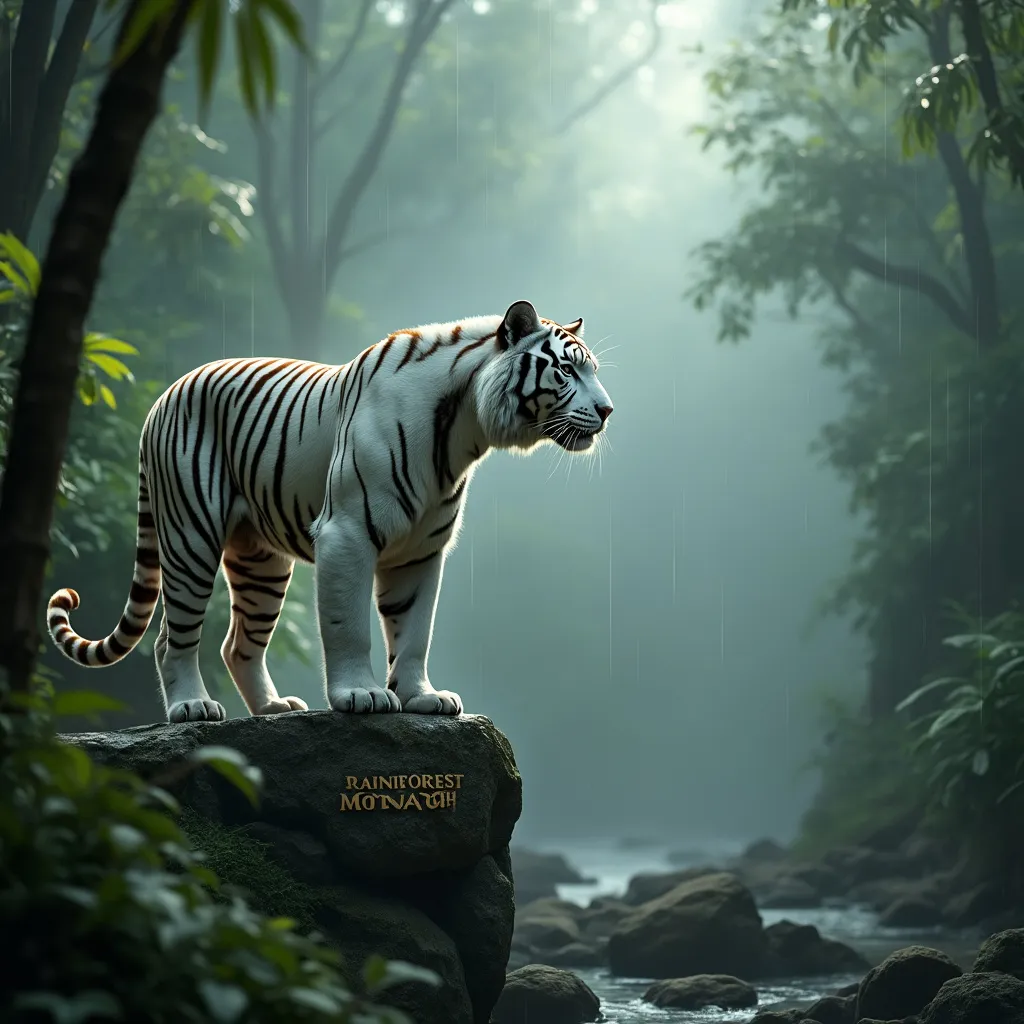
FLUX 1.1 Pro vs. FLUX Pro

In the comparison below, FLUX 1.1 Pro is at the top, while FLUX Pro is at the bottom.

OCR Workflow with Amazon Textract

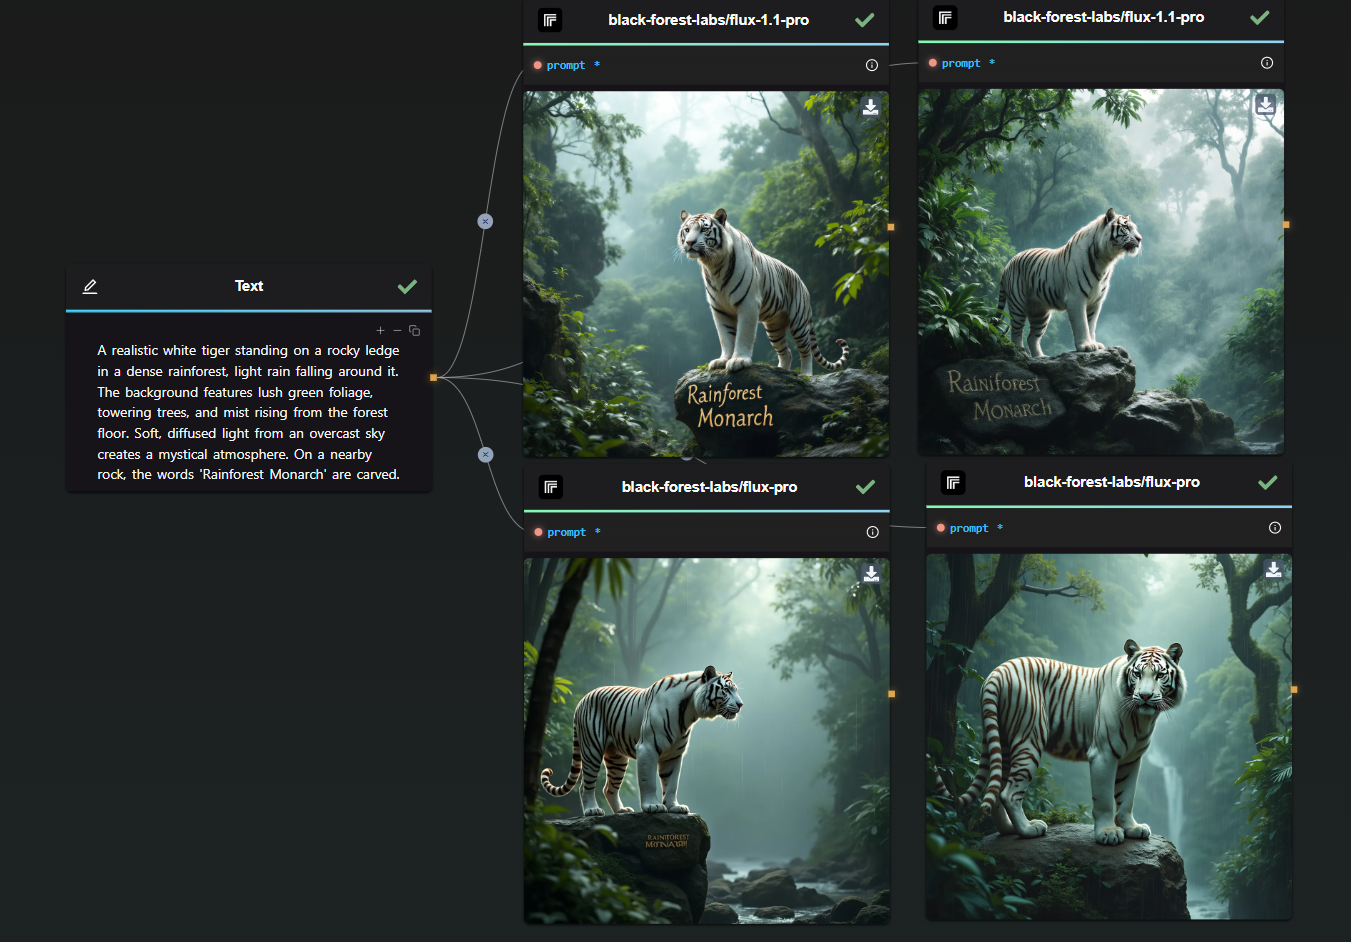
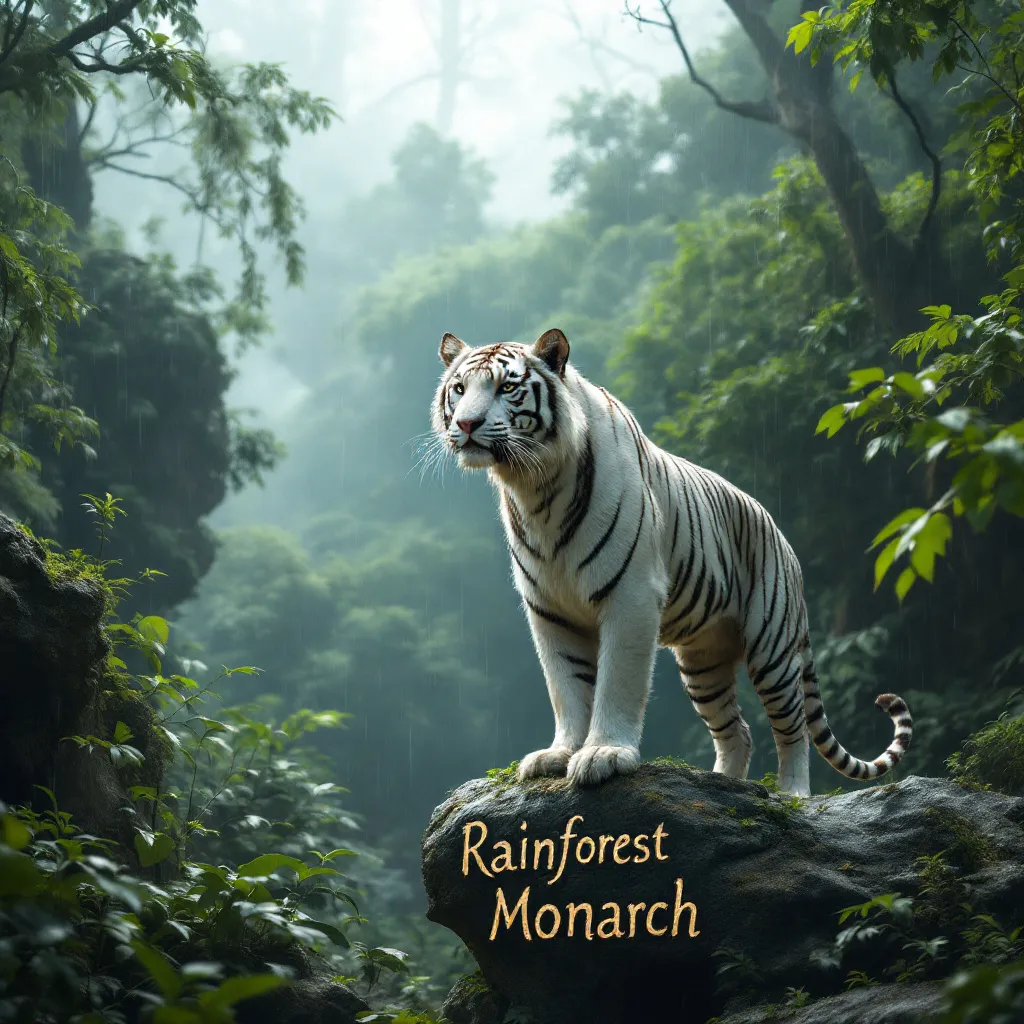
The difference is clear: FLUX 1.1 Pro generates a more realistic-looking tiger with a richly detailed background, resulting in a more immersive scene. FLUX Pro, on the other hand, missed the text prompt in one of its generations.

Note: Each model was given a single attempt—no retakes, no cherry-picking.

  • Speed: FLUX 1.1 Pro is three times faster than FLUX Pro, making it the ideal choice for time-sensitive projects.

  • Image Quality: Improved prompt adherence and diversity mean FLUX 1.1 Pro produces superior images compared to FLUX Pro.

  • Cost: Priced at just 4 cents per image, FLUX 1.1 Pro offers a cost-effective solution for high-quality image generation.

  • Prompt Upsampling: FLUX 1.1 Pro includes an optional prompt upsampling feature for enhanced image generation. (not enabled for the test)

  • Custom Ratios: It allows more flexibility in aspect ratio customization than its predecessor.

    FLUX 1.1 First GenerationFLUX 1.1 Second Generation
    FLUX Pro First GenerationFLUX Pro Second Generation

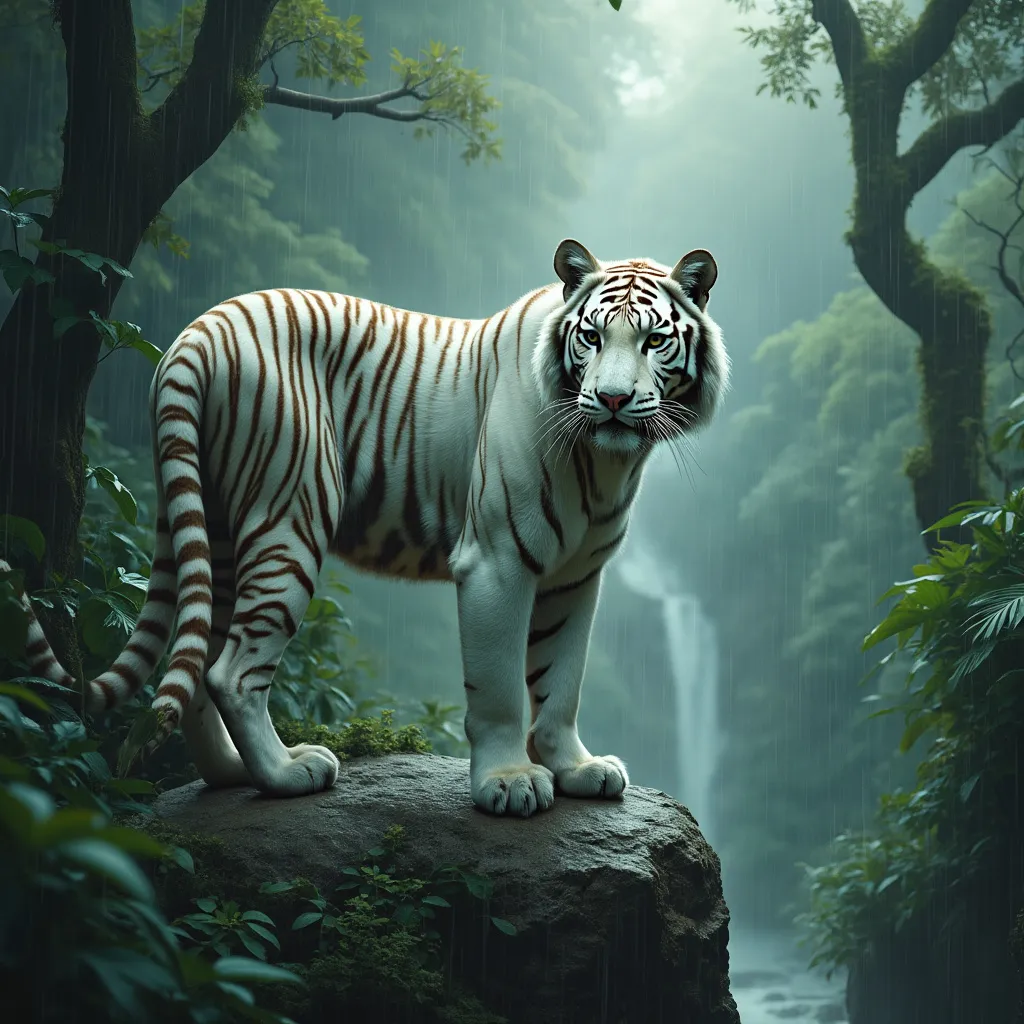
FLUX 1.1 Pro vs. Stable Diffusion 3 Large

OCR Workflow with Amazon Textract

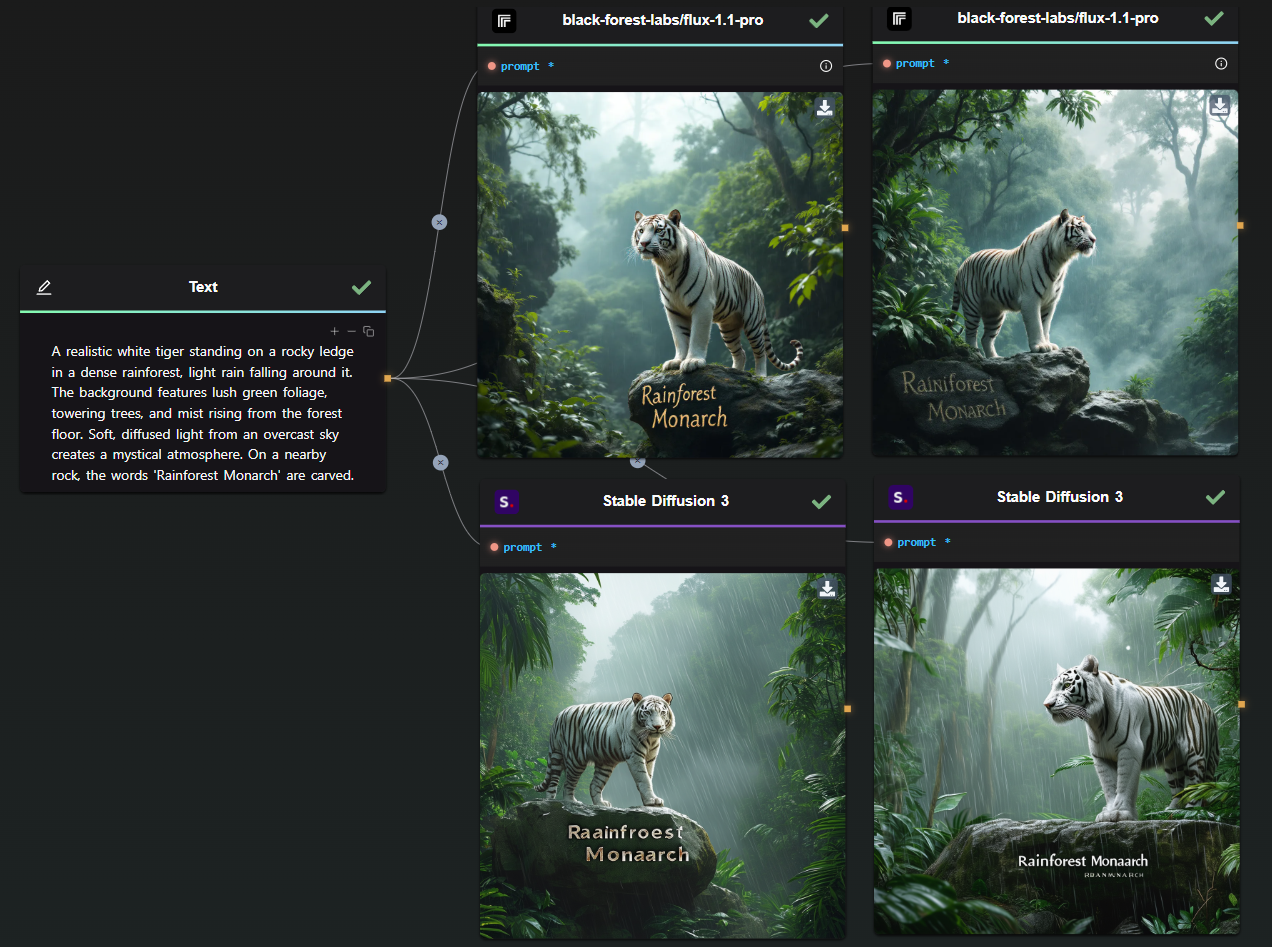
Again, this was a one-shot generation for each model. The results speak for themselves—FLUX 1.1 Pro significantly outperforms Stable Diffusion 3.

  • Performance: FLUX 1.1 Pro is faster and generates higher-quality images, especially in high-resolution settings.
  • Customization: Offers advanced customization options, providing greater control over output compared to Stable Diffusion.
  • Limitations: FLUX 1.1 Pro currently lacks an image-to-image feature.
  • Overall Quality: FLUX 1.1 Pro consistently delivers more precise and visually appealing results.

FLUX 1.1 Pro with Prompt Upsampling

For curiosity’s sake, here’s a comparison with prompt upsampling enabled:

OCR Workflow with Amazon Textract

By analyzing the outcome, we can infer what has been added during the upsampling process:

First Image: The focus here is on the tiger's deep, unrealistic teal eyes, giving it a mythical quality. There is a new kind of brown texture on the rock, making it appear less perfect and more integrated into the environment. I also suspect that the upsampling added the large tree in the background.

Second Image: In this version, the tiger's position appears more defined. I believe the upsampling introduced the waterfall in the background, as well as the silhouette of a mountain. Additionally, the area around the tiger's head is less cluttered, making it the focal point in the now more open space. The rock also features additional texture.

In conclusion, prompt upsampling is a fascinating tool that can add significant detail, realism, and improved composition compared to a standard prompt used by someone less experienced. However, the downside is the unpredictability of the direction in which upsampling will take the image.

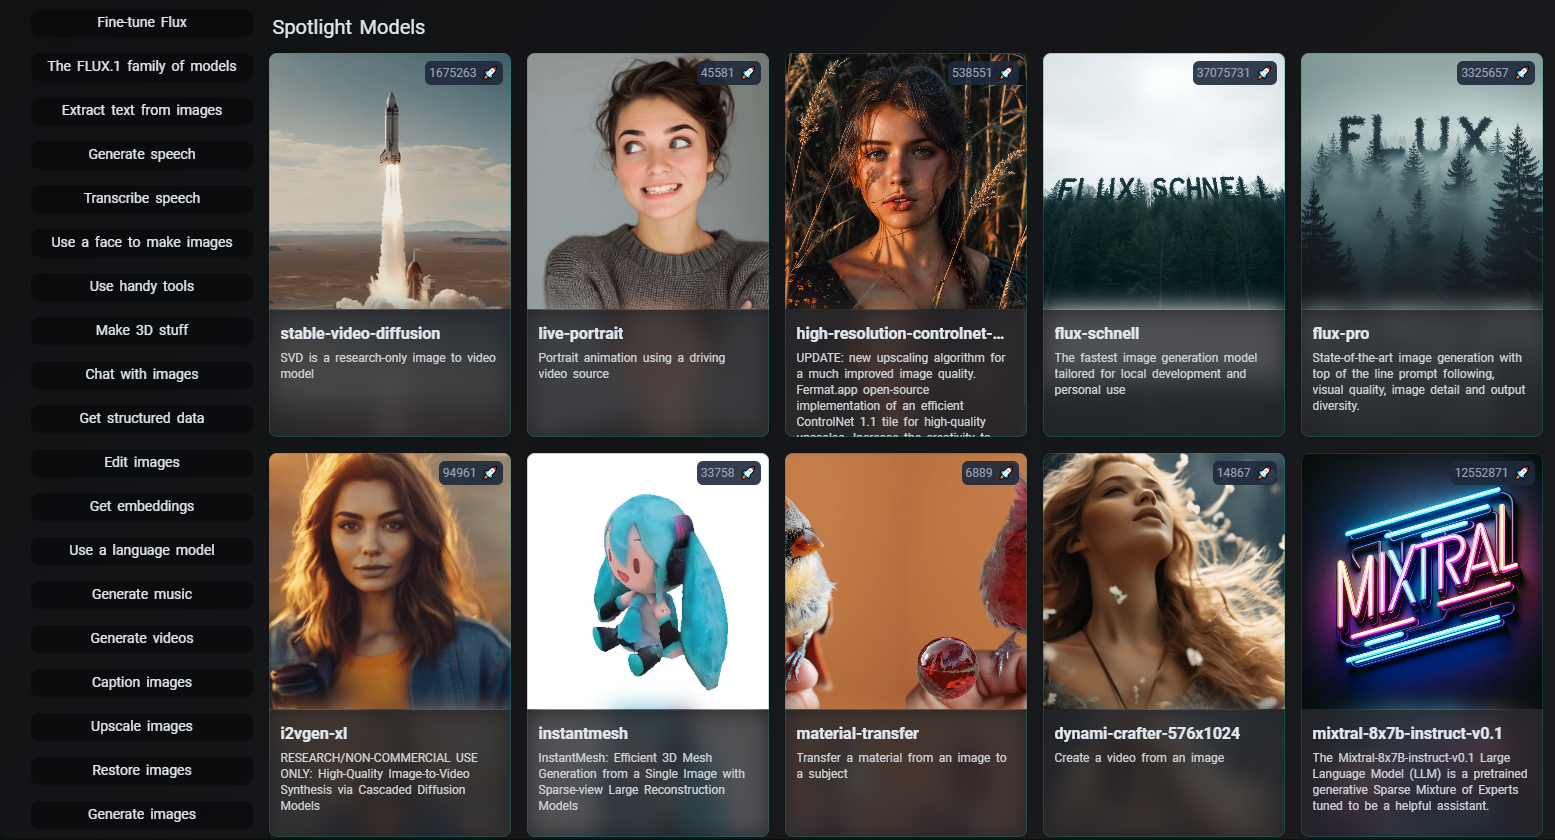
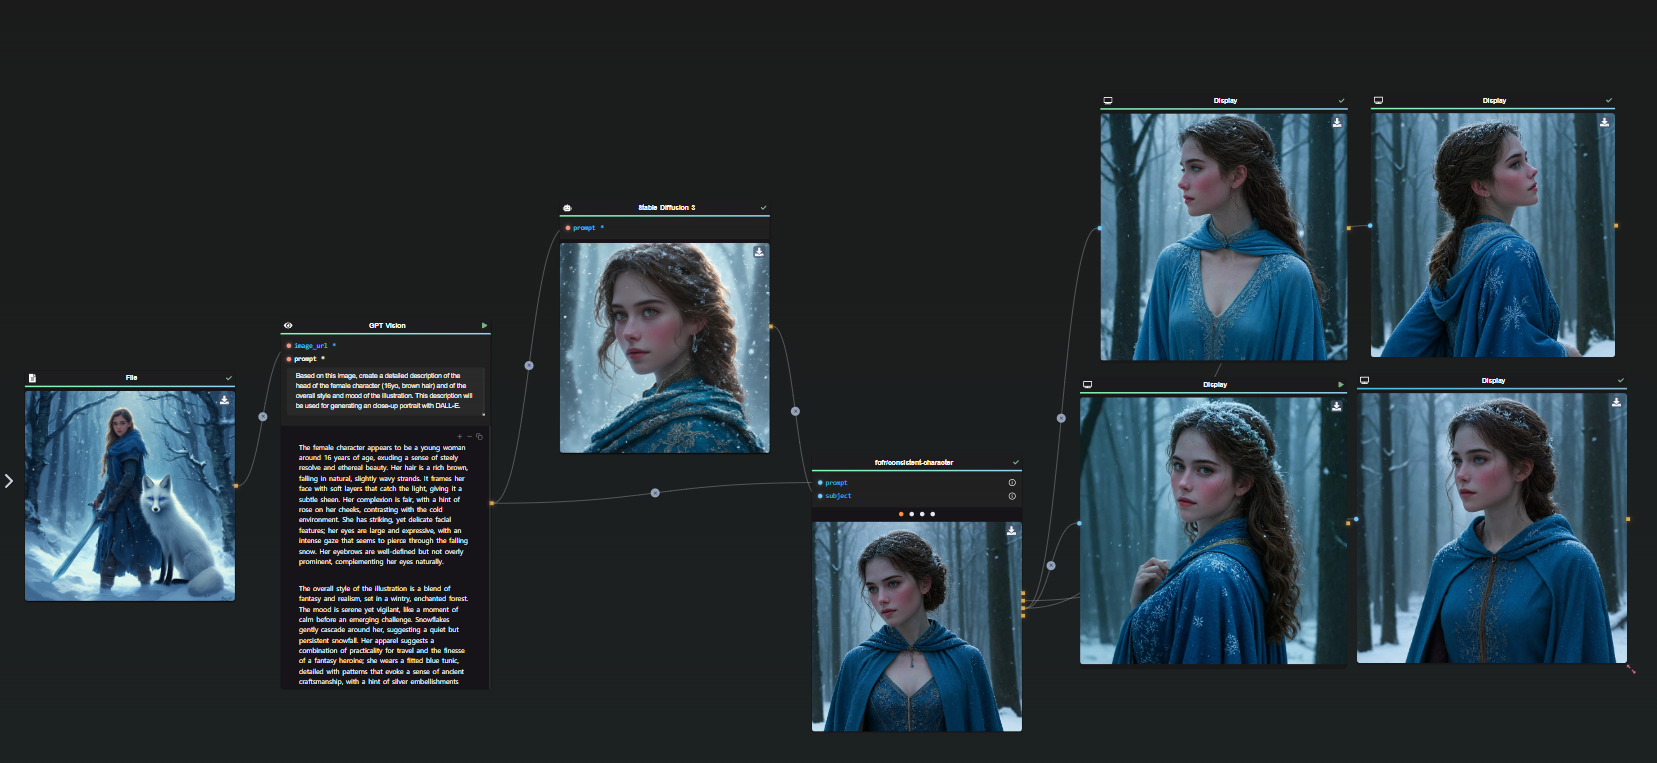
Start Using FLUX 1.1 Pro in Your Workflows with AI-FLOW

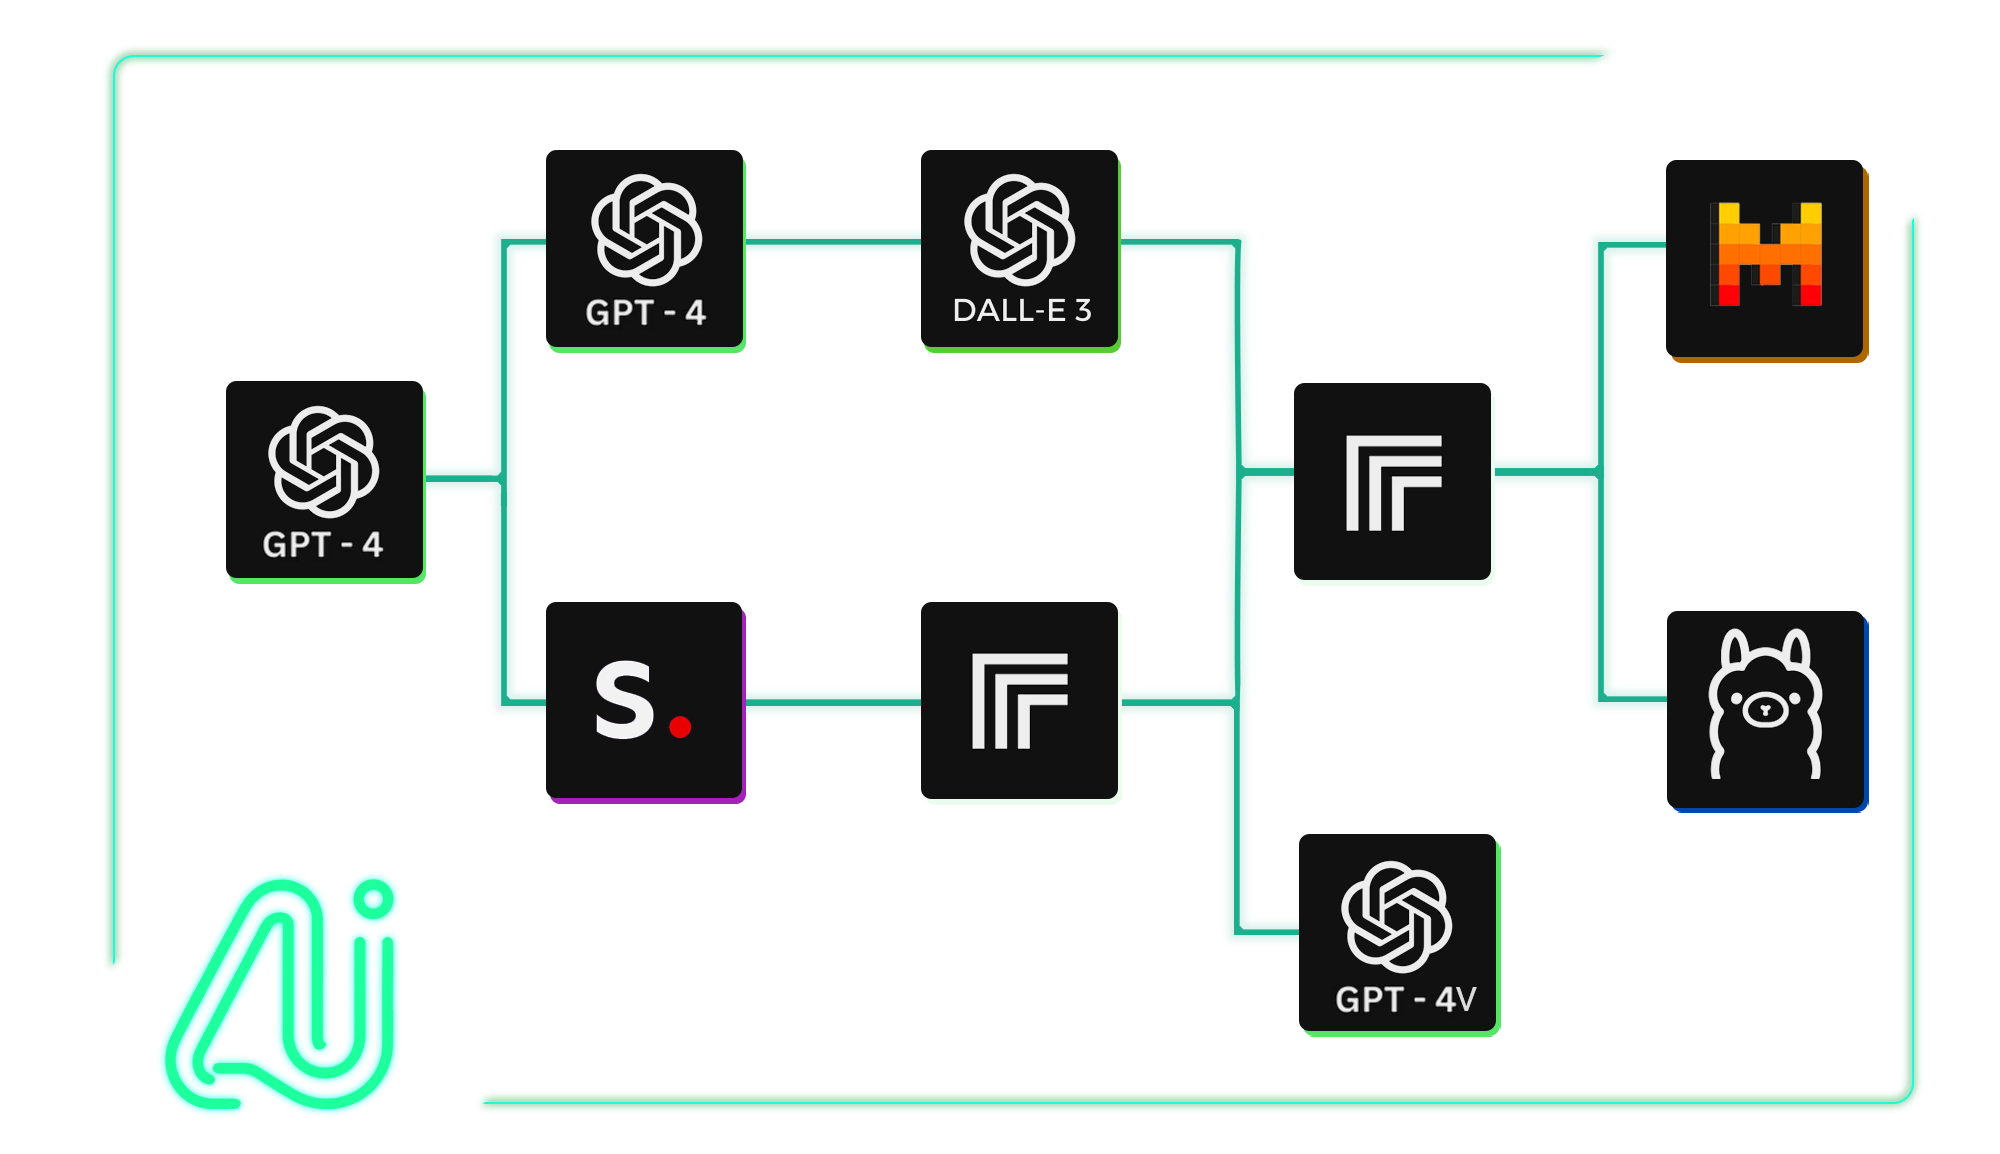
AI-FLOW is a powerful platform where you can connect multiple AI models seamlessly, automate processes, and build custom AI tools without extensive coding knowledge. Whether you’re automating content creation, experimenting with various AI models, or managing data, AI-FLOW has the tools you need to streamline your projects.

You can easily experiment with FLUX 1.1 Pro by using the Replicate Node in AI-FLOW. Simply drag the node into your workflow and start generating stunning images in seconds.

Ready to Transform Your Projects with FLUX 1.1 Pro?

Get started for free and explore the potential of FLUX 1.1 Pro by visiting AI-Flow App. Unleash your creativity and take your projects to the next level with the power of AI-driven image generation!


Additional Resources

For more detailed information, refer to the following resources:

· 4 min read
DahnM20

Generate Coloring Book Pages with AI: A Step-by-Step Guide

Coloring books are universally beloved, offering a unique blend of creativity and relaxation. With AI-Flow, creating intricate and imaginative coloring book pages is now easier than ever, whether you are an artist, a publisher, or simply a coloring book enthusiast. This article will walk you through how to leverage the AI-Flow template specifically designed for generating black-and-white illustrations suitable for coloring books.

What is AI-Flow?

AI-Flow is an open-source platform that allows users to build and manage AI workflows through a simplified drag-and-drop interface. This tool integrates multiple AI models, enabling you to create custom AI tools for a variety of tasks without extensive coding knowledge.

Generating Coloring Book Pages

The Template in Focus

The provided template in AI-Flow, "Generate coloring book pages" allows users to produce detailed and imaginative visual concepts perfect for coloring book pages. This template brings together the power of several AI models to deliver high-quality, intricate line work that can be customized and tailored to your needs.

Template How To Create Coloring Book Pages

Key Capabilities

1. Integration of Multiple AI Models

The template leverages the integration of advanced AI models like GPT-4o and FLUX Schnell. These models work in harmony to produce descriptive prompts and then render those prompts into beautiful, cohesive black-and-white illustrations suited for coloring.

2. Drag-and-Drop Functionality

Using AI-Flow's intuitive drag-and-drop interface, you can easily set up your workflow. Connect nodes representing different AI functions and models, adjust settings, and view real-time outputs. This functionality makes designing a breeze, even for those without a technical background.

Steps to Create Your Coloring Book Pages

  1. Select the Template: Choose the "Generate Coloring Book Pages" template from AI-Flow's template library.

  2. Customize Your Prompts: Tailor the GPT node prompt to match your envisioned coloring book theme. For example, you can describe whimsical forest scenes, underwater adventures, or magical gardens.

  3. Run the Workflow: Once your prompt is set, run the workflow. The AI models will create three image descriptions and generate high-quality illustrations rendered in intricate line work.

  4. Review and Edit: Review the generated illustrations. AI-Flow allows you to relaunch nodes individually if needed to ensure the output perfectly fits your vision.

  5. Save and Export: Save your completed illustrations. These can be directly uploaded to your coloring book project, ready for printing or digital sharing.

Coloring book page generated

Customization and Enhancement

  • Generate More Pages at Once: Update the GPT node prompt to generate five detailed visual concepts.
  • Experiment with Other Image Generators: Try using Stable Diffusion 3, DALL-E 3, or Flux Pro instead of FLUX Schnell.
  • Experiment with Prompts: Play around with different descriptive prompts to see varying results and find the best fit for your creative project.
  • Incorporate Additional Data: Upload external images and use GPT Vision to describe them to have a base for other generations.
  • Upscale Your Images: Use the Replicate Node to access an image upscaler like Real-ESRGAN.

Template Customized

Conclusion

Creating a coloring book has never been this simple and effective. With AI-Flow, you can generate exquisite, detailed, and imaginative coloring book pages effortlessly. This user-friendly platform empowers you to bring your creative ideas to life, whether for personal enjoyment or commercial publication.

Ready to start your colorful journey? Explore AI-Flow now and generate your first coloring book pages today!


By leveraging AI-Flow’s comprehensive and user-friendly tools, you can transform your creative processes and produce stunning, tailor-made outputs that reflect your unique artistic vision. Embrace the power of AI-Flow and let your creativity flourish!

· 6 min read
DahnM20

Build and Deploy AI Workflows with AI-Flow

In today's rapidly evolving technological landscape, artificial intelligence (AI) is at the forefront of innovation. However, building custom AI tools often requires integrating multiple AI models or tools, which can be a daunting task, especially for those without extensive coding experience.

AI-Flow is a platform designed to simplify the process of building and deploying AI workflows. With its intuitive drag-and-drop interface, AI-Flow allows users to connect various AI models seamlessly and automate complex tasks with ease. In this article, we'll explore how to build and deploy AI workflows using AI-Flow, highlighting its key features and the API Builder for deployment.

Integrate Multiple AI Models

Getting Started with AI-Flow

What is AI-Flow?

AI-Flow is both a platform and an open-source tool that enables users to create custom AI tools through a simple drag-and-drop interface. It supports a wide range of AI models. Whether you're looking to generate images, summarize content, or automate workflows, AI-Flow provides the tools you need to get started quickly and efficiently.

Key Features of AI-Flow

  • Integrate Multiple AI Models Seamlessly: Combine AI models like GPT-4, Claude, and all the models hosted on Replicate and StabilityAI, among many others, for innovative outcomes.
  • Drag-and-Drop Interface: Create AI tools in minutes without any coding.
  • Customizable AI Solutions: Tailor AI solutions to your specific needs, from SEO content creation to image generation.
  • API Builder: Automate inputs and retrieve outputs via API requests or webhooks, making it easy to integrate AI workflows into your projects.

Building AI Workflows with AI-Flow

Step 1: Creating Your First Workflow

Once you have AI-Flow set up, you can start creating your first workflow:

  1. Open the AI-Flow Interface: Launch the AI-Flow application and navigate to the workflow builder.
  2. Drag and Drop Nodes: Select the AI models you want to use from the available nodes and drag them into the workflow area.
  3. Connect Nodes: Connect the nodes to define the flow of data between them. For example, you can connect a text generation model like GPT-4o to an image generation model like FLUX Pro.
  4. Configure Nodes: Customize the parameters for each node to suit your specific requirements. This might include setting prompts for text generation or specifying styles for image creation.

Step 2: Running Your Workflow

  1. Run the Workflow: Click the "Run" button to execute your workflow within the AI-Flow interface.
  2. Review Outputs: Check the outputs generated by each node to verify that they meet your expectations.
  3. Make Adjustments: If necessary, adjust the parameters or connections between nodes to refine your workflow.

Workflow Output Example

Optional: Start with a Template

AI-Flow comes with various templates, inspired by user feedback. These templates can be easily customized or used as a way to discover the features of the app.

Start with a template - AI Flow

Deploying AI Workflows with the API Builder

This is an optional feature, designed for those looking to integrate their workflow into an external project.

What is the API Builder?

The API Builder is a powerful feature within AI-Flow that allows you to automate inputs, execute workflows with REST API calls, and handle outputs efficiently with webhooks. This makes it easy to integrate your AI-powered workflows into any project, whether it's a web application, mobile app, or backend service.

Step 1: Configuring API Input and Output Nodes

To deploy your workflow via the API Builder, you'll need to use the API Input and Output nodes:

  1. API Input Node: Define the inputs for your API by mapping each field in the request body to a corresponding API Input node in your workflow. Set default values for optional parameters.

Webhook Node Example

Example Request Body:

{
"my_prompt": "Lorem Ipsum",
"my_context": "Lorem Ipsum"
}
  1. API Output Node: Specify the names of the fields in the final response to ensure the output is structured and understandable.

Webhook Node Example

Example Response:

{
"my_output": "Lorem Ipsum dolor sit amet, consectetur"
}

Step 2: Generating API Keys

To ensure secure access to your workflow, generate API keys within the API Builder. These keys are essential for authorizing requests and are displayed only once for security purposes.

Step 3: Running Your Workflow via API

With your API keys in hand, you can now run your workflow using REST API calls. The API Builder provides code snippets to help you get started. For example, using cURL:

curl https://api.ai-flow.com/v1/flow/<your_flow_id>/run \
-H "Content-Type: application/json" \
-H "Authorization: Bearer $AI_FLOW_API_KEY" \
-d '{
"my_prompt": "Lorem Ipsum",
"my_context": "Continue my sentence with 5 words of lorem ipsum"
}'

This command initiates the flow and returns a run ID to track the process. You can retrieve the results using this ID once the processing is complete.

Step 4: Enhancing Integration with Webhook Nodes

The Webhook Node allows you to send outputs to designated URLs, enabling real-time integration and response handling in your applications. Configure the Webhook Node by specifying the target URL and selecting the outputs to send.

Example Configuration:

{
"my_output": "Lorem Ipsum dolor sit amet, consectetur"
}

This ensures that structured data is sent to the specified URL, facilitating smooth integration and authentication via custom signatures.

Conclusion

AI-Flow simplifies the way we build and deploy AI workflows by offering an intuitive, no-code platform that simplifies the integration of multiple AI models. With its drag-and-drop interface, customizable solutions, and API Builder, AI-Flow empowers users to create and deploy AI-powered workflows effortlessly. Whether you're a beginner or an expert, AI-Flow provides the tools you need to harness the power of AI and drive innovation in your projects.

Start building your AI workflows today with AI-Flow and experience the ease and efficiency of seamless AI integration. For more information and to get started, visit the AI-Flow Application and explore the comprehensive documentation and resources available.


Additional Resources

For more detailed information, refer to the following resources:

· 4 min read
DahnM20

AI-Flow is a tool designed to simplify and automate your AI workflows by connecting various services and tools into a unified flow. This guide will help you get started with AI-Flow, including adding nodes, connecting them, and customizing your workspace for an optimized workflow.

Adding and Connecting Nodes

To build your AI workflow, nodes can be added to the canvas using a simple drag-and-drop interface. Here's a quick overview of how to manage nodes:

  • Handles: In AI-Flow, input and output connections are visualized through handles:
    • Round handles represent input connections.
    • Square handles represent output connections.
  • Handle Color Coding:
    • Blue input are optional.
    • Red input are mandatory and must be connected (or filled) for the node to function.

For some nodes, values can either be entered directly into the field or provided through a handle. If a handle is connected to a field, the input field disappears, leaving only the handle.


Example Node connection

Here’s a basic example:

  • Both methods yield the same result.
  • The context field is optional, allowing the node to function without it.
  • The prompt field is mandatory and must be either filled in or connected to another node.

Types of Nodes

AI-Flow offers a wide variety of nodes to suit different needs. Below is a general overview of the node categories:

  • Inputs: Nodes that bring external data into your flow.
  • Models: These nodes connect to AI models provided by services such as OpenAI, StabilityAI, and Replicate.
  • Tools: Nodes designed to manipulate data and structure your workflow.
  • API Builder: These nodes enable your flow to be accessed via API calls. Learn more about this feature in the API Builder documentation.

To dive deeper into the functionality of a specific node, use the help action within the node for detailed descriptions, demos, and related resources.

Help Action

File Upload Node

The File Upload node is used to upload a file into the workflow. The node returns a URL that links to the uploaded file.

It's important to note that if you upload a PDF file, the output of the File Upload node will not contain the text content of the PDF itself. To extract the text from the document, follow the upload with a Document-to-Text node, which will process the file and return its text content.

File Upload Node

Opening the Right-Side Pane

Help Action

The right-side pane in AI-Flow provides additional functionality to enhance your workflow management. Here’s what you can do when the pane is open:

  • View Outputs: See a comprehensive list of all outputs generated by the nodes in your flow.
  • Edit Nodes: Directly edit any selected node, even if the node is minimized on the canvas.
  • Disable Auto-Save: Choose to disable the automatic cloud save feature if preferred.
  • Save and Import Flows: You can save your current flow as a .json file for future use or import a previously exported flow.
  • API Management: Manage your API settings and configurations directly from this pane.

This feature is essential for keeping your workflow organized and accessible while providing quick access to critical actions.

Customizing Your Experience

You can tailor the AI-Flow interface to fit your needs:

  • Access the settings to customize which nodes are displayed on the app.
  • The minimap can be toggled on or off to suit your preference.

Note that new nodes may be added over time but may not appear by default. Stay updated with news on the Home page and adjust your display settings to include any newly added nodes that fit your workflow.

Additional Resources

For more detailed information, refer to the following resources:

· 2 min read
DahnM20

AI-Flow empowers users to automate complex AI workflows by connecting various tools, models, and data sources. Through the Replicate Node in AI-Flow, you can easily access, select, and utilize models from Replicate to enhance your AI workflows.

Replicate Node Overview

The Replicate Node in AI-Flow serves as a gateway to a multitude of open-source AI models available on the Replicate platform. Replicate allows community members to host and run models in the cloud, and AI-Flow makes it simple to integrate these models into your workflows.

With the Replicate Node, you gain access to a wide variety of models, including text generators, image creators, video processors, and more.

Example Node connection

Spotlight Models and Categories

AI-Flow’s Replicate Node features a curated selection of the most popular models to help users get started efficiently. These "spotlight" models are displayed in the interface for easy access. However, the complete Replicate catalog offers a vast array of additional models that cannot be fully represented within the interface. If you require a specific model not listed, you can easily search for it on the Replicate website and integrate it into AI-Flow by entering the model's ID.

Model Popup

The categorized interface allows for quick navigation, whether you're seeking models for text generation, image creation, or other specialized tasks. However, not all models are fully compatible with AI-Flow due to the diversity in functionality and support across community-hosted models. Despite this, the Replicate Node is designed to make the integration process as seamless as possible, ensuring that you can leverage a wide range of models efficiently within your workflow.

· 4 min read
DahnM20

Unleashing the Power of AI Workflow with API Builder Nodes

Streamlining and integrating AI workflows is now more accessible with the advanced capabilities of the AI-Flow API. By leveraging the API Builder, developers can create robust AI flows, ensuring seamless integration and interaction between various AI models like GPT, DALL-E, Claude, Stable Diffusion, or any Replicate model. This article delves into the core features of the AI-Flow API Builder, demonstrating its benefits and ease of use.

API Builder Overview

Streamline Your AI Flow with API Input and Output Nodes

API Input Node: The API Input Node is designed to define the inputs for your API, mapping each field in the request body to a corresponding node in your flow. By setting default values, developers can make certain parameters optional.

API Input Node Example

Example Configuration:

{
"my_prompt": "Lorem Ipsum",
"my_context": "Lorem Ipsum"
}

This configuration showcases how inputs are structured, making it straightforward to initiate the flow with clear, defined parameters.


API Output Node: Configuring the API Output Node is very simple. This node specifies the names of the fields in the final response, ensuring the output is structured and understandable. Multiple output nodes can be set to pass additionnal or intermediate results.

API Output Node Example

In this simple example, the API response will be formatted as followed:

{
"my_output": "Lorem Ipsum dolor sit amet, consectetur"
}

This example demonstrates the simplicity of output configuration, providing a clear and concise response structure.

Manage and Monitor Your API with the API Builder View

The API Builder View is your command center for managing and monitoring your AI Workflow API. Accessible through the right pane of the app, this view provides a comprehensive overview of your API configuration, allowing you to generate and manage API Keys seamlessly.

API Builder View

Generating API Keys: To ensure secure access, API Keys are generated within the API Builder. These keys, essential for authorizing requests, are displayed only once to maintain security. Including these keys in your requests as an Authorization header is crucial for successful API calls.

Running Your Flow through the API: Launching your flow is straightforward with the provided code snippets in the API Builder View. For instance, using cURL, you can initiate your flow as follows:

curl https://api.ai-flow.com/v1/flow/<your_flow_id>/run \
-H "Content-Type: application/json" \
-H "Authorization: Bearer $AI_FLOW_API_KEY" \
-d '{
"my_prompt": "Lorem Ipsum",
"my_context": "Continue my sentence with 5 words of lorem ipsum"
}'

This command initiates the flow, returning a run ID to track the process. Retrieve the results using this ID once the processing completes.

Enhance Integration with Webhook Nodes

The Webhook Node is a versatile tool within the API Builder, enabling you to send outputs to designated URLs. Configuring the Webhook Node involves specifying the target URL and selecting the outputs to send, with the option to include custom signatures for enhanced security.

Webhook Node Example

In this case, the webhook will send the following data :

{
"my_output": "Lorem Ipsum dolor sit amet, consectetur"
}

In this configuration, the Webhook Node sends structured data to the specified URL, ensuring smooth integration and authentication via custom signatures.

Conclusion

The AI Workflow API, powered by the API Builder Nodes, offers a streamlined, efficient way to create and manage AI flows. With intuitive nodes for input and output, API management tools, and flexible webhook configurations, developers can build powerful AI workflows tailored to their needs.

Additional Resources

For more detailed information, refer to the following resources:

· 4 min read
DahnM20

Generate Consistent Characters Using AI: A Comprehensive Guide

Are you looking to create consistent and cohesive characters in your AI-generated images? This guide will walk you through practical methods to achieve uniformity in your AI character generation, part of our broader challenge on How to Automate Story Creation.

The Challenge of Consistent AI Image Generation

AI-powered image generation is a powerful tool, but it often introduces a level of randomness. This means you might need to generate images multiple times to get a convincing result. This guide doesn't present state-of-the-art techniques but rather shares my own experiments to help you achieve more consistent character images.

While the methods discussed are not foolproof, they represent a series of experiments that can guide you in developing your own approach to consistent AI character generation.

Method 1: Precise Prompt Descriptions

One of the keys to successful image generation is crafting high-quality prompts. If your descriptions are precise and consistent, you’re more likely to achieve similar results across multiple images.

Given our challenges with precision, we’ll use AI to assist in generating detailed descriptions. For example, I started with an image previously generated and asked ChatGPT to describe it accurately. This description was then used as a prompt for Stable Diffusion 3.

First Generation

Despite some similarities, the AI missed certain details, such as the character's age. By updating the prompt to specify that the character is 16 years old, we achieve better consistency.

Second Generation

In this iteration, the AI misinterpreted the hair color due to lighting effects in the original image. Using StabilityAI’s Search and Replace feature, I swapped red hair for brown hair and refined the description.

Third Generation

Here's a quick fix for the character's pet, again using the Search and Replace feature.

Fourth Generation

With the revised prompt, including specific details about hair color and other features, the results are more consistent at the beginning in the new iteration.

Method 2: Creating a Consistent Face Template

Once you have a consistent character concept, ensuring the face remains consistent across different angles and expressions can be challenging. To address this, create a clear face template that can be used to correct other images.

Using the same method, generate a close-up portrait of the character:

Portrait Generation

Next, use models like fofr/consistent-character with the Replicate Node to generate various face angles. This model helps maintain consistency in facial features across different poses.

Face Angle Generation

Although we lost some of the digital painting fantasy vibe, the model ensures facial consistency, which can be invaluable for face-swapping in illustrations. We can maybe find a way to reintroduce it later.

Conclusion and Next Steps

This guide provides a starting point for achieving consistency in AI-generated characters. By refining prompts and creating consistent face templates, you can produce more cohesive and believable character images.

Stay tuned for Part 2, where we’ll explore additional methods to refine and complete your character generation process.

Start experimenting with these methods today using AI-FLOW.


By incorporating these strategies, you’ll be on your way to mastering consistent character generation in AI. For more in-depth techniques and examples, be sure to follow our blog and check out the next part of this series.